Step-by-step installation instructions – Vaddio EasyUSB AudioBRIDGE User Manual
Page 5
EasyUSB AudioBRIDGE
Easy USB
AudioBRIDGE - Document Number 342-0769
Rev B
Page 5 of 16
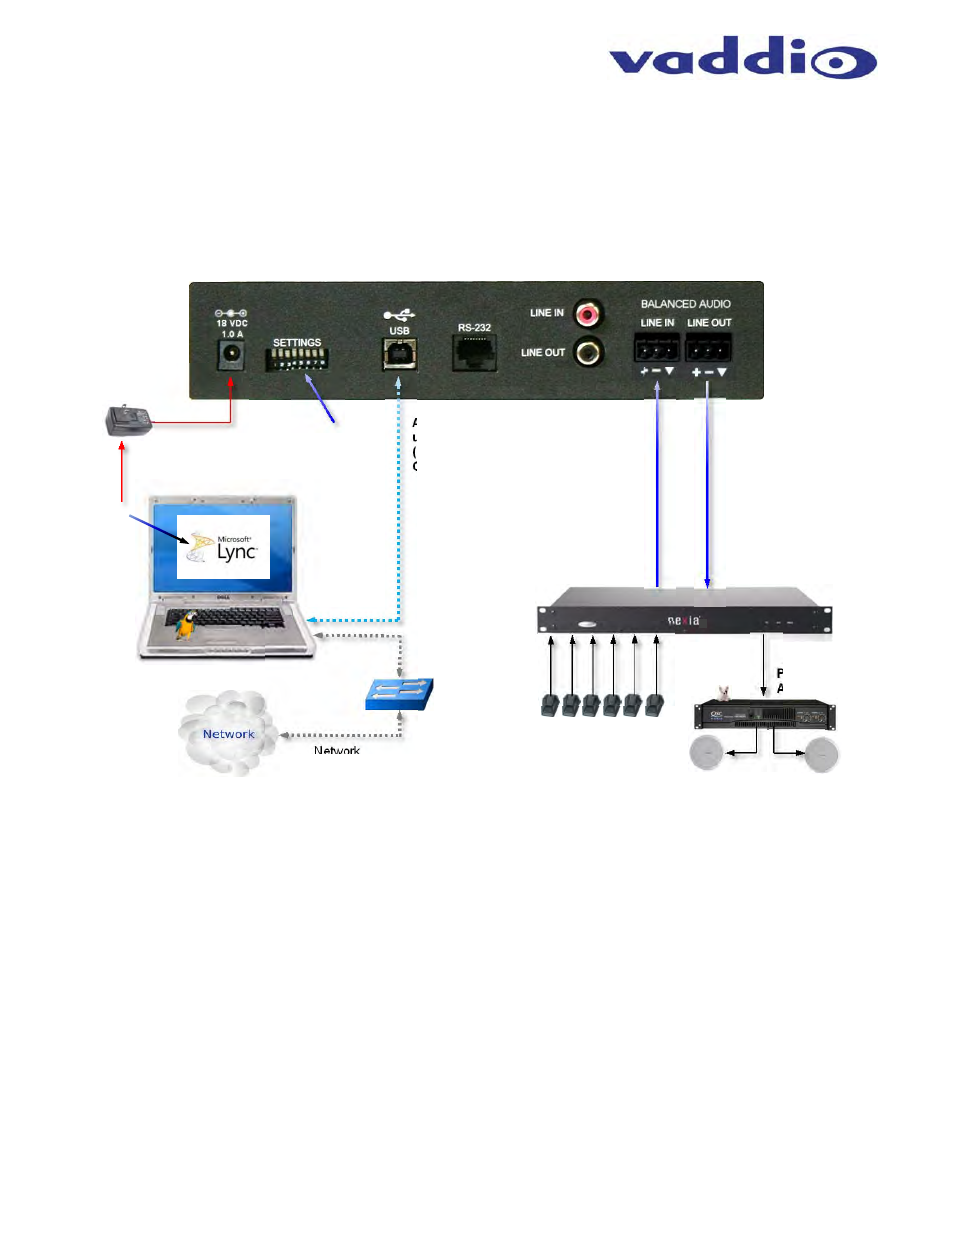
PC-based USB Conferencing Application
The diagram below depicts a typical AudioBRIDGE connection diagram when used with PC soft-clients (Jabber,
Skype, Lync, etc…) for the group audio system. Simply connect the AudioBRIDGE to the room’s existing
professional A/V equipment. Send local microphone (near-end) audio to the Line Input of the AudioBRIDGE.
Connect the AudioBRIDGE Line Output to the room’s sound system for playback of USB audio from the far-end.
Use type 405 when connecting to professional audio conferencing DSP mixers with echo cancellation.
Diagram: PC with USB 2.0 Basic Conferencing Connection Diagram
Step-by-Step Installation Instructions
EasyUSB AudioBRIDGE Installation
Position the EasyUSB AudioBRIDGE in a centralized location within the conference room, 6’ (1.83m) from the
PC. Follow steps below to install devices:
STEP 1: Plug in the 18 VDC power supply into the AudioBRIDGE power connector, but don’t plug in the AC side yet.
STEP 2:
Plug USB Type-B Male connector of the USB 2.0 cable into the AudioBRIDGE. Plug the Type-A Male connector
into the PC USB port.
STEP 3: Connect the balanced line output on the room’s DSP mixer into the balanced line input 3-pin phoenix-type wire
terminals of the AudioBRIDGE. Connect the AudioBRIDGE’s balanced line output cable on the 3-pin phoenix-type wire
terminals and connect the other end of the cable to a line input on the room’s DSP mixer.
NOTE: Maintain the positive, negative and ground terminals between the AudioBRIDGE and the room’s Pro DSP mixer.
STEP 4: Set the dip switches to the appropriate USB Terminal mode (see table on the next page).
STEP 5: Plug in the AC for the AudioBRIDGE and a blue power LED will light on the front panel (a flashing blue LED
indicates a fault condition). Once the AudioBRIDGE has power and is connected to the PC, the PC will recognize the
AudioBRIDGE as both a USB Microphone and USB Speaker device in the operating system. With the PC connected to the
network, launch the UC application.
PC with UC Client Software
(Turn off internal echo canceler)
Room’s Pro
DSP Mixer
with AEC
EasyUSB AudioBRIDGE
Rear Panel
AudioBRIDGE
uses UAC
(Universal Audio
Class) Drivers
Supplied
6’ (1.83M)
USB 2.0
Cable
Local Near-end
Mic Audio to
Line Input
Far-end Audio
(from USB
connection) to
Pro Mixer
PRO
Amplifier
Room Speakers
Line
Level
Audio
Room Microphones
Network
Switch
Network
Ethernet
18 VDC
Power
Supply
Balanced
Line Output
Balanced
Line Input
❶
❷
❸
❹
❺