Manipulating the paddle to store cw messages, Manipulating the paddle to store cw messages -23 – Kenwood TS-990S User Manual
Page 101
5-23
ASSISTING YOUR SMOOTH QSO 5
4 Use the function keys, the MULTI/CH control or a USB
keyboard to enter a CW message.
• A maximum of 50 alphanumeric characters and symbols
can be configured. The default is "On".
[SPACE] (F1): Press to enter a space.
[-] (F2)/[+] (F3): Displays the previous character or the next
character.
[
] (F4) and [
] (F5): Press to move the cursor
to the left or right.
[BACK SPACE] (F): Press to delete the character to the
left of the cursor.
[DEL] (F): Press to delete the character to the right of the
cursor.
[CHAR] (F): Press to change the character type. Each time
you press [CHAR] (F), the character type cycles through
the following sequence:
ABC (upper case) > abc (lower case) > !”# (symbols) >
ABC (upper case)
• Pressing [CANCEL] (F7) reverts to the CW Message
screen without storing the message.
Note:
◆ If "%N" is entered and stored as a part of CW message, this will be
substituted with the contest number and sent.
◆ The continual code such as “AR” or “BT” will be a text string from
the character entered subsequent to "~" to a space.
◆ The following alphanumeric characters and symbols can be
entered.
A
B
C
D
E
F
G
H
I
J
K
L
M
N
O
P
Q
R
S
T
U
V
W
X
Y
Z
0
1
2
3
4
5
6
7
8
9
/
?
.
,
‘
(
)
:
=
+
-
_
"
@
~
%
<
>
Space
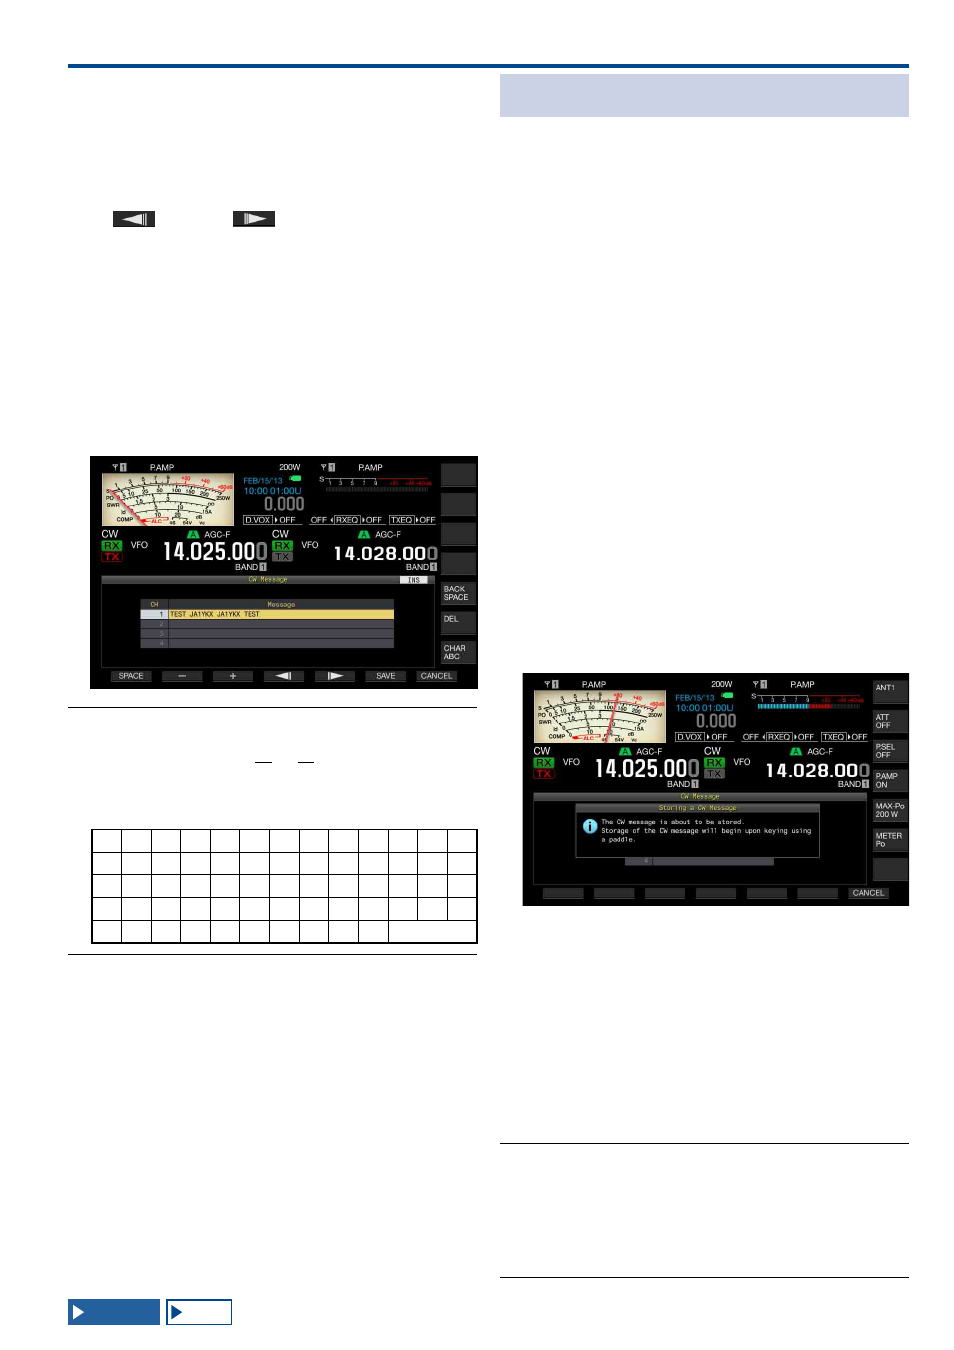
5 Press [SAVE] (F6) to store a CW message.
6 Press [ESC] to exit.
MANIPULATING THE PADDLE TO STORE CW
MESSAGES
After reviewing the status of Menu 5-10 whether "Paddle"
has been selected for the entry method of CW messages,
you can follow the procedure below to store each CW
message.
You can store CW messages in channel 1 through channel
8.
1 Press [CW/ CW-R] to select CW mode.
The Bandscope screen must be closed with a press of
[SCP] if the Bandscope screen opens.
2 Press [KEYER] (F2) to open the CW Message screen.
In any transmit mode other than CW mode, [KEYER] (F2)
does not appear in the key guide. Press [CW/CW-R].
3 Press and hold [CH1] (F2), [CH2] (F3), [CH3] (F4),
[CH4] (F5), [CH5] (F2), [CH6] (F3), [CH7] (F4),
or [CH8] (F5) to select the channel to which a CW
message will be stored.
• A message notifying you of the storing of the CW message
appears.
• If no channel to which a CW message will be stored
appears on the key guide, press [MORE] (F1). An alternate
key guide will appear.
• Each time you press [NEXT] (F7), a key guide for [MORE]
(F1), [CH1] (F2), [CH2] (F3), [CH3] (F4) and [CH4] (F5),
and the key guide for [MORE] (F1), [CH5] (F2), [CH6]
(F3), [CH7] (F4), [CH8] (F5) and [NEXT] (F6) alternately
appears.
• Pressing [CANCEL] (F7) during the standby state reverts
to the CW Message screen without storing the message.
4 Key the paddle and store the CW messages.
During the paddle keying, a screen displays the progress
of CW message entry. Continue paddle keying and store
the CW messages. While storing the CW messages, the
percentage memory usage appears the main screen.
5 Press [STOP] (F4) to finish storing a CW message.
• The CW Message screen reappears.
• If the memory becomes full while storing the CW
messages and the memory usage reaches 100%, the
entry of the CW messages in progress ends.
6 Press [ESC] to exit.
Note:
◆ In a channel where no CW message is stored, the channel number
will be grayed out.
◆ If you do not manipulate a paddle after the editing of a CW
message begins, nothing will be stored in that channel.
◆ If "Straight Key" is selected for the PADDLE or KEY jack, no
CW message can be stored. A CW message must be stored by
manipulating a paddle.