Getting started, 1 overview, 2 connecting up – Videoswitch VM User Manual
Page 3: Videoswitch
VM-Series Multiplexer
User Manual
20/02/2002 12:00
Videoswitch
3
VM601h.doc
1. Getting Started
1.1 Overview
Congratulations on choosing a Videoswitch multiplexer. This product combines ease-of-use with high image
quality and reliability. Basic day-to-day operation is performed by one-press operation of the front panel keys.
Configuration of the multiplexer is accomplished by entering the easy-to-use password protected menus.
1.2 Connecting Up
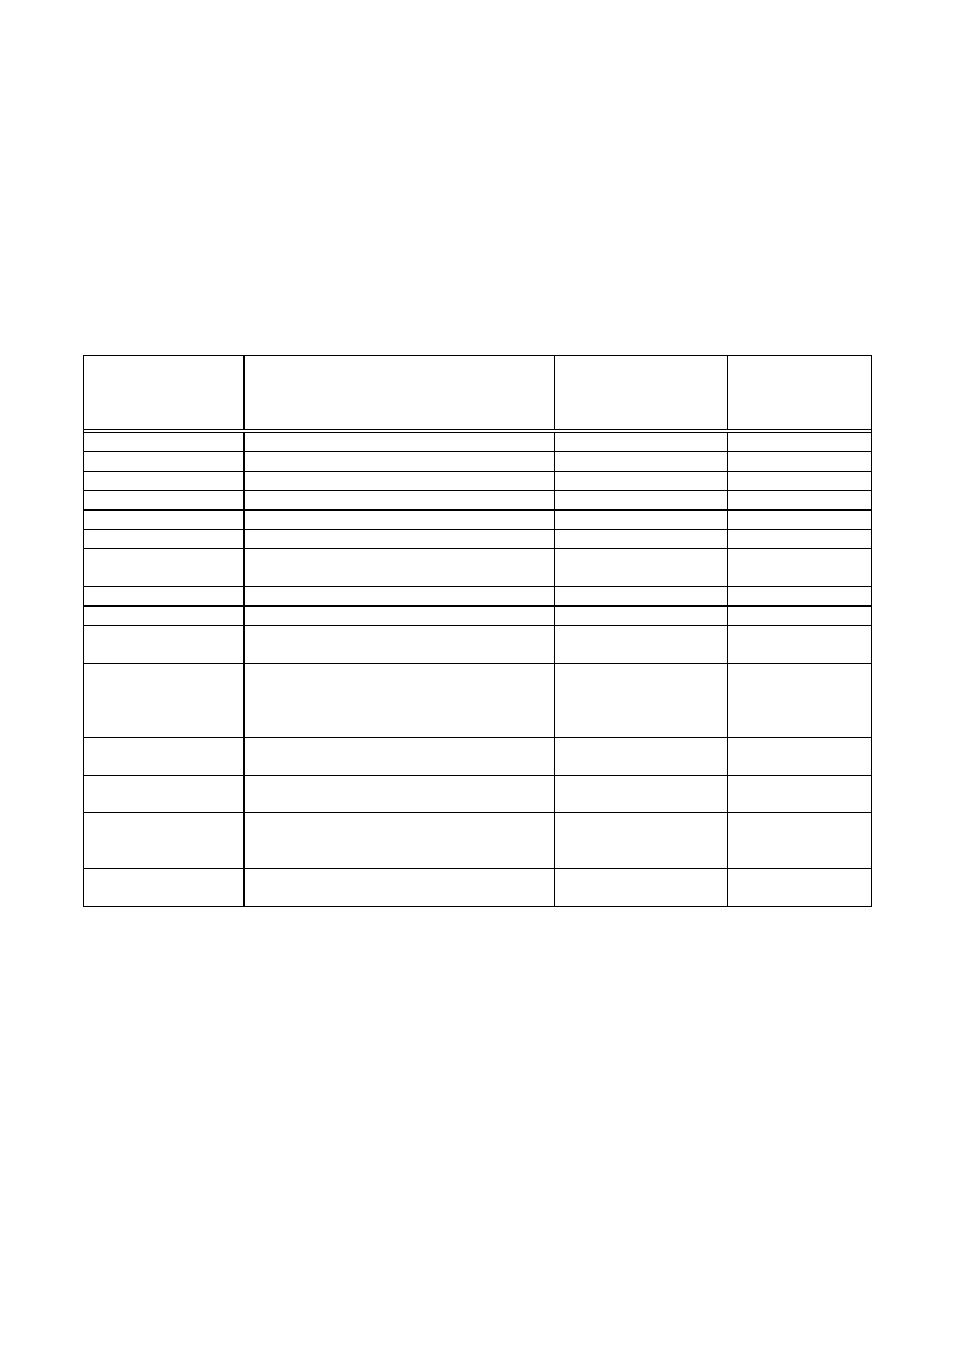
This table indicates what each connector on rear panel of the multiplexer should be connected to. Note that
in all installations some connections are essential. Others are optional, depending on whether you require
special facilities such alarms, automatic time lapse mode switching and remote control.
Connector
identification on
Rear Panel of
Multiplexer
What to connect it to…
Connecting cable
required
Essential in most
systems?
CAMERA “1”
a Colour or Monochrome Camera
BNC to BNC
Yes
CAMERA“2”
a Colour or Monochrome Camera
BNC to BNC
Yes
CAMERA“3”
a Colour or Monochrome Camera
BNC to BNC
Optional
CAMERA“4”
a Colour or Monochrome Camera
BNC to BNC
Optional
…etc
…etc
…etc
Optional
MONITOR “A”
Monitor (main control monitor)
BNC to BNC
Yes
MONITOR “B”
Monitor (public display monitor or
secondary control monitor)
BNC to BNC
Optional
VCR “PLAY”
Connect to VCR’s video Output
BNC to BNC
Yes
VCR “RECORD”
Connect to VCR’s video Input
BNC to BNC
Yes
“12V DC 2A”
Connect to Videoswitch 12V dc, 2Amp
power supply (PSU)
Attached to PSU
(provided)
Yes
“VCR SYNC”
Connect to VCR’s “Camera Switch” or
“Sync” terminal
Phono to single wire
(provided)
Preferred, so that
time-lapse
configuration is
automatic.
“ALARMS”
Connect inputs to PIR detectors or other
devices with volt-free contacts.
25-way D-type Male
to twisted pairs
Optional
“ALARMS”
Connect alarm relay output contacts to
VCR’s time-lapse mode control input
25-way D-type Male
to 3 single wires
Optional
“REMOTE”
VK-3201 or VK-3202 Remote keyboard,
or to Computer
Male 9-way D-type to
Female 9-way D-type
If remote
keyboard is
required
“e-BUS”
Do not connect to anything! This is used
for factory software upgrades.
none
No