Hydraulic fan system controller : hfs - 2, Software setup guide – High Country Tek HFS-2Q User Manual
Page 24
Hydraulic Fan System Controller : HFS - 2
Software Setup Guide:
1
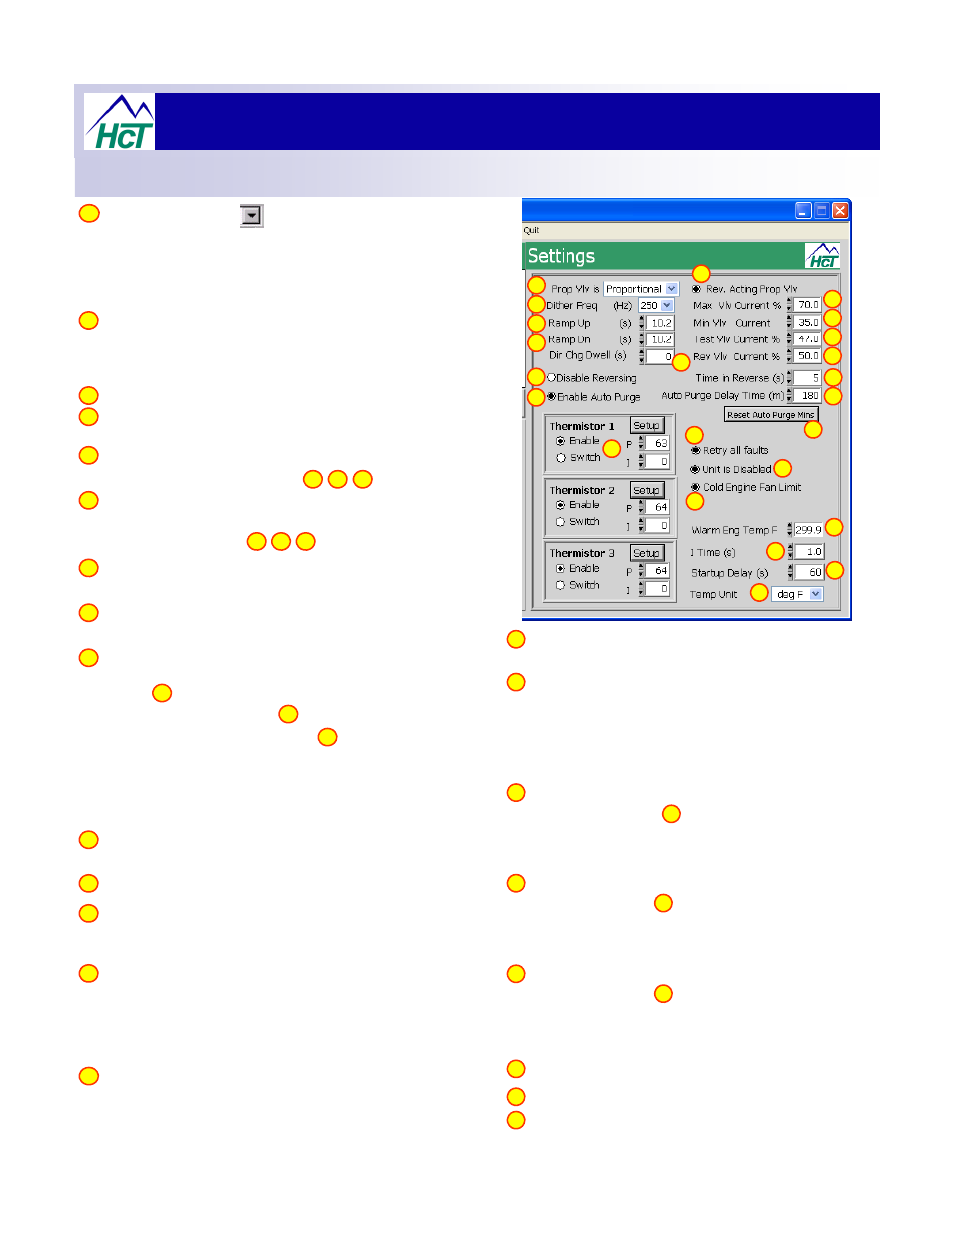
Click the ‘down arrow ‘ and select from the menu for
‘Proportional or ON/OFF’ type output current. In ON/OFF mode, no
Min, Max, Test or Rev Vlv current settings are available and the
output will be dependent on the supply voltage to the controller.
In ON/OFF mode the ramps are left active to aide the use of a ‘soft-
shift’ valve if used.
Click the down arrow and select from the drop down menu, the
dith
f
b t
31 5H
d 250H th t i
t t
2
19
3
18
1
2
17
16
dither frequency between 31.5Hz and 250Hz that is nearest to
the recommended value for the proportional valve product being
driven.
Use the up/down arrows on each box or directly enter a value (
in seconds ) in the range 0 – 60S for the ramp UP and DOWN.
3
4
Clicking this button will disable the reversing ( purge ) feature
and remove from the display items
5
6
7
8
4
5
6
7
8
14
15
19
20
21
22
23
and remove from the display items
6
7
8
Clicking this button will enable or disable the ‘Auto-purge’
feature but still allow the manual ‘Purge’ feature to operate.
In ‘Manual Purge’, items need to be set.
6
7
3
4
Sets the time ( 1 – 60 seconds ) that the fan will spend in the
reverse ( Purge ) direction.
7
Sets the time ( 1
180 Minutes) between fan reverse
8
9
10
11
12
13
Sets the time ( 1 – 180 Minutes) between fan reverse
( Purge ) cycles when Auto-Purge is enabled.
Clicking this button Enables the ‘cold engine fan limit’ feature
and will prevent the fan from operation until the temperature
seen in is reached.
If this feature is Disabled, item is removed from the display.
If Thermistor 1 or 2 are disabled, item is removed from the
display.
9
10
10
9
Click this button to allow inverted current output to control
reverse acting proportional valves.
16
Set the Maximum valve current here from 0 – 100%.
Maximum current ( 100% ) depends on coil Ohmic value
and supply voltage and will determine the fans maximum
speed.
This setting must be entered first and the software ensures
17
p y
Both Thermistors 1 & 2 must be enabled for this feature to work
with Thermistor 1 being allocated for the warm engine sensor
and Thermistor 2 being allocated to the CHARGE AIR
SENSOR.
Sets the units of temperature displayed throughout the software
from Degrees Centigrade ( °C ) to Degrees Farenhieght ( ° F ).
11
Sets the overall ‘Integral constant of the controller.
12
This setting must be entered first and the software ensures
that no other settings can be greater than this.
Set the Minimum valve current here from 0 – 100% of the
maximum current in. This current will determine the
fans starting speed.
Software ensures that this setting cannot be greater than the
maximum setting.
18
17
Set the Test valve current here from 0 – 100% of the
19
This feature is intended to allow vehicle starting with minimum
loading and holds OFF controller action until the time entered
her in seconds ( 0 – 60S ) expires.
13
Click this button to enable ‘retry all faults’ which will allow the
controller to automatically try an error reset every 4 seconds to
see if the fault has cleared.
If this feature is disabled, any error will trigger the controller to
14
maximum current in. This setting determines the fan
speed for the noise test mode.
Software ensures that this setting cannot be greater than the
maximum setting.
17
Set the Reverse valve current here from 0 – 100% of the
maximum current in. This setting determines the fan
speed for the Purge mode.
Software ensures that this setting cannot be greater than the
i
tti
20
17
24
shutdown and stop functioning until a ‘Power On Reset’ is
applied.
Click this button to enable or disable the entire controller. This
button on a new controller is defaulted to disabled.
The first time that a controller is enabled, the date from the
connected PC is ‘Trapped’ and taken as activation date
information.
15
maximum setting.
See the ‘Thermistor Set-up ‘, page 23 in this manual.
21
23
This sets the ‘Dwell’ time during the Purge
sequence, see page 30 for more details.
22
This resets the ‘Auto-Purge’ timer at any time.