Setting the span – AMETEK 7330 Pro-Stik II User Manual
Page 5
5
Manual Setting of Span
1. Place the float at desired 4mA position and power
up the probe.
2. The 4mA position is set by “shorting” the White
Programming Wire to the Black “Loop –” Wire for 3
seconds, breaking the contact for 3 seconds, then
shorting the White and Black wires for 2 seconds,
then remove the short.
3. Place the float at desired 20mA position.
4. The 20mA position is set by “shorting” the White
Programming Wire to the Black “Loop –” Wire for 3
seconds, breaking the contact for 3 seconds, then
shorting the White and Red “Loop +” wires for 2
seconds, and then remove the short.
5. The Span is set.
CAUTION
6. During normal operation, electrically insulate the
White Program wire to prevent accidental setting of
span.
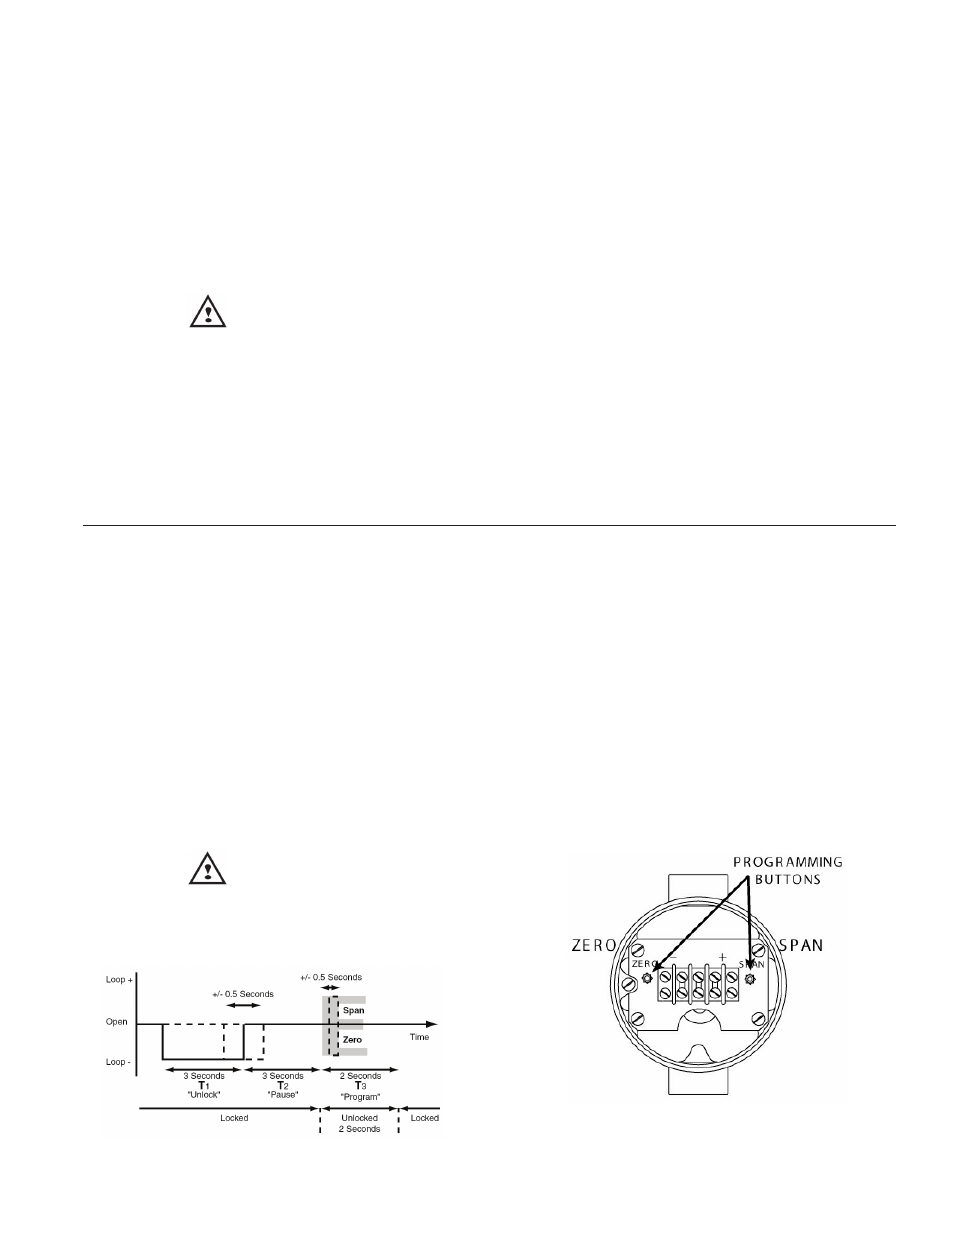
Security Timing Sequence
Setting the Span
Correlating Level
Once the magnetostrictive level probe has been
installed, the output may not be scaled properly for the
actual installation. The actual level and the position of
the probe in the tank needs to be correlated. You might
need to adjust the span to be consistant with actual
tank conditions by using a reference value. No other
“calibration” is required.
CAUTION
Before setting the span in a hazardous area,
make sure that the programming wire is
properly protected through a safety barrier.
See the wiring instructions and Installation
Drawing E0240200 on page 9 for proper
connections.
The probe is shipped from the factory with the span
preset based on the probe length. Re-setting of the
span is not required unless different 4mA and/or 20mA
points are required by the application. The 20mA point
can be set prior to setting the 4mA point. There is no
specific order. The 4mA or 20mA position can be at
either the top or bottom of the probe.
The Zero (4mA) or Span (20mA) setting can
be changed at any time simply by following the
appropriate steps below.
The span can be set with either the probe outside or
inside the vessel. When the span is set in the vessel,
the actual level position in the vessel is used to set
the 4mA and 20mA positions. If this is not practical,
then the probe can be calibrated outside the tank (i.e.
“bench calibrated”).
There is a
timing sequence that is used to unlock the
probe for programming. This is to insure that the span
cannot be accidentally re-programmed by someone
in the field. We recommend you use a watch with a
second hand when setting the span, however, this may
not be necessary.
Optional Push Button Setting of Span
An optional housing with Zero and Span push buttons
is available.
1. Place the float at 4mA position and push the Zero
button and hold for 3 seconds, release the button for
3 seconds, then push the the Zero button again for 2
seconds
2. The 4mA position has been set.
3. Place the float to the 20mA position and push the
Zero button and hold for 3 seconds, release for 3
seconds, then push the Span button for 2 seconds.
4. The 20mA position has been set.