JELD-WEN JII104 Fiberglass Gliding Patio Doors with Applied Nailing Fin User Manual
Page 6
INSTALLATION INSTRUCTIONS
for Fiberglass Gliding Patio Doors with Applied Nailing Fin (JII104)
6
6
INSTALL PATIO DOOR
Warning!
To avoid
injury, use at least
two people to install.
Adequately support
the door until fully
installed.
1. Apply a 3/8"
continuous bead of
sealant across the sill
pan back dam.
2. Install nailing fins
into the appropriate
jamb fin slots on
the side jambs and
the head jamb.
NOTE: Be careful to
apply the nailing fin
intersection gaskets
at the top corners
(one in each side
jamb and one in the
head jamb).
3. Tilt patio door into
the rough opening.
Make sure the back
of the door makes
solid contact with the
sealant.
Sealant
SECURE PATIO DOOR
Note!
Do not over tighten fasteners and do not allow fasteners to
deform the nailing fin, it must be kept flat and straight.
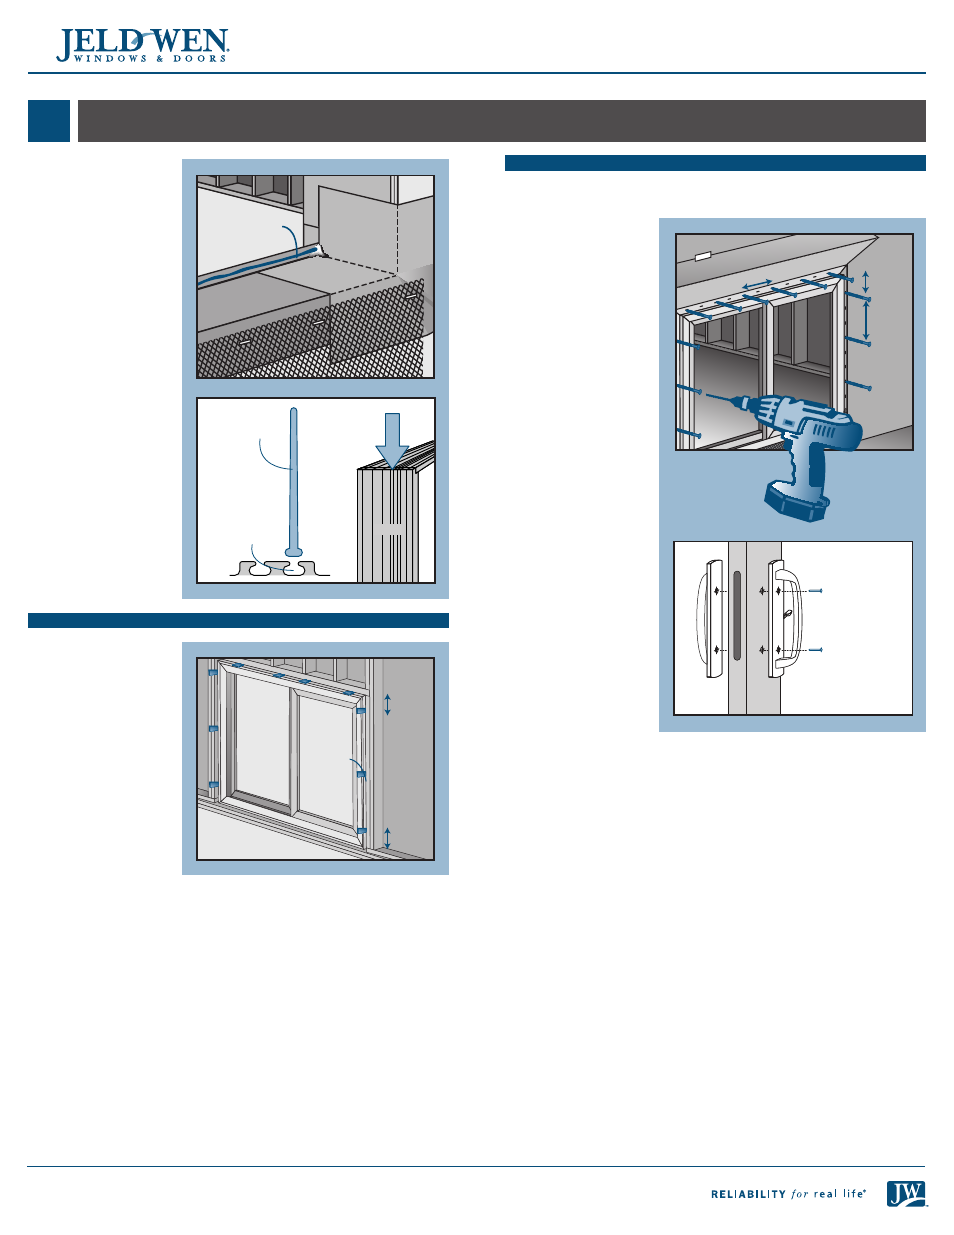
7. At each remaining
corner and at 5"
intervals, fasten
patio door through
the nailing fin with
#8 x 1" washer or
pan head screws.
For step-down
landings, secure
the sill in the same
manner.
8. Install handle on
the operating panel
with the provided
screws.
SHIM THE JAMBS
Note!
Secure all shims
with sealant.
4. From the interior,
shim the side jambs
6" from the corners
and then at the
center point. Shim
the head 6" from the
corners and then at
8" intervals. Shim so
the door is square,
level and plumb.
5. Temporarily secure
both top corners
through the nailing
fin until door is fully
installed.
6. Verify the door is
square, level and plumb.
4"
5"
4"
Fin
Interior
Jamb
Jamb fin slot
Jamb fin
slot
8"
Strike
plate
6"
6"
Interior
Interior