JELD-WEN Entry Door Jamb Extension Kits User Manual
JELD-WEN For Home
©2011 JELD-WEN, inc.; This publication and its contents are owned by JELD-WEN, inc. and are protected under the U.S. Copyright Act and other intellectual property laws.
All trademarks, service marks, logos and the like (whether registered or unregistered) are owned or controlled by JELD-WEN, inc. or others.
Unauthorized use or duplication of JELD-WEN intellectual property is prohibited.
JELD-WEN reserves the right to change product specifications without notice. Please check our website, jeld-wen.com, for current information.
INSTALLATION INSTRUCTIONS
for Entry Door Jamb Extension Kits
KIT INCLUDES:
• 2-Side jamb pieces
• 1-Head jamb piece
• 1-Sill extender
NEEDED TOOLS:
• Pencil
• Measuring tape
• Saw
• Drill with bits
• Caulking gun
• Putty knife
• Clamps
• Pry bar
NEEDED MATERIALS:
• # 8 x 2 1/2" deck
screws
• Sealant (paintable)
• Wood putty or
spackle
• Finishing supplies
Thank you for selecting JELD-WEN products. Attached are JELD-WEN’s
recommended installation instructions for 2" Exterior Door Jamb
Extension Kits. This kit converts a 4 9/16" jamb to a 6 9/16" jamb.
1. Carefully pry or cut off existing brickmould trim from the existing
frame if installed.
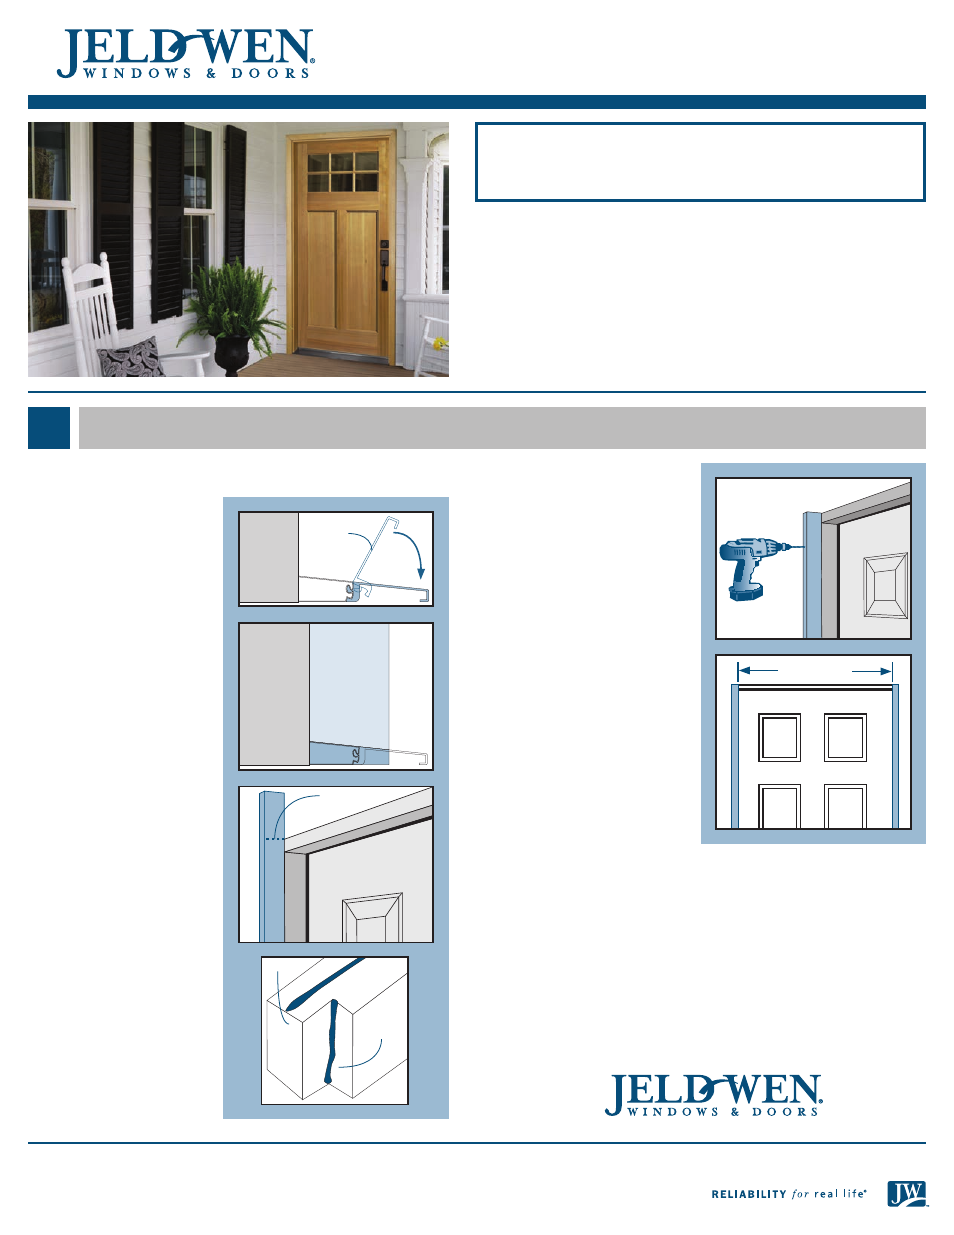
2. To install the sill extender,
tilt the extender up at 45
degree angle to hook onto
nose of sill and line up flush
with edges. Push the front
of extender down and step
on the extender to snap it
into place.
3. Each side jamb extender is
beveled on one end to fit
the profile of the sloped
sill. There is a right and a
left piece. Place against
the jamb flush with the
inside of the jamb, with the
beveled edge on the sill
(high side of bevel towards
door).
4. Mark the side jamb
extenders flush with
the top outside edge of
jamb as shown and cut to
length. Pre-drill a 1/8" hole
horizontally centered (or in
the kerf (groove) if present)
in each extender 1" from
each end and 3 more
evenly spaced between the
first two in each extender.
5. Run a 1/4" bead of sealant
along the bottom of
the extender where it is
notched to contact the
sill and up the length
of extender that will be
against jamb as shown.
6. Secure the extenders to
jamb (clamp in place if
necessary) with 2 1/2"
deck screws through the
previously-drilled holes.
Set screw heads 1/4" below
surface.
7. Measure the distance
between the two side
jamb extenders and cut the
head extender to length.
Pre-drill a 1/8" hole 1"
from each end and 1 hole
in the center. Apply a 1/4"
bead of sealant the length
of extender on face that
will be against the jamb.
Secure to jamb with 2 1/2"
deck screws through the
pre drilled holes. Set screw
heads 1/4" below surface.
8. Fill all holes with wood putty or spackling. Sealant can be applied
and smoothed to the joint between the extenders and the existing
jamb and sill for a seamless appearance.
9. Run a bead of sealant along the joint where the jamb extenders
meet the sill on each end.
10. Finish all exposed wood parts with top quality products.
Please visit jeld-wen.com/resources for warranty
and care and maintenance information.
Thank you for choosing
(12/11)
Measure here
Extender
Sill
extender
Existing
jamb
Cut here
Side
against
jamb
Sill notch
Bottom