Install the ink tanks – Canon imagePROGRAF iPF815 User Manual
Page 6
6
MEMO
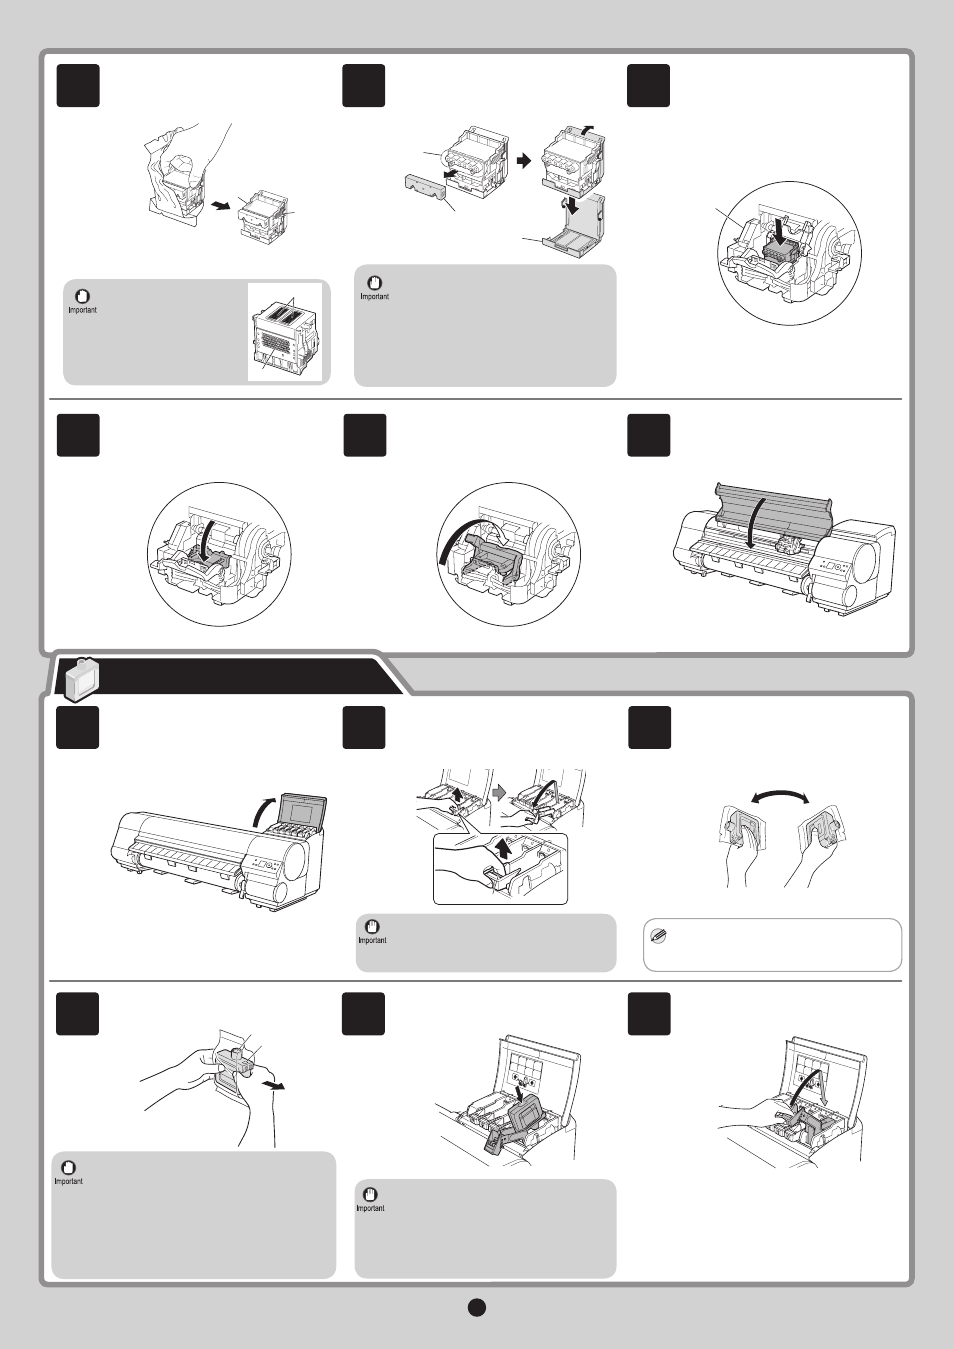
Load the fi ve Ink Tanks.
With the Printhead nozzles facing
down and the metal contacts toward
the back, insert it slightly at an angle
into the Carriage (a). Carefully push
the Printhead fi rmly into the Carriage
(a), ensuring that the nozzles and metal
contacts do not touch the carriage.
Pull the Printhead Fixer Cover down
toward the front to lock the Printhead in
place.
Push the Printhead Fixer Lever back.
Close the Top Cover .
•
•
•
Do not reattach the protective material
after removing it. Dispose of these
materials according to local regulations.
Never touch the ink supply section (d).
This may affect printing quality.
The Printhead is fi lled with ink. When
removing Safety Cap 1 (a) and Safety
Cap 2 (b), be careful not to spill it.
Remove the orange Safety Cap 1 (a).
To remove Safety Cap 2 (b), push the
grip (c) as you remove the cap.
Open the Ink Tank Cover .
Lift the stopper (a) of the Ink Tank Lock
Lever of the color to load. Lift the Ink
Tank Lock Lever until it stops, and push
it down to the front.
Before removing the Ink Tank from the
pouch, shake the tank gently from side
to side seven or eight times.
If you do not shake the Ink Tank, the ink
may sediment, which may affect printing
quality.
•
Open the pouch and remove the Ink
Tank .
Insert the Ink Tank into the holder facing
as shown, with the ink holes down.
Lift the Ink Tank Lock Lever until it
stops, and push it down until it clicks into
place.
Never touch the ink holes (a) or metal contacts
(b). Touching these parts may cause stains,
damage the Ink Tank, and affect printing quality.
•
Avoid dropping the Ink Tank after removing the
tank from the pouch. Otherwise, ink may leak
and cause stains.
•
Do not remove and shake the Ink Tank that
has already been installed in the printer. Ink
may leak out.
•
Ink Tank cannot be loaded in the holder if
the color or orientation is wrong.
•
If the Ink Tank does not fi t in the holder, do not
force the tank into the holder. Make sure the
color of the Ink Tank Lock Lever matches the
color of the Ink Tank , and check the orientation
of the Ink Tank before reloading the tank.
•
Push the Ink Tank Lock Lever down until it
locks.
Make sure the Ink Tank Lock Lever does
not return to the original position.
•
•
Hold the Printhead by the grips (a) as
you remove it from the bag.
Never touch the Printhead
nozzles (a) or metal
contacts (b). This may
damage the Printhead and
affect printing quality.
•
9
10
11
12
8
a
b
d
c
C
1
2
3
GG
B
B
B
a
4
5
6
A
A
MB
K
BK
GY
Y
M
A
A
MBK
BK
GY
Y
M
C
D
Install the Ink Tanks
7
a
a
a
b