Setup, Air pressure guidelines, Adjusting the suspension (air pressure) – MAGURA TS6 User Manual
Page 20: Air.pressure.guidelines adjusting.the.suspension, Air.pressure)
20
THE PASSION PEOPLE
www.magura.com
Before.you.go.for.your.first.ride.with.your.new.MAGURA.suspension.fork,.
take.some.time.to.adjust.the.suspension.and.damping.to.match.your.
personal.weight.and.style.of.riding..This.is.absolutely.necessary.to.make.
best.use.of.your.suspension.fork’s.characteristics.
a
ir
pressure
guiDelines
L
L
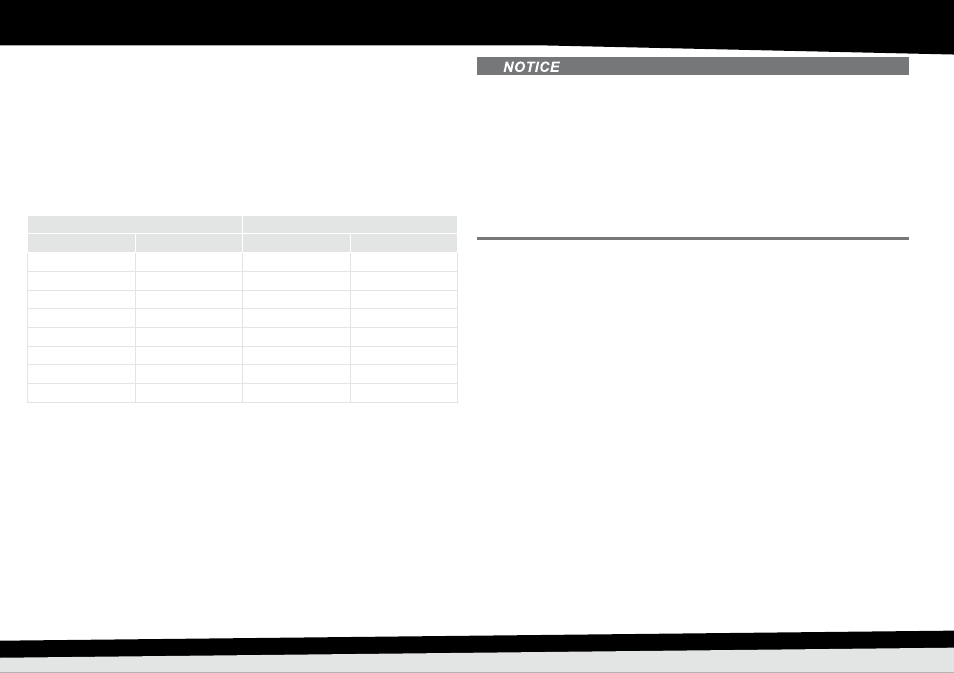
Note.that.the.specified.air.pressure.values.are.for.reference.only..You.
should.adjust.them.for.your.personal.riding.style,.your.seating.position,.
the.characteristics.of.the.road,.and.the.geometry.of.your.bicycle.
Rider’s weight
Air pressure
kg
lb
bar (± 0.5)
psi (± 7)
50–59
110–124
3.5–3.9
50–52
60–69
125–149
4.0–4.3
53–60
70–79
150–174
4.4–5.0
61–70
80–89
175–199
5.1–5.6
71–78
90–99
200–224
5.7–6.3
79–85
100–109
225–249
6.4–7.0
86–99
110–119
250–274
7.1–8.0
100–114
120–130
275–286
8.1–8.9
115–126
a
Djusting
the
suspensiOn
(
air
pressure
)
L
L
The.air.suspension.on.your.MAGURA.suspension.fork.helps.to.compen-
sate.for.uneven.terrain.and.keeps.your.front.wheel.in.contact.with.the.
ground.at.all.times..
Insufficient.air.pressure.causes.a.pronounced.drop,.frequent.bottoming.
out.and.a.spongy.ride..
Excessive.air.pressure.reduces.the.maximum.suspension.travel.and.
provokes.a.hard.response.from.your.suspension.fork..
As.a.general.rule,.the.higher.your.weight.and.speed,.and.the.rougher.
the.terrain,.the.higher.the.air.pressure.will.need.to.be.
Material damage due to severe bottoming out caused by insufficient air
pressure.
Î
–
Never.use.your.suspension.fork.if.there.is.insufficient.or.no.air.pressure..
Material damage due to excessive air pressure.
Î
–
Never.exceed.the.maximum.permissible.air.pressure.of.10.bar.(150.psi)..
Air leaking due to incorrect fitting of the valve cover.
Î
–
Never.use.the.suspension.fork.without.a.valve.cover.
Î
–
Always.keep.the.valve.cover.seals.clean.
Î
–
Always.firmly.close.the.valve.cover.
.
)
Remove.the.valve.cover.
.by.turning.counter-clockwise.
.
.
)
Shift.the.lever.
.on.the.pump.head.to.the.upper.position.(Posi-
.
.
)
Screw.the.union.nut.
.on.the.pump.head.onto.the.valve.until.hand.
tight.
.
)
Shift.the.lever.
.on.the.pump.head.to.the.lower.position.(Position.B).
О
О
The.valve.pin.is.pressed.in;.the.valve.is.open.
О
О
You.can.read.off.the.current.pressure.on.the.pump.pressure.gage.
.
)
Adjust.the.air.pressure.if.needed.
L
L
Pushing.the.ventilation.button.
.fully.gradually.reduces.the.pressure.
Pushing.the.ventilation.button.lightly.completely.evacuates.the.pressure.
.
)
Shift.the.lever.
.on.the.pump.head.to.the.upper.position.(Position.A).
О
О
The.valve.pin.is.released;.the.valve.is.closed.
О
О
No.loss.of.pressure.when.you.remove.the.union.nut.
.
)
Remove.the.union.nut.
S
et
u
p