Tele Vue 4inch Mount Ring Set (MRS-4011) User Manual
4" mount ring set, Mrs-4011)
32 Elkay Dr., Chester, New York 10918 (845) 469-4551 www.televue.com
Introduction
Thank you for purchasing the Mount Ring Set for your Tele Vue telescope. The Mount Ring serves three purposes: Firstly,
it provides a secure mounting for your telescope to your Tele Vue mount, or to other mounts via adapters. Secondly, it pro-
vides a means for fore and aft balancing when you change eyepieces. Thirdly, the Ring Mount holds accessories, such the
Starbeam finder or Piggy-Cam, via machined channels in the top half.
Features
The inside of the Rings are lined with a thin felt layer to prevent scratching the
tube when adjusting balance and provide ample friction to hold your telescope in
place. The Mount Ring bottoms have 1/4” studs to mate with the mounting plate.
The accessory channels are tapped with #10-32 threads to accept Starbeam and
other Tele Vue accessories. The included mounting plate attaches to the Gibraltar5
Head (G5H-3016), and to Tele Vue’s Vixen Mount Adapter (AVT-1011) for use with
Vixen-style equatorial mounts. See diagram at bottom for features of the mounting
plate.
Mount Ring Installation and use
The Mount Ring comes fully assembled. To install on the telescope you will need to
separate the upper and lower halves.
1) Unscrew and remove the two bat handles. To loosen, start with the handle
flipped to the left as you face it. Rotate the handle all the way to the right. Flip the
handle back to the left and repeat until you are able to turn the screw with the
handle oriented straight up. Tightening is simply the opposite procedure.
2) Using the supplied 5/32" Allen Key, remove the two socket head screws located
on the side opposite the bat handles.
3) Place the scope in the lower half of the Mount Ring Set and then place the upper
half of the Mount Ring Set on top of the scope.
4) Thread in the two Allen Key screws just a couple of turns. Then thread in the bat
handles the same number of turns. The Mount Ring will be very loose on the tube.
5) Progressively tighten the right, then left, side screws so the gap between the upper and lower
halves remains relatively consistent from side to side and front to back. Continue to tighten the bat
handles and screws until the telescope tube is secure in the Mount Ring Set.
Balancing
1) When adjusting balance due to changing eyepieces, snug the mount's altitude tension screws, or
hold the telescope tube since the telescope will become unbalanced when you remove the eyepiece.
2) Adjust balance by loosening the bat-handles and sliding the telescope within the Rings. Loosen just
enough so the telescope slides with force, but not so loose that it slips on its own. Re-tighten bat handles.
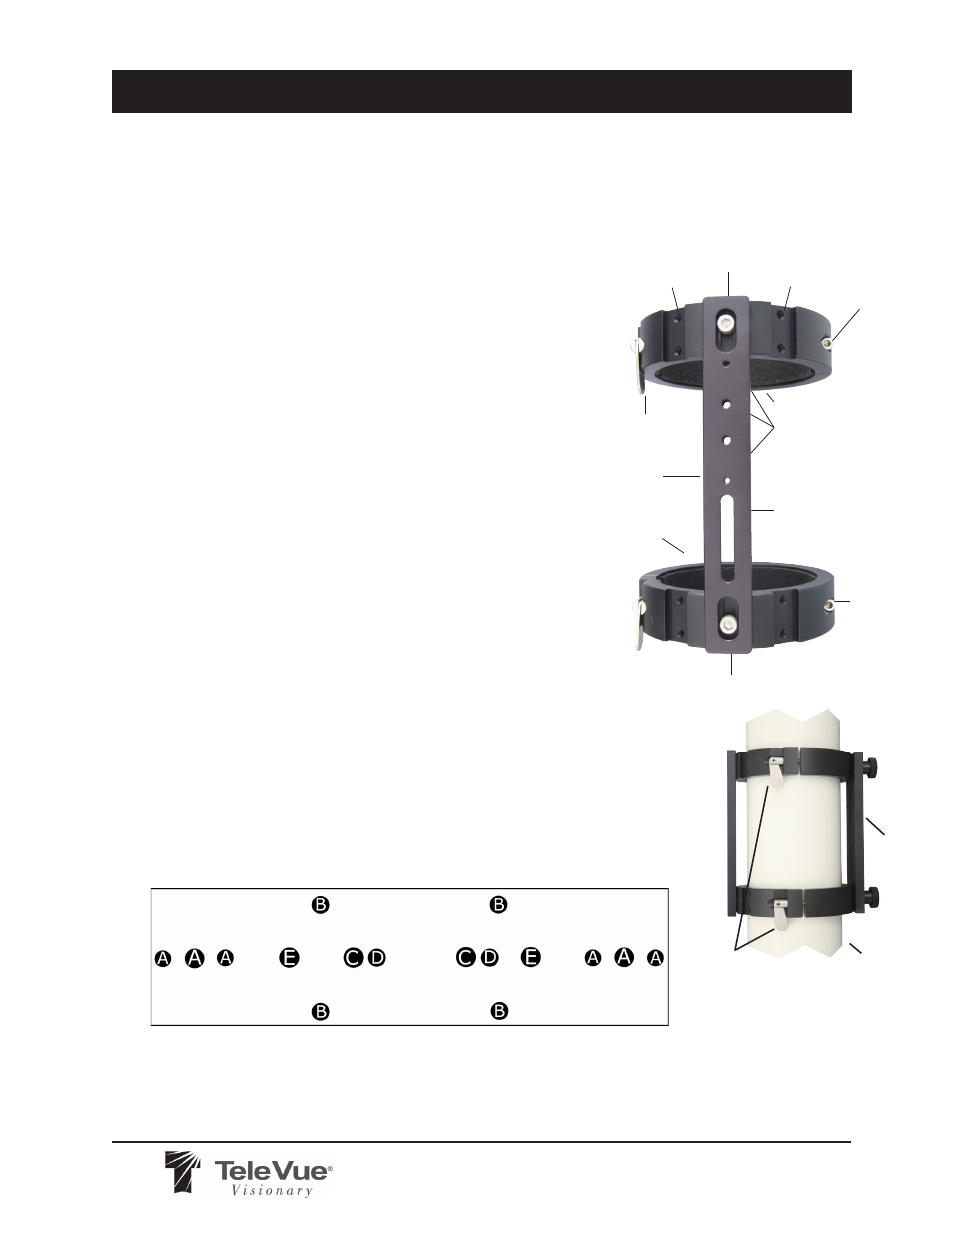
A. Holes - These accept the mount ring studs (and guide pin studs on 5" rings) as shown in the scope cutaway diagram above.
B. Holes - For use with the Tele Vue Gibraltar-5 Head. (Mounting instructions will come with the Gibraltar5)
C. Holes - For use with other Tele Vue Ring Mounts. (By using longer than normal studs, other Tele Vue scopes can conveniently be
attached to the Gibraltar5 Head without removal of the Mounting Plate.)
D. Tapped Holes - For use with the Tele Vue’s Vixen Mount Adpater plate (AVT-1011) adapters for attachment to Vixen mounts.
E. Holes - For use with Vixen AM-AD-2576 accessory plate. The Vixen plate allows use of the NP127is and guide scope on Vixen mounts.
V10/25/2013
(MRS-4011)
4" MOUNT RING SET
Telescope
Mounting Plate
Star Beam
Holes
1/4" screw clearance
slot for piggybacking.
Socket
Head
screw
Socket
Head
screw
Mount Ring
Ring Spacing Adjustment
Bat Handle
Accessory
Bar
Mount Ring
Accessory
Channel
Ring Spacing
Adjustment
Bat Handle
Accessory
Channel