Wiring diagram troubleshooting – RIKON Power Tools 25-200H User Manual
Page 23
SYMPTOM
POSSIBLE CAUSES
SOLUTIONS
TROUBLESHOOTING THE PLANER
Poor feeding of lumber
through the planer
1. Drive belt is worn or broken
2. Drive belt tension spring is broken
3. Lumber sticking on planer's table
4. Feed rollers not applying enough
pressure on lumber
1. Check and replace as necessary.
2. Check tension and/or replace the spring.
3. Clean the table and apply silicone based
lubricant to reduce friction.
4. Adjust the feed roller pressure.
Not planing lumber to a
uniform thickness
1. Planer table is not level to
cutterhead
1. Adjust table and/or cutterhead as needed.
Board thickness does not
match scale markings
1. Depth of cut scale not set correct
1. Adjust scale to match board thickness
Small raised lines are
running along the surface
1. Knives are nicked or broken
1. Rotate insert knives to new sharp edges.
Snipe on board ends
(NOTE: Snipe can be
reduced, but not fully
eliminated )
1. Feed rollers not set properly
2. Lumber not supported when fed
into or exiting the planer
3. Short boards not butted
1. Adjust feed roller height for applying
pressure onto lumber to keep flat on table.
2. Support long boards with roller stands.
3. Run boards butt end to end through planer
Planed surface is torn -
also called 'chip out' or
'tear out'
1. Cutting against the grain
2. Cut is too deep
3. Knives are dull
1. Cut with the grain. For figured woods, take
shallow cuts to minimize tear out.
2. Reduce cutting depth to 1/16" or less.
3. Rotate insert knives to new sharp edges.
Planed surface grain is
rough, raised or fuzzy
1. Lumber has a high moisture
content
2. Knives are dull
1. Reduce the moisture content by drying
it, or switch to other properly seasoned
lumber.
2. Rotate insert knives to new sharp edges.
Planed surface is glossy
1. Cutting depth is too shallow
2. Knives are dull
3. Feed rate is too slow
1. Increase depth of cut slightly.
2. Rotate insert knives to new sharp edges.
3. Increase feed rate.
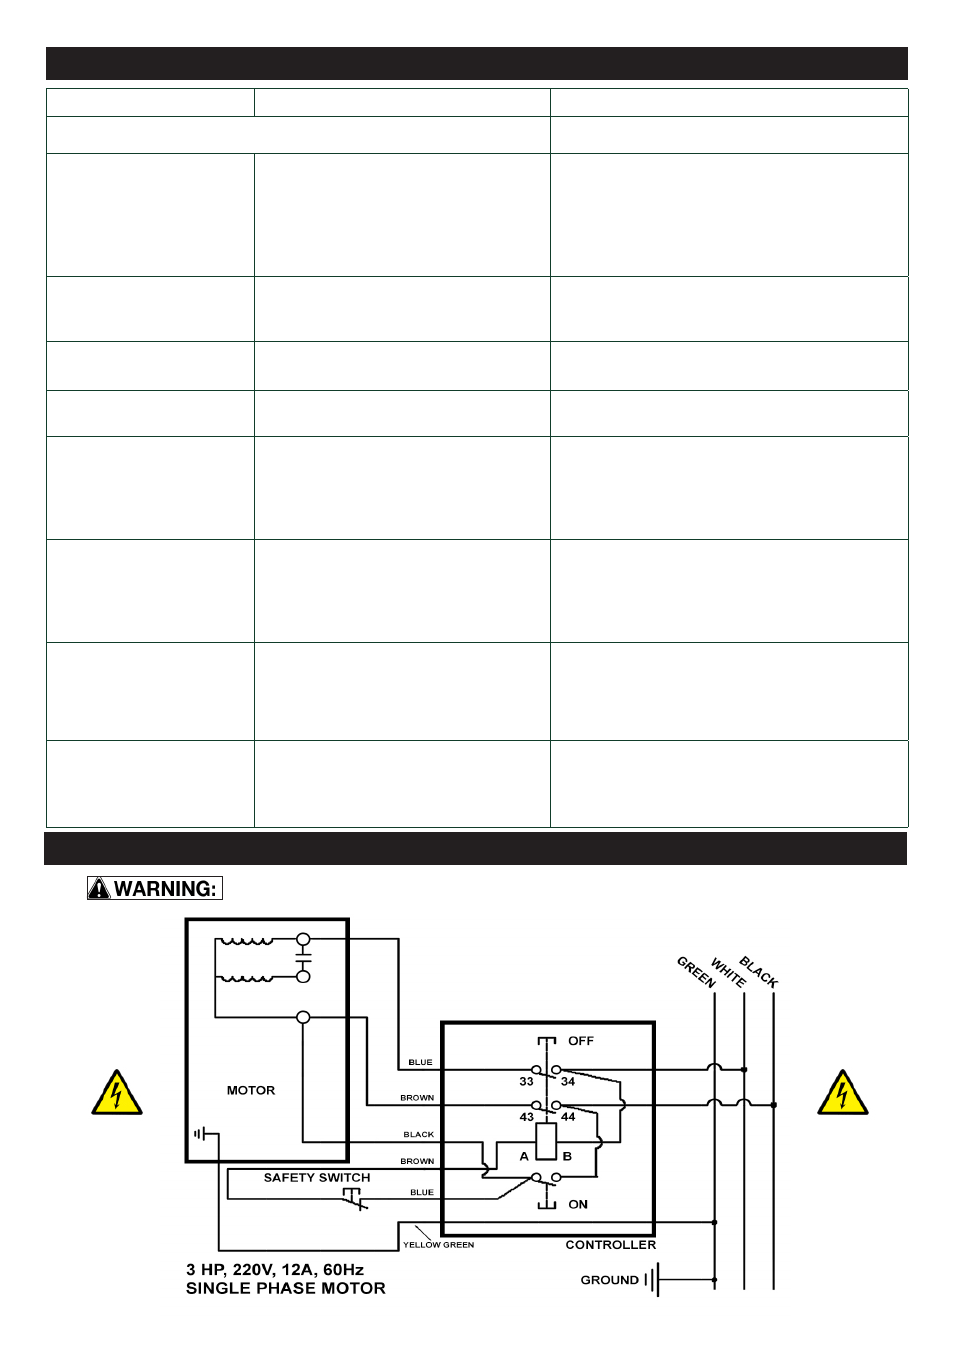
This machine must be grounded. Replacement of the power supply cable should only be
done by a qualified electrician. See page 5 for additional electrical information.
WIRING DIAGRAM
TROUBLESHOOTING
23