Spreader maintenance – SaltDogg 1400701SS Self-Contained Stainless Steel Hopper Spreaders User Manual
Page 5
55
TM
3. Spinner/Chute Assembly Operation
Attach chute to hopper assembly by inserting tabs into slots
in chute motor plate. Then secure chute by engaging spring
latches in respective holes. Chute heights can be adjusted
by attaching lower chute weldment to the upper one using
upper or lower set of holes. Two sets of holes are located
on the bottom of upper chute weldment and under internal
baffles selectors.
Adjustable shaft can be connected in two positions: upper
and lower. Two sets of holes are located in upper and lower
portions of coupler. Shaft to be secured by 5/16 cross bolt
and nut.
A. The spread pattern and the amount of material dispensed
is dependant on the following factors:
1. Gear Motor RPM
2. Feed gate position
3. Baffle settings
4. Spinner Motor RPM
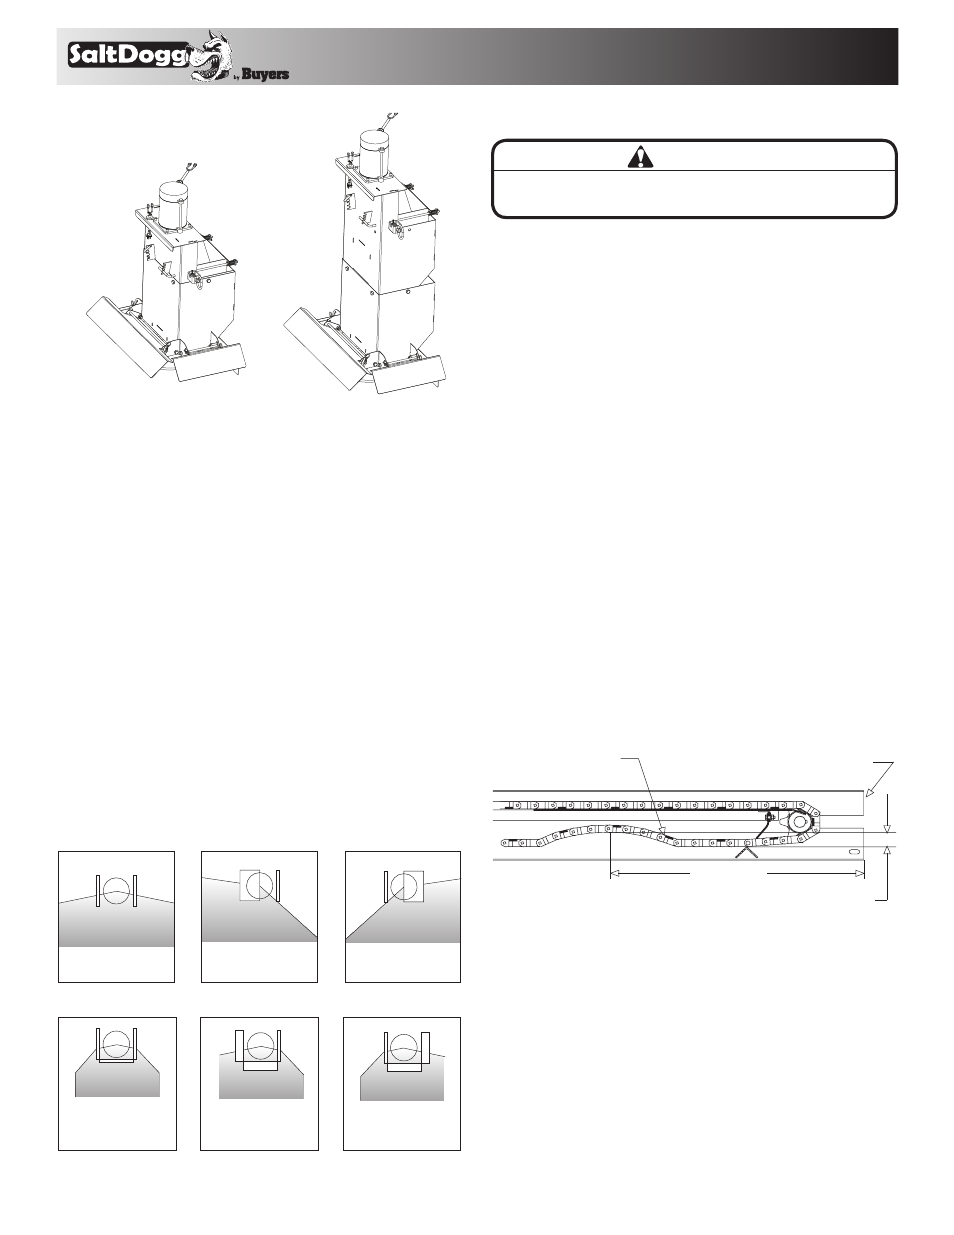
Below are illustrations that show the baffles effect on the
spread pattern as viewed from the top of the spinner disk.
Both internal
baffles out
Left baffle in,
Right baffle out
Right baffle in,
Left baffle out
All baffles adjusted
down for a confined
spread pattern
Right baffle deflects
material down;
heavy on right side
Left baffle deflects
material down;
heavy on left side
Internal Baffle Adjustment
External Baffle Adjustment
CAUTION
Always follow the following precautions so as not to
cause damage to the spreader.
4. Precautions
A. If the feed chain does not move because of dense material
or a material jam, remove all material from the hopper and
free the chain.
B. If the material in the hopper freezes, move the spreader
into a warm area to thaw.
C. To prevent the feed chain from freezing, do not store
material in the spreader.
D. The gearbox is designed to only accept torque from the
electrical motor. Therefore, DO NOT ATTEMPT TO FREE
THE FEED CHAIN BY USING A PIPE OR SIMILAR TOOL
TO MOVE OR DISLODGE THE CHAIN. If the feed chain
is moved, the gears within the gearbox will strip. This
action will void all warranties.
Spreader Maintenance
1. Use dielectric grease on all electrical connections before
an electrical connection is made or after a connector is
disconnected.
2. Grease the following:
• Idler shaft bearings (2)
• Bearing (1)
• Spinner shaft bearing (1)
3. Check the Feed Chain tension periodically.
To check the tension, measure in 21"-25" from the rear
edge of the gear box mount. Push up on the chain with
your hand. The conveyor chain should lift up 2"-3" off the
conveyor chain guide or cross angles.
4. Empty the spreader of all ice control material when not in
use to prevent a frozen feed chain.
5. Wash out the spreader when it is not in use. At the end of
the season wash out the spreader to remove all ice control
materials. Thoroughly dry all metal surfaces. Paint and oil all
bare metal surfaces and chains to protect from rust. Properly
store the spreader for the next season.
Feed
Chain
Rear of Sill
Extension
2" - 3"
21" - 25"