Spinner shield & receiver mount, Hopper and retainer – SaltDogg TGSUVPROA Salt Spreader User Manual
Page 2
Quality since 1946
2
1
10
11
3
9
12
17
5
13
1
2
3
4
5
21
22
23
24
25
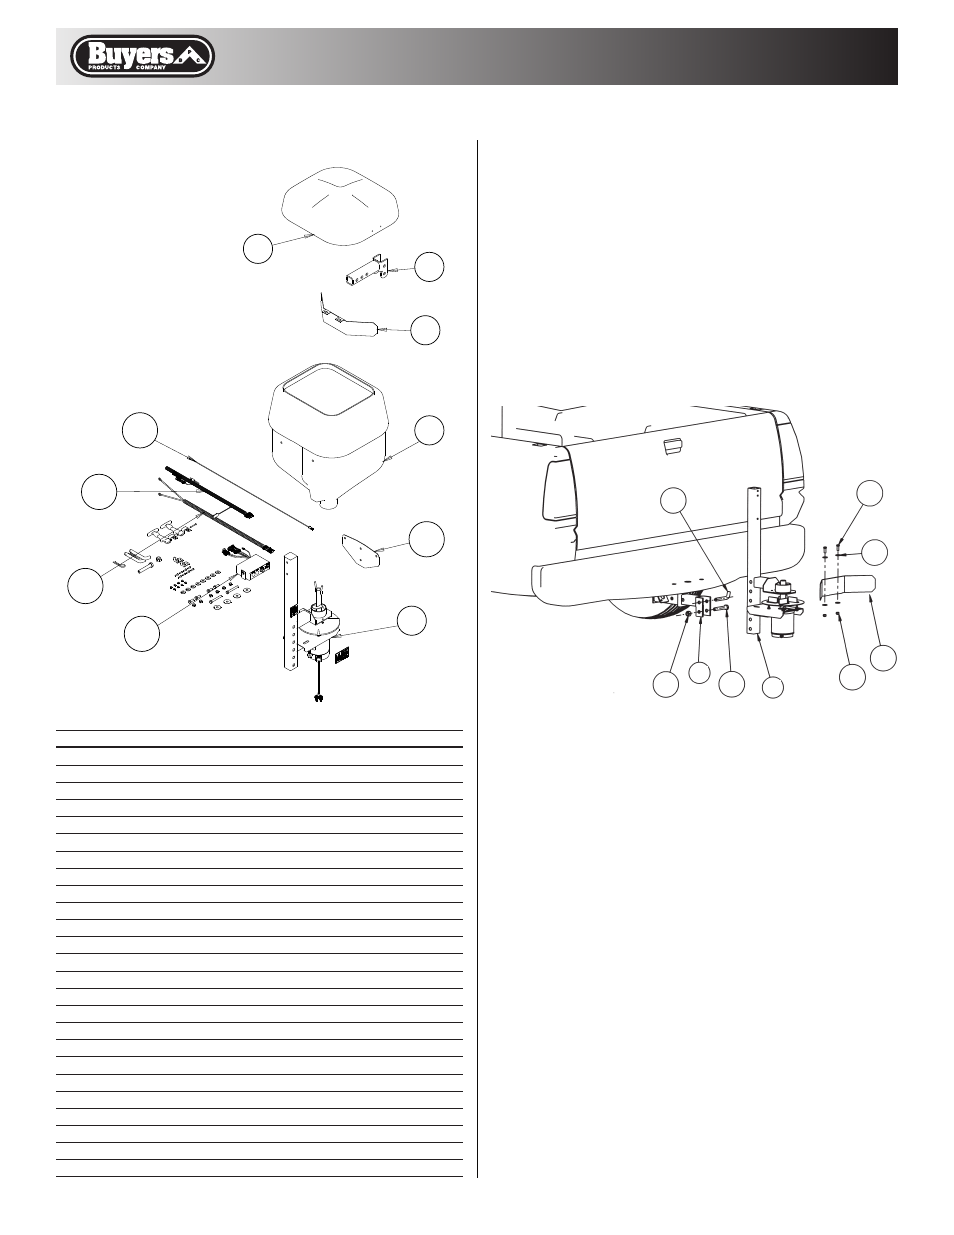
Spinner Shield & Receiver Mount
(fig. 2)
1. Slide 2" receiver mount (3) into receiver hitch.
Secure it with hitch pin (9)
2. Mount motor/frame assembly to the receiver
mount by inserting 5/8" bolt and nut (10, 11) in the
bottom hole and hitch pin in the top hole of the
receiver mount. Frame position is adjustable.
3. Install spinner shield (5) with 3/8-16 x 1 hex
screws, flat washers and nuts (12, 13 and 17).
Position shield ½" away from spinner.
Shield position is adjustable.
Bill of Materials
1
3017107
1 MOTOR, FRAME ASSY,TGSUVPROA
2
3013283
1 HOPPER, W/ GRAPHICS MOLDED SALT DOGG
3
3004589
1 REC. MOUNT, SWING DOWN, TGSUV1 WELDMENT
4
3003571
1 LID, TGSUV1
5
3005977
1 SHIELD, SPINNER, TGSUV1A
6
3006943
1 DECAL, MODEL ID/DATE, TGSUVPROA
7
3014780
1 HARDWARE BAG TGSUVPRO
8
3005714
1 HARDWARE BAG ASSEMBLY, TGSUV1A
9
HP6253WC
2 HITCH PIN WITH HP COTTER
10
3000544
1 SCREW, HH CAP 5/8-11X3.5 GR.5 ZINC
11 FNE063011069
1 NUT, NYLOCK 5/8-11, ZN
12 FCS038016100SS 4 SCREW, HHC 3/8-16 X 1 304 SST
13 FNE038016044SS 6 NUT, NYLOCK 3/8-16 X 7/16 SST
14
3000626P
2 KEEPER, LATCH WJ201 BLACK
15 FBSH01002475SS 8 SCREW, BHC #10-24 X .75 SST
16 FNE010024024SS 8 NUT, ELASTIC STOP 10-24 SS
17 FWF038100007SS 8 WASHER, FLAT 3/8 USS SST
18
3002982
2 STRAP, HOOD CATCH, BLACK
19
3007068
2 CAP SCREW, HX HD-3/8-16X3 SST
20
3007115
4 WASHER, FLAT 3/8 X 1.5 X.048 SST
21
3011864
1 CONTROLLER TGS W/ VIBRATOR SWITCH
22
3008615
1 WIRE HARNESS, POWER TGS
23
3008620
1 WIRE HARNESS MAIN W/ VIBRATOR, TGS
24
203700
1 WIRE ASSEMBLY, 36 LONG
25
3015788
1 RETAINER HOPPER TGSUV
ITEM
PART NO.
QTY.
DESCRIPTION
Fig. 1
Hopper and Retainer
(fig. 3)
1. Slide the hopper onto the sleeve below until the
holes in the hopper line up with the holes in the
frame tube.
2. Install hopper retainer (25) using two 3/8-16 x
3 hex cap screws (19) and two 3/8-16 x 1 hex cap
screws (12) from the outside of the retainer through
the retainer, tube and hopper. Install 4 large flat
washers (20) inside hopper and 4 smaller 3/8 flat
washers (17) outside retainer. Secure hopper to
frame with 4 3/8-16 nuts (13).
Fig. 2