Warning, Caution, Installation – TREND GV Series User Manual
Page 2: Adjustments and final checkout, Disposal, Gv series data sheet
2
GV Series Data Sheet TA200888 Issue 1/A 05/09/05
EN2C-0053SZ20 R0705
GV Series
Data Sheet
Manufactured for and on behalf of the Environmental and Combustion Controls Division of Honeywell Technologies Sàrl, Ecublens, Route du Bois
37,Switzerland by its Authorized Representative.
Trend Control Systems Limited reserves the right to revise this publication from time to time and make changes to the content hereof
without obligation to notify any person of such revisions or changes.
Trend Control Systems Limited
P.O. Box 34, Horsham, West Sussex, RH12 2YF, UK. Tel:+44 (0)1403 211888 Fax:+44 (0)1403 241608 www.trend-controls.com
Trend Control Systems USA
6670 185th Avenue NE, Redmond, Washington 98052, USA. Tel: (425)897-3900, Fax: (425)869-8445 www.trend-controls.com
INSTALLATION
WARNING
• Take care that installer is a trained experienced
service man.
• Turn off gas supply before starting installation.
• Disconnect power supply to prevent electrical
shock and/or equipment damage.
Mounting position
The gas valve may be mounted in any position between
plus or minus 90 degrees from the vertical.
Mounting location
The distance between the gas valve and the wall/ground,
must be at least 30 cm.
Main gas connection threaded valves
• Take care that dirt cannot enter the gas valve during
handling.
• Ensure the gas flows in the same direction as the arrow
on the housing of the gas valve.
• Use a sound taper fitting with thread according to ISO 7-1
(BS 21, DIN 2999) or a piece of new properly reamed pipe,
free from swarf.
• Do not thread or tighten the pipe or pipe fitting too far,
otherwise valve distortion and malfunction could result.
• Apply a moderate amount of good quality thread
compound to the pipe or fitting only, leaving the two end
threads bare; PTFE tape may be used as an alternative.
• In order to tighten the pipe in the valve, do not use the
actuator as a lever but use a suitable wrench operating
on the wrench boss.
Main gas connection flanged valves
• Take care that dirt cannot enter the gas valve during
handling.
• Ensure the gas flows in the same direction as the arrow
on the housing of the gas valve.
• Ensure that the inlet and outlet flanges are in line and
separated from each other enough to allow the valve to
be mounted between them without damaging the gasket.
• Place gasket. If necessary, grease it slightly to keep it in
place.
• Mount gas valve between flanges using the bolts for each
flange.
WARNING
Tightness test after installation.
• Spray all pipe connections and gaskets with a good
quality gas leak detection spray.
• Start the application and check for bubbles. If a
leak is found in a pipe connection, remake the joint.
A gasket leak can usually be stopped by tightening
the mounting screws. Otherwise, replace the gas
valve
Electrical connection
CAUTION
• Switch off power supply before making electrical
connections.
• Take care that wiring is in accordance with local
regulations.
Use connection cable which can withstand 105 °C ambient.
Wiring
Follow the instructions supplied by the appliance manu-
facturer.
ADJUSTMENTS AND FINAL
CHECKOUT
WARNING
Adjustments must be made by qualified persons only.
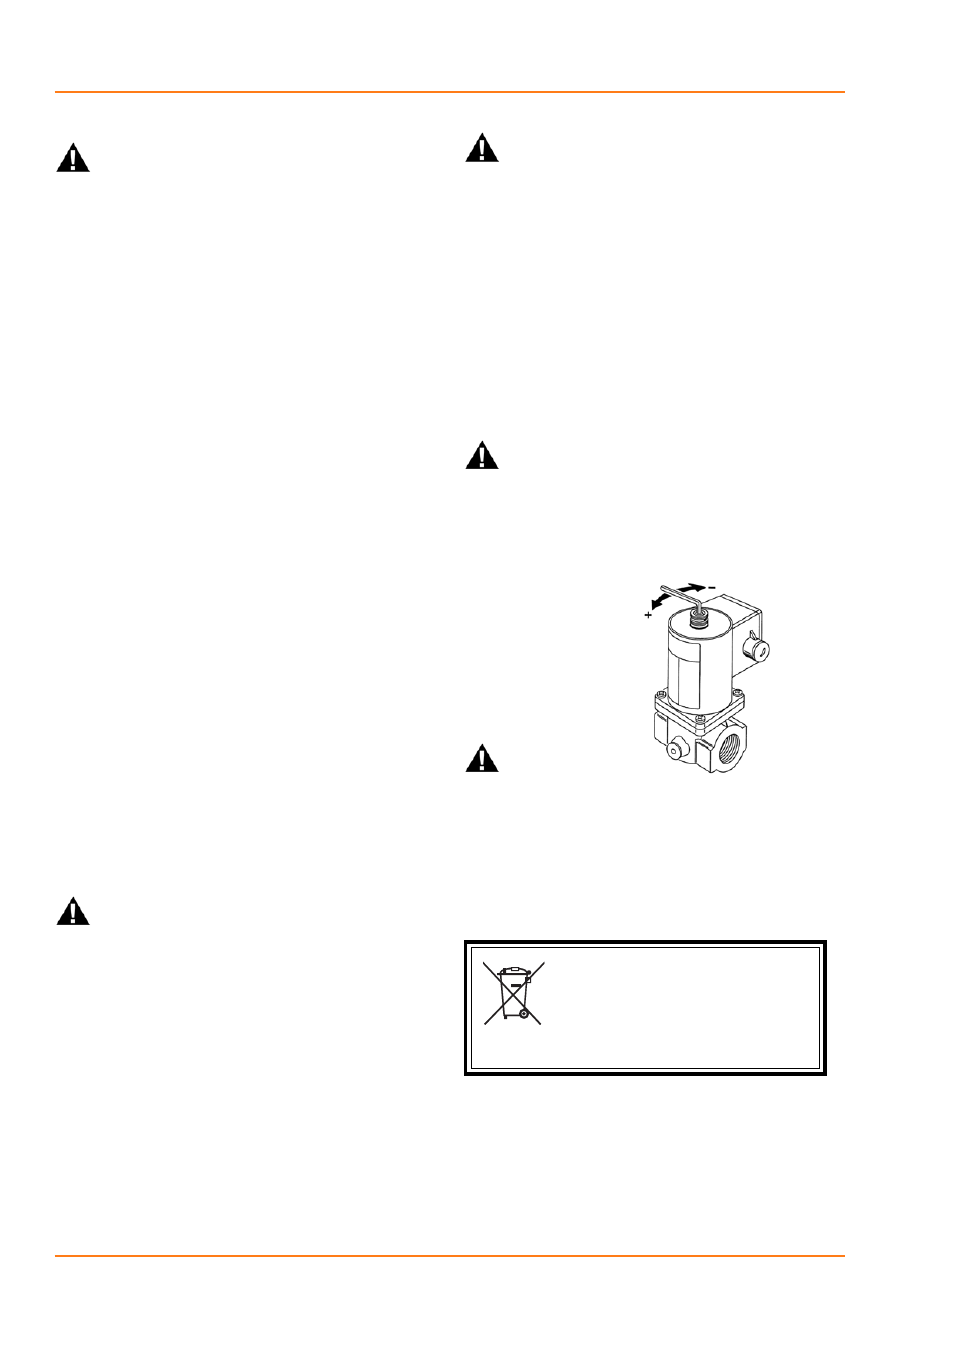
GVS80, GVF65, 80 (see fig. below)
Flow rate adjustment
• Remove the cap screw from top of the coil.
• Place a socket head wrench into the adjustment nut.
• Turn wrench counter-clockwise to increase or clockwise
to decrease flow rate.
• Replace cap screw.
CAUTION
To ensure safe valve closure, it is essential that voltage
supplied to the terminals is reduced to 0 volt.
Final checkout of the installation
Set appliance in operation after any adjustment and observe
several complete cycles to ensure that all burner com-
onents function correctly.
DISPOSAL
WEEE Directive :
At the end of their useful life the packaging and
product should be disposed of by a suitable
recycling centre.
Do not dispose of with normal household waste.
Do not burn.