Ab b b, Installation instructions em-mpo/star3din, Installation – TREND EM-MPO_STAR3DIN User Manual
Page 3: Connect measurement connections, Continued), Connect to enc2/s, Switch on, 0i install in panel, Fix enc2/s
3
EM-MPO/STAR3DIN Installation Instructions TG200770 Issue 1/B 07/04/05
Installation Instructions
EM-MPO/STAR3DIN
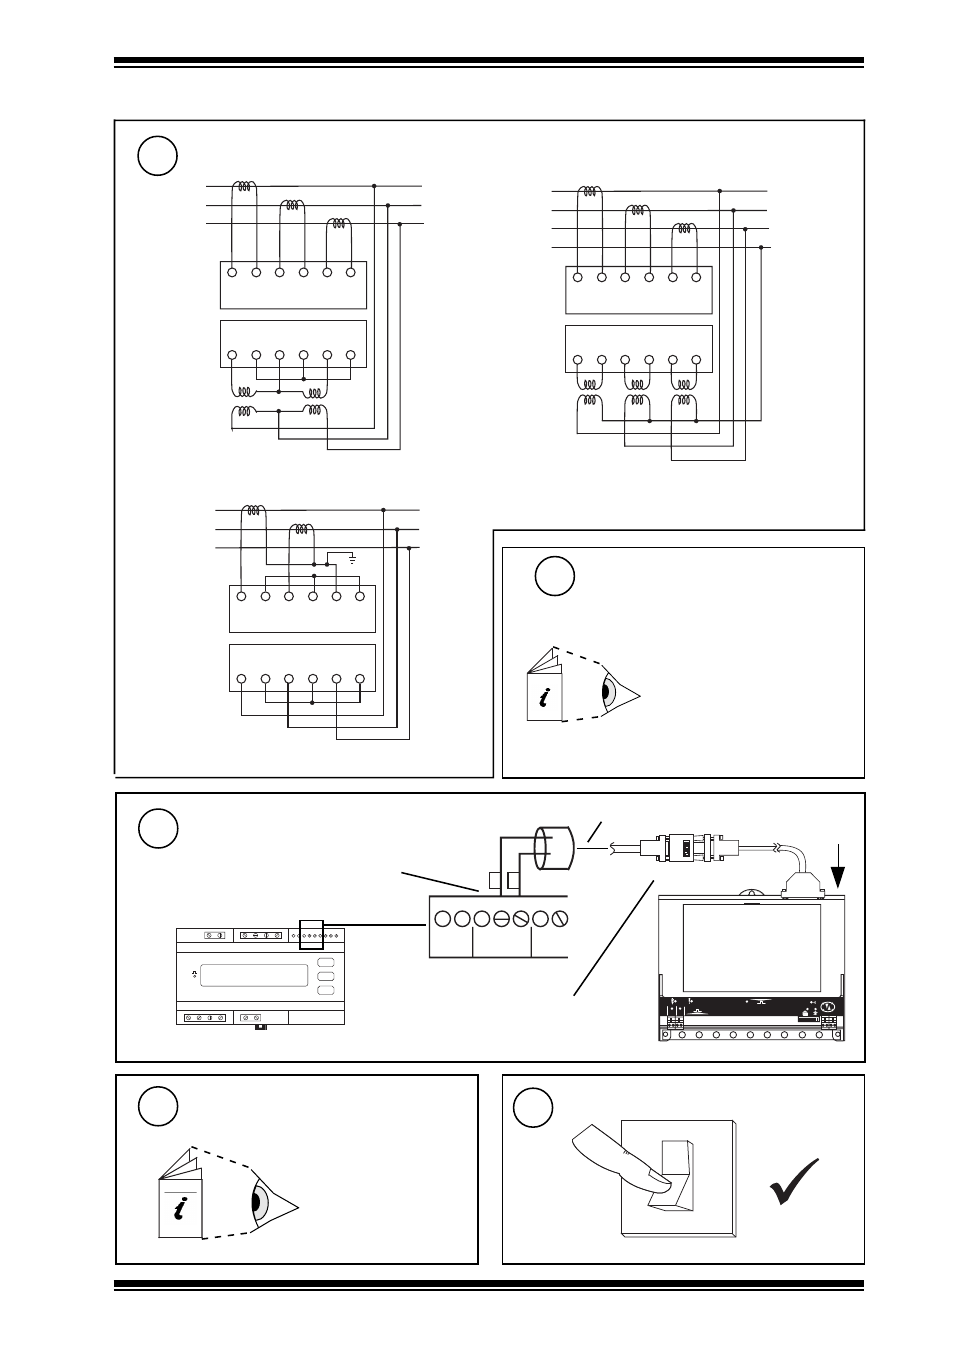
Connect Measurement Connections
(continued)
5
INSTALLATION
(continued)
P1
P2
AL1
P1
P2
AL2
P1
P2
AL3
VL1
N
C U R R E N T I N P U T
V O L T A G E I N P U T
N
N
VL2
VL3
L1
L2
LO
AD
S1
S2
L3
S1
S2
S1
S2
P1
P2
AL1
P1
P2
AL2
P1
P2
AL3
VL1
N
C U R R E N T I N P U T
V O L T A G E I N P U T
N
N
VL2
VL3
L1
L2
LO
AD
S1
S2
L3
S1
S2
S1
S2
N
P1
P2
AL1
P1
P2
AL2
P1
P2
AL3
VL1
N
C U R R E N T I N P U T
V O L T A G E I N P U T
N
N
VL2
VL3
L1
L2
LO
AD
S1
S2
L3
S1
S2
3 Phase without Neutral (Delta) using 2VTs
3 Phase with Neutral (Star) using 3CTs
3 Phase without Neutral (Delta) using 2CTs
Connect to ENC2/S
7
Switch
On
9
0
I
Install in Panel
8
PAG
SEL
SET
STAR3 din
10Wh
MULTI PANEL METER
1
2
3
4
5
6
7
8
9
1 0
T X
R X
O K
1
2
ensure correct polarity
RS485
A B
3 m cable supplied with ENC2/S
EM-MPO/STAR3DIN
ENC2/S
blue
red
if using ACC/STAR3DIN/PANELKIT Panel
Mounting Kit
ACC/STAR3DIN/PANELKIT
Installation Instructions
TG200338
A B
RS485
← →
RS232
ensure RS232/RS485 converter
is connected correct way round.
Fix ENC2/S
6
NBOX/ENC2/S
Installation Instructions
Sheet 1 Fixing
TG200270
A
A
A
B
B
B