Ht/o installation instructions 4 maintenance – TREND HT_O User Manual
Page 6
6
HT/O Installation Instructions TG200992 Issue 1/A 30/01/08
HT/O
Installation Instructions
4 Maintenance
(continued)
8
One point calibration
For calibration over limited range about single point
•
This calibration decreases accuracy over remainder of
working range
Single Point Humidity Calibration
1
Remove lid from the calibration chamber (ACC/CAL/HT)
and clean chamber thoroughly.
2
Insert one of the cloths provided with the calibrating
liquid. Pour calibrating liquid (ACC/CAL/HT/35% or /
80%) onto the fabric. Refit lid and screw tightly.
3
Insert probe into sensor aperture of chamber and tighten
collar to provide air tight seal around the probe. Wait
30 min.
4
Either: (If chamber humidity >50%RH.) Press Up
pushbutton for 3 s to start. LED will illuminate.
Or: (If chamber humidity <50%RH.) Press Down
pushbutton for 3 s to start. LED will illuminate.
5
Press Up or Down pushbutton to adjust measured value
in 0.1% steps
6
Either: Press Up pushbutton for 3 s to stop. Calibrated
value is stored. LED is extinguished.
Or: Press Down pushbutton for 3 s to exit calibration
without storing value. LED is extinguished.
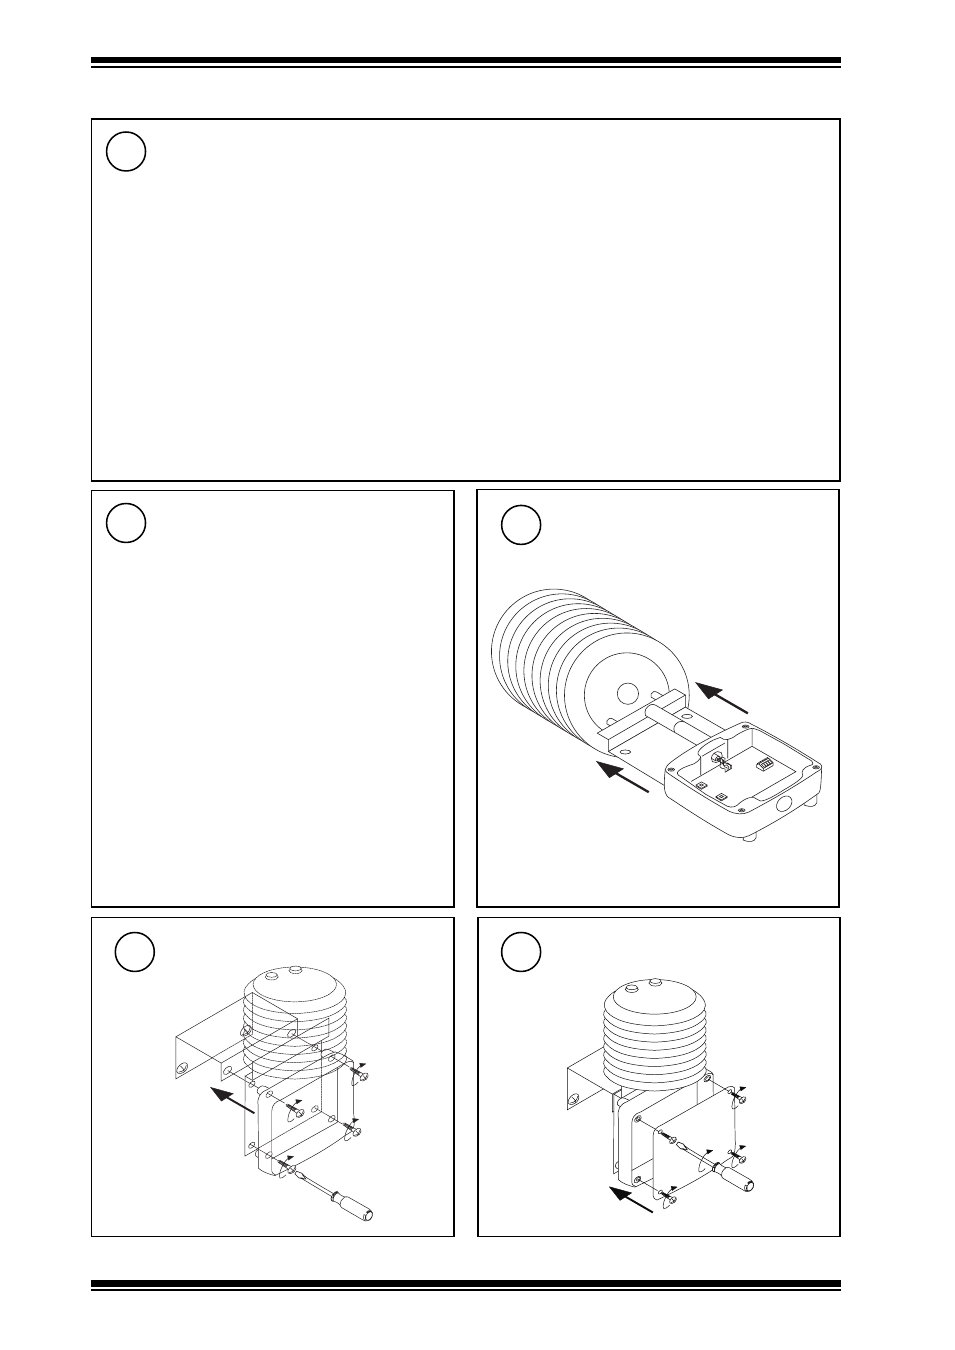
Replace Cover
11
Re-attach Sensor
10
Replace Radiation Shield
9
7
Two point calibration
For calibration over whole working range
•
Start calibration at lower humidity point.
•
Difference between the two points should be >30%RH
Low Humidity Calibration
1
Remove lid from the calibration chamber (ACC/CAL/HT)
and clean chamber thoroughly.
2
Insert one of the cloths provided with the calibrating
liquid. Pour calibrating liquid (ACC/CAL/HT/35%) onto
the fabric. Refit lid and screw tightly.
3
Insert probe into sensor aperture of chamber and tighten
collar to provide air tight seal around the probe. Wait
30 min.
4
Press Down pushbutton for 3 s to start. LED will illuminate.
5
Press Up or Down pushbutton to adjust measured value
in 0.1% steps.
6
Either: Press Up pushbutton for 3 s to stop. Calibrated
value is stored. LED is extinguished.
Or: Press Down pushbutton for 3 s to exit calibration
without storing value. LED is extinguished.
High Humidity calibration
7
Remove lid from the calibration chamber (ACC/CAL/HT)
and clean chamber thoroughly.
8
Insert one of the cloths provided with the calibrating
liquid. Pour calibrating liquid (ACC/CAL/HT/80%) onto
the fabric. Refit lid and screw tightly.
9
Insert probe into sensor aperture of chamber and tighten
collar to provide air tight seal around the probe. Wait
30 min.
10 Press Up pushbutton for 3 s to start. LED will illuminate.
11 Press Up or Down pushbutton to adjust measured value in
0.1% steps
12 Either: Press Up pushbutton for 3 s to stop. Calibrated
value is stored. LED is extinguished.
Or: Press Down pushbutton for 3 s to exit calibration
without storing value. LED is extinguished.