Attach rear panels, Final assembly, Soft close – Salamander Designs Synergy System SB237C/B User Manual
Page 4
A
.
Insert Hardware
Combine the 1” threaded studs with the flat nuts.
Slide 2 sets of hardware down the two outside
posts and 4 sets down the two center posts.
Allow studs to remain loose at bottom of post.
C
.
Place Rear Panels
Secure each panel in place with thumb nuts.
1
2
3
4
5
6
7
8
9
S20 / SVDO
REAR PANEL
41/2"
6"
8"
www.salamanderdes
igns.com
EXTENDED
REAR PANEL
S30 / S40
REAR PANEL
SP
ACER
TOOL
1
2
3
4
5
6
7
8
9
S2
0 /
SVD
O
REA
R P
ANE
L
41/
2
"
6"
8"
www.salamanderdesigns.com
EX
TEN
DED
REA
R P
ANE
L
S3
0 /
S4
0
REA
R P
ANE
L
SP
ACER
TOOL
1
2
3
4
5
6
7
8
9
S20 / SVDO
REAR PANEL
41/2"
6"
8"
www.salamanderdes
igns.com
EXTENDED
REAR PANEL
S30 / S40
REAR PANEL
SP
ACER
TOOL
2X
4X
2X
4X
REAR
Attach Rear Panels
A
.
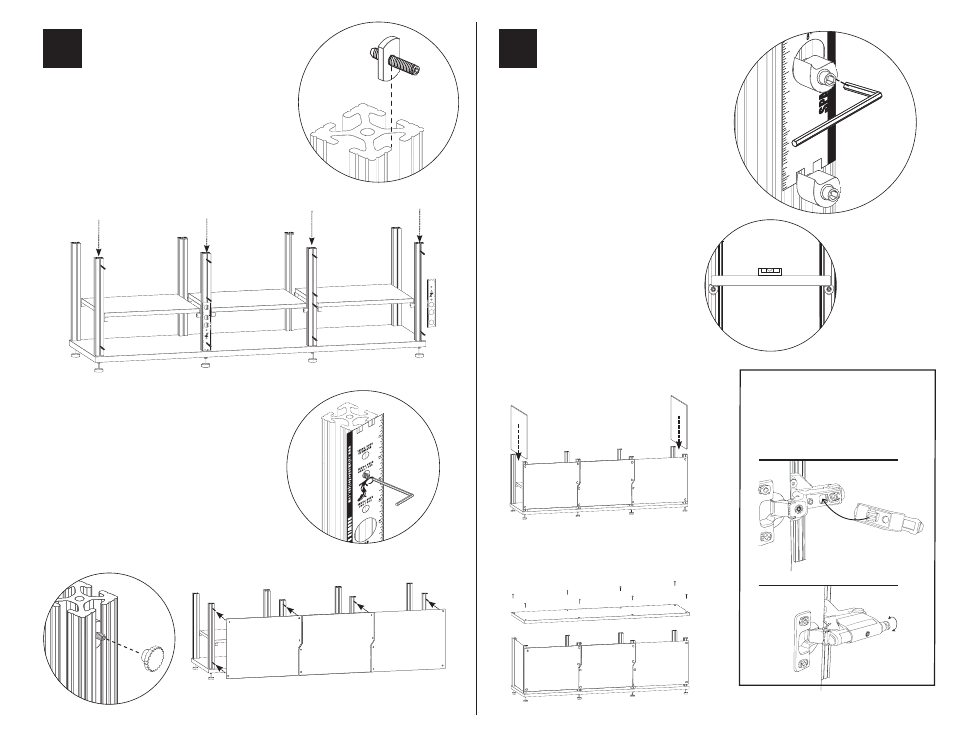
Placing & Adjusting Shelves
Place shelves from the bottom up. Angle the
shelf in between the front post and set on top
of shelf pegs. Use the Spacer Tool to adjust
spacing between shelves. Position the peg
through the Spacer and tighten.
5
Final Assembly
4
1
2
3
4
5
6
7
8
9
S20 / SVDO
REAR PANEL
41/2"
6"
8"
www.salamanderdes
igns.com
EXTENDED
REAR PANEL
S30 / S40
REAR PANEL
SP
ACER
TOOL
1
2
3
4
5
6
7
8
9
S2
0 /
SVD
O
REA
R P
ANE
L
41/
2
"
6"
8"
www.salamanderdesigns.co
m
EX
TEN
DED
REA
R P
ANE
L
S3
0 /
S4
0
REA
R P
ANE
L
SP
ACER
TOOL
Doc No. 500-790/v4.12 237 -4/4
C
.
Insert Side Panels
Carefully slide side panels down center
channel of outside posts. Be sure the
posts are square to the bottom shelf to
prevent any damage to side panels.
B
.
Fine Tuning
Use the bubble level to precisely adjust
the shelves. Be sure to level both sides
as well as front to back. Use the hex
key to tighten each peg.
D
.
Secure Top
Secure top with the 8 connector bolts to
complete installation.
A
B
SOFT
CLOSE
INSTALLATION
D E F I N I N G O R I G I N A L
™
D E F I N I N G O R I G I N A L
™
D E F I N I N G O R I G I N A L™
Logomark
Logotype
Tagline
Rule
SLOW CLOSE
FAST CLOSE
B
.
Position & Secure Studs
Align the Spacer Tool at the top of each post,
then position top studs through the small “Rear
Panel” hole. Repeat this step with the bottom studs
aligning the Tool along the bottom of post to set
spacing for cable passage.
Use the hex key to
secure the top and bottom studs to the posts.