Installation, Ransburg, Mcv installation procedures – Ransburg MCV2 Dual Purge Color Changer A10986-XX_A10993-XX User Manual
Page 14
Determine Location for
Color Changer
The Color Changer should be located as close as
possible to the spray device in order to save paint
and solvent with a color changer. If possible, use
an enclosure to protect the color changer from
airborne paints and solvents.
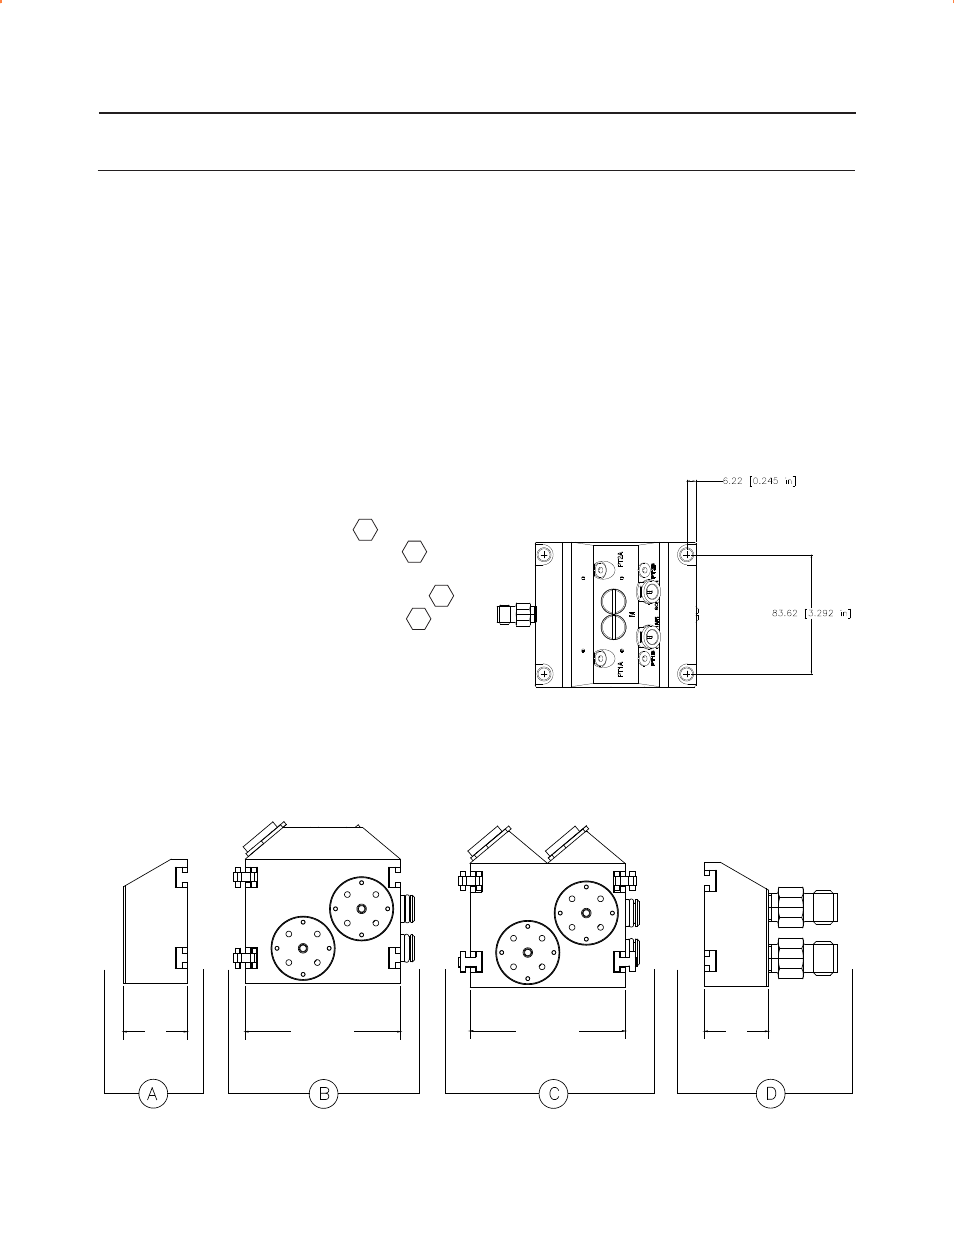
Calculate Footprint of Color
Changer (See Figure 3)
To calculate the footprint of the color changer add:
• The dimension of the end plate
• The dimension of the purge assembly
• The dimension(s) of the module(s) used to
create the desired number of color valves
• The dimension of the output assembly
Example: To calculate the footprint of a 2-Color
MCV Assembly:
1” (End Plate) + 2-7/16” (purge assembly) +
2-7/16” (2-color valve assembly) + 1” (output
assembly) = 17-3/4”.
Mounting the Color Changer
The mounting configurations are as follows
(reference Figure 4):
• 5/16” clearance holes for flush mounting
to the booth wall
INSTALLATION
Figure 3: Calculate Footprint
Figure 4: Mounting the Color Changer
A
B
C
D
MCV INSTALLATION PROCEDURES
1"
2 7/16"
2 7/16"
1"
MCV 2 Dual Purge Color Changer - Installation
11
CS-05-01.9
Ransburg
- RCS 2 Ratio Control System (82 pages)
- DynaFlow Programmers Manual (59 pages)
- DynaFlow User Manual (100 pages)
- Vector Solo 79901 Waterborne RS90-WB (66 pages)
- Vector Solo 79900 Solventborne RS90-AS (64 pages)
- Vector_Solo Technical Manual (16 pages)
- Solo Installation & Set-Up Kit (8 pages)
- Vector Solo AA90 79698 (58 pages)
- Vector Solo 65KV 79965 Solventborne RS70-AS (60 pages)
- Vector R Series Classic 79503 R90 Solventborne (74 pages)
- Vector R Series Cascade 79500 R90 Solventborne (78 pages)
- Vector AA90 79580 Cascade (62 pages)
- No. 2 Process Handgun Electric Motor (61 pages)
- No. 2 Spray Techniques (16 pages)
- No. 2 Air Motor Atex Approved Unit 80086-XX (63 pages)
- 9060 HV P.S. Air Motor 80102-31X (36 pages)
- 9060 HV P.S. Electric Motor 80102-21X (42 pages)
- REA Automatic Applicators 77359, 76110, 77140 (66 pages)
- Evolver SE Robotic Atomizer A12455-XXXXXXXX (79 pages)
- 9060 LV Auto Cascade 80120-XXX (56 pages)
- 9060 HV Auto Classic 80100-XXX (56 pages)
- Turbodisk Applicator Assembly A11376 (78 pages)
- Turbodisk Fairing Assembly 70158 (17 pages)
- MMA-303 Direct_Ind Test Stand (26 pages)
- MMA-303 Direct_Ind Charge Atomizer A12870 (132 pages)
- MMA-570 Direct_Ind Charge Atomizer A13366 (109 pages)
- Aerobell (Std.) Rotary Atomizer A12381 (89 pages)
- 9040 Aerobell Control Module 78387-00 (33 pages)
- Aerobell 33 AER5000, AER5001 (57 pages)
- Aerobell 168 A12787 (116 pages)
- Aerobell 168 Atex Approved 13350 (106 pages)
- RPA-2 Powder Applicator A12950-XXX (47 pages)
- RMA Indirect A11600 (103 pages)
- RMA Indirect A12869 (121 pages)
- Test Stand RMA-303, EVOLVER, EVOLVER NE (28 pages)
- RMA Dual Purge Direct A12300 (116 pages)
- RMA Dual Purge Direct A12868 (120 pages)
- RMA-560 Single_Dual Purge Direct A13364 (104 pages)
- RMA Direct A12867 (118 pages)
- Evolver Solvent Robot Applicator 79190-XXXXXXXX (82 pages)
- Evolver 303 Solvent Applicator A11976-XXX (85 pages)
- Evolver 303 Dual Purge Solvent Robotic Applicator A12374-XXX (86 pages)
- Evolver MicroPak Controller A10406 (37 pages)
- Voltage Master 2 78789_LEPS5001 (51 pages)
- PulseTrack2 A11515-XXXXX (58 pages)