8 chassis & fuel tank assembly – SPP Pumps Auto Prime Q Series - Workshop Manual User Manual
Page 22
Manual No/Rev
W72-021E / 8
Workshop Manual for
AUTOPRIME Q Range Pump Units
Our policy is one of continuous improvement and we reserve the right to alter specifications at any time
Page 22 of 36
7.
Position the drive belts over the pulleys and
fit the belt tensioner (7) to the bearing
housing, adjust to give slight tension to the
belts.
8.
Fit the vacuum hose between the solenoid
valve and the vacuum pump using hose
clips to ensure an airtight joint.
(Refer to Lifter Parts Diagram 7.12.1)
9.
Fit the lifter (1) to the pump bearing housing
using the three screws (2) with washers (4).
10.
Fit the lifter support strut to the pump
casing using bolt (6) and washer (7), do not
tighten at this stage.
11.
Fit the spacer (5) between the lifter and the
strut and fit bolts (8) with washer (9) and
nuts (10). Tighten all bolts securely.
7.8 Chassis & Fuel Tank Assembly
7.8.1 Chassis Assembly Notes
The support leg (22), light bracket (17) and
security bracket (19) are not fitted when
building a Q pump unit as a pod.
For trailers intended for use in France, the
pedestrian guard rail must be fitted.
For trailers that are to be used in Europe
the European VIN number plate must be
fitted.
For single fuel tanks the drain hose kit
comprises a 90deg hose socket in place of
the ‘T’ piece used with twin tanks.
The drain hoses for the pump, coalescer
and engine are specified with their
assemblies.
7.8.2 Chassis Assembly Instructions
1.
Mount the chassis (1) on suitable support
stands.
2.
Fit the sound insulation kit (2) to the
chassis.
3.
Fit foam strip (3) to the chassis in three
positions on under the fuel tanks and at
each end of the fuel tank channels.
4.
Fit foam strip also to the inside of the two
shrouds (1 & 10).
5.
Prepare the fuel tanks by fitting the short
drain hoses (26 or 27) to the fuel tanks and
secure with hose clamps.
6.
Fit the fuel gauge and the fuel pipe fitting
(Fuel Tank diagram items 4 & 5) to the
primary fuel tank.
7.
Feed the drain hose through the slots in the
chassis frame members and retain the fuel
tanks within the side channels using the
square washers and fasteners specified.
8.
Fit the remaining items for the fuel tank
drain assembly. Use Loctite 577 sealant on
all screwed pipe connections
9.
Fit the hose tails (28 & 29) and plugs (30 &
31) to the drain points on the chassis.
10.
Fit the side shrouds (9 & 10), but leave the
front and rear shrouds (14 & 15) for fitting
after the pump and engine unit have been
installed, tighten all bolts.
After Pump Installation Is Complete:
11.
If the chassis is not already mounted on
suitable supports, lift the unit and provide
support to give access to the eight
mounting hole un the underside and located
in pairs in the centre or each side and end.
12.
Remove all dirt and grease, apply
degreasing agent to each of the mounting
holes to clean the threads and surrounding
area for application of sealant.
13.
Clean the shorter thread end of the
mounting studs and apply Loctite 577 to
this thread, fit the studs to the chassis
tighten to approximately 61 Nm.
14.
Apply a continuous bead of Loctite 5220
around each stud to seal the gaps in the
welds etc.
15.
For skid mounted units, mount the chassis
on the skid (35) and retain with washers
and nuts.
16.
For trailer mounted units, fit the support leg
(22) and mount the chassis on the required
trailer and retain with washers and nuts.
17.
For trailer units, fit the lighting and security
brackets (17 & 19), note that the two
screws securing the rear shroud must be
replaced by longer screws (18).
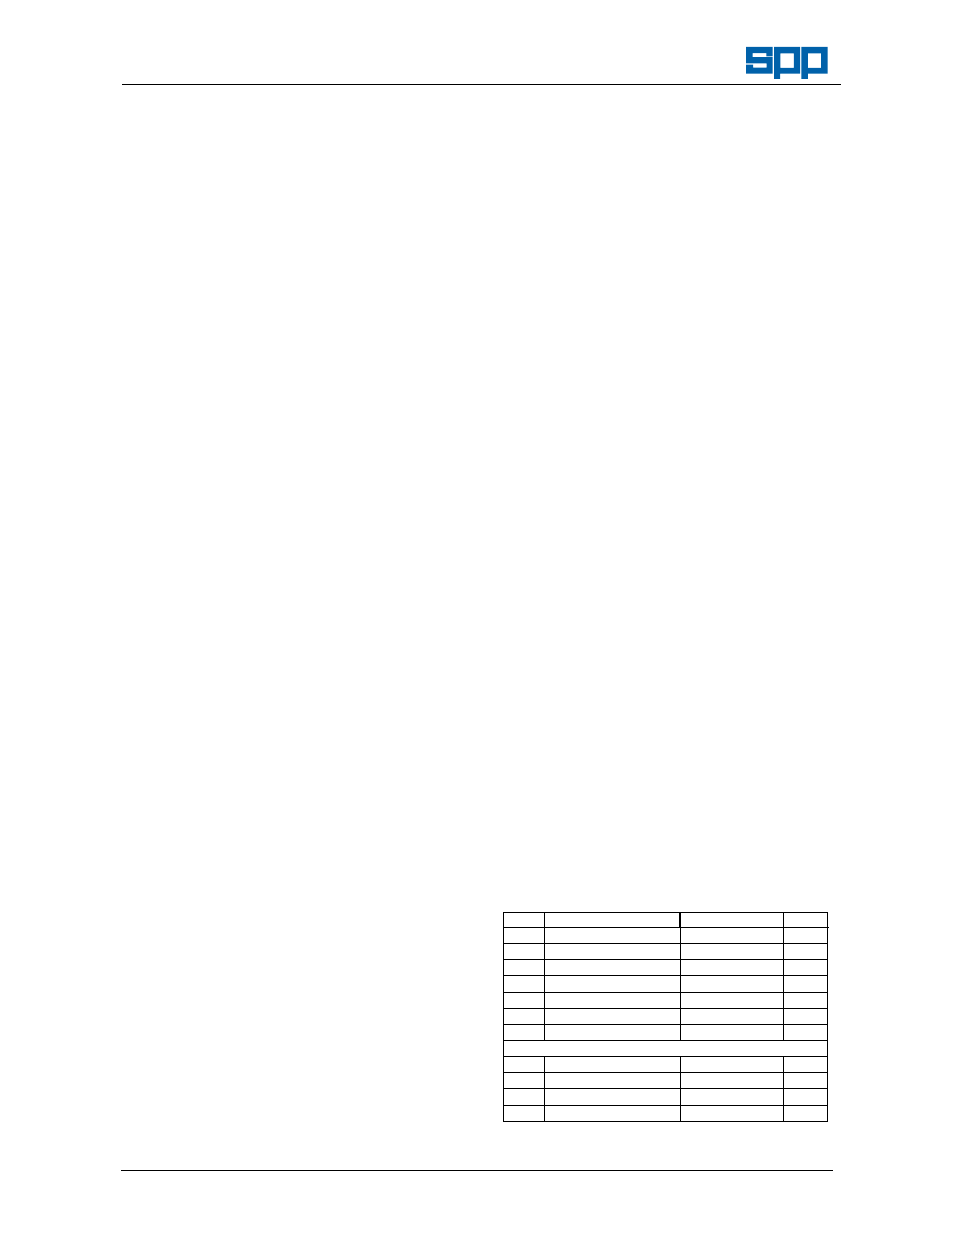
7.8.3 Fuel Tank Assembly
ITEM
DESCRIPTION
PART No
QTY
1
Primary Fuel Tank
Assy.
21340
1
2
Fuel Tank Only
21321
1
3
Filler Cap
21343
1
4
Fuel Gauge
21341
1
5
Fuel Pipe Fitting
21342
1
6
Gasket Fuel Pipe
Fitting
21674
1
7
Screw M5 x 12
MS1267
6
Secondary Fuel Tank and Air Vent Pipe – not illustrated
Secondary Fuel Tank
21322
1
Sec. Tank Vent Pipe
21636
900mm
1
Cable Base
TY1029
3
Cable Tie
TY1000
3