Dissolved o, Sensor maintenance, Figure 1 – PASCO PS-2108 Dissolved Oxygen Sensor User Manual
Page 3: Figure 2, Figure 3
Dissolved O
2
Sensor Maintenance
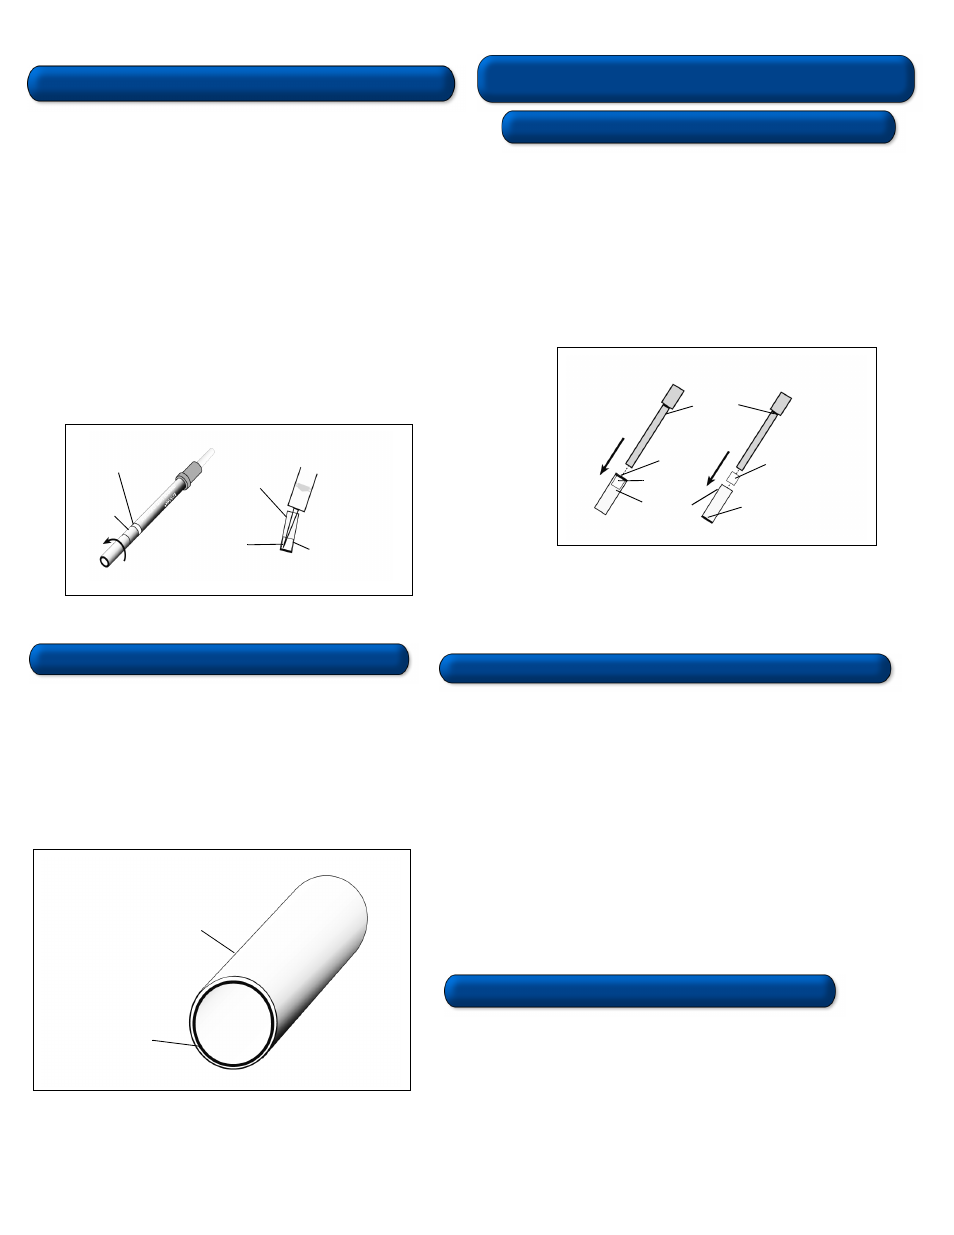
R e p l a c i n g t h e M e m b r a n e
If the membrane is damaged, replace it as follows:
1. Follow steps 1–3 under “Changing the Electrolyte
Solution.”
2. Use the plunger to push the steel cylinder membrane cartridge
out of the cartridge housing (Figure 1).
3. Examine the O-ring and replace it if it is damaged. (See
“Replacing the O-ring” and Figure 3 on the reverse side of this
card.)
4. Use the plunger to insert a replacement membrane cartridge,
and push it down until it is seated at the end of the housing that
has the O-ring (Figure 2).
5. Follow steps 4–7 of “Changing the Electrolyte
Solution.”
C h a n g i n g t h e E l e c t ro ly t e S o l u t i o n
To maintain optimal performance of the probe, periodically replace the electrolyte
solution and clean the silver electrode.
Replace the electrolyte solution and clean the electrode as follows:
1. Hold the probe below the stainless steel band, unscrew the probe, and remove
the cartridge housing. (Note: Always hold the probe below the stainless steel
band when unscrewing or applying torque to the probe.)
2. Rinse and air dry the cartridge housing.
3. Rinse the electrode with deionized water. Examine the silver portion of the
electrode: if it appears tarnished, rub this portion with a paper towel to remove
the oxidation. (Be careful not to rub the glass portion of the electrode!)
4. Fill the syringe with 10 ml of electrolyte solution (the solution provided with the
sensor). Avoid air bubbles.
5. Place the tip of the syringe very close to, but not touching the membrane, and
slowly fill the membrane cartridge and cartridge housing to approximately 5
mm from the top of the housing. (Note: Do not allow air bubbles to form in the
cartridge housing or membrane.)
6. Agitate the cartridge housing after filling to dislodge air bubbles.
7. Replace the cartridge housing and dry the sides with a paper towel. Do not
touch the membrane.
012-07688C
Figure 1
Grasp
probe
here.
stainless steel
band
Syringe tip should
be close to,
but not touching,
the membrane.
Fill to here.
Cartridge with
membrane
plunger
replacement
membrane
cartridge
cartridge
cartridge housing
O-ring
O-ring
Figure 2
CARD 3A
Tro u b l e s h o o t i n g
If the Dissolved Oxygen Sensor does not give the expected output, perform the
three maintenance procedures described on this card, checking the sensor
operation after each procedure:
1. “Changing the Electrolyte Solution”
2. “Replacing the Membrane”
3. “Replacing the O-ring”
If the Dissolved Oxygen Sensor still does not function properly, contact PASCO
Technical Support.
S t o r a g e
Short-term storage:
1. Rinse the probe covering and tap or shake gently to dry.
2. Empty the electrode storage bottle and rinse it if necessary.
3. Insert the clean, dry probe into the clean, empty electrode storage bottle.
4. Enclose the probe with bottle in the plastic zip-lock storage bag. (Note: Keeping
the end of the probe in the empty storage bottle protects the probe membrane
from trauma.)
Long-term storage:
1. Empty the electrolyte solution in the cartridge housing and clean the electrode
before storage. (Note: It is not necessary to store the probe in water or solution
for long-term storage. Follow the procedure on card 3A, for “Changing the
Electrode Solution,” except for refilling the cartridge housing).
2. Clean any tarnish (oxidation) off of the electrode and replace the dry cartridge
housing.
3. Insert the probe in the empty electrode storage bottle. The sensor is ready for
storage.
R e p l a c i n g t h e O - r i n g
The O-ring rarely requires replacing. However, if it develops nicks
and splits, or leaks electrolyte solution from the probe, replace it as
follows:
1. Follow steps 1–2 under “Replacing the Membrane.”
2. After removing the membrane cartridge, remove the O-ring with
a pair of fine-tipped tweezers and insert a new O-ring.
3. Reassemble the unit, as directed in steps 4–7 of
“Changing the
Electrolyte Solution.”
cartridge housing
Examine the O-ring
for damage.
Figure 3
CARD 3B