PASCO CI-6499 Drop Counter User Manual
Page 5
012-08549A
Drop Counter
5
Equipment required:
CI-6499 Drop Counter, buret
or syringe with 2 stopcocks, ScienceWorkshop interface,
DataStudio software (version 1.8.5 or later), 0.1 M
NaOH, 0.1 M HCI, beaker (150 mL), pH Sensor,
buffered solution of pH 4.0 and 7.0, magnetic stirring
rod, rod stand, rod, right-angle clamp, three-fingered
clamp, mass balance (0.1 g resolution)
1. Set up the Drop Counter Apparatus (See page 3 for
instructions.)
2. Open DataStudio and setup and calibrate the pH
Sensor. (See the instructions provided with the
sensor.)
3. Calibrate the Drop Counter in mL fluid/drop (See
page 4) or open the saved DataStudio calibration file.
4. Fill the buret (or syringe) with 0.1M NaOH. Place
a waste beaker under the Drop Counter. Turn the
stopcock and release a few mL of NaOH to flush
other liquid or bubbles from the stopcock.
5. Fill a 150 ml beaker with 100 ml of deionized water.
Add 5 ml of 0.1M HCl to the beaker. (Optional: Add
a few drops of phenophthalein indicator to the
beaker.) Add a spin bar to the beaker and place the
beaker on a stir plate (set the stir plate to medium
speed).
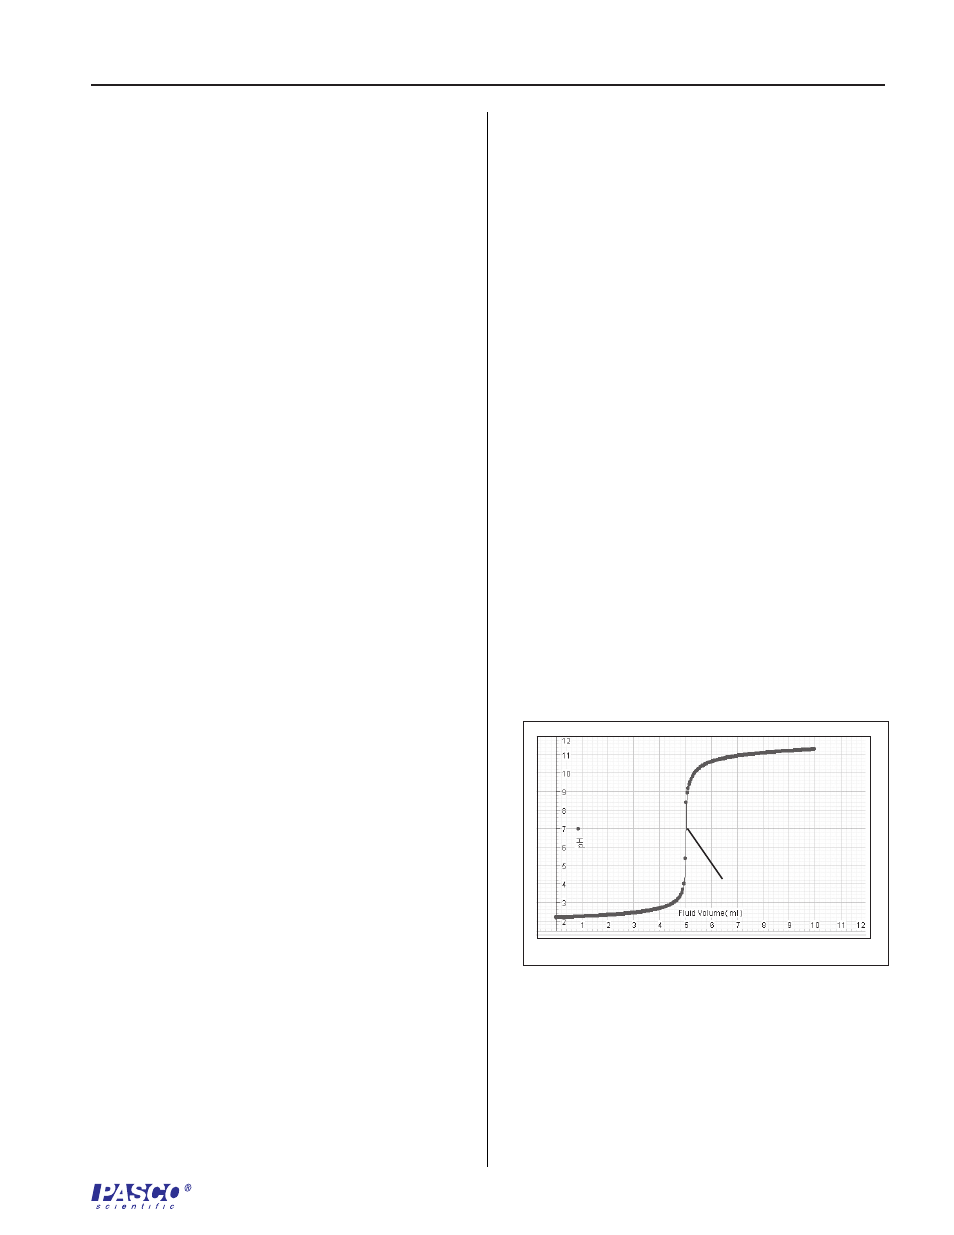
Sample Data
equivalence point
Suggested Experiment
The following is sample data from a titration experiment
performed with the Drop Counter.
Figure 3
6. Insert the pH electrode through one of the holes on the
Drop Counter. Ensure that the tip of the pH electrode is
fully immersed in the solution. The drops from the
buret/syringe should fall through the Drop Counter and
into the beaker.
7. In DataStudio, create a graph of pH vs. Fluid Volume.
Click the Start button to prepare the Drop Counter to
read drops.
8. If using a syringe: Turn the bottom valve to the full “on”
position and release the titrant.
Or
If using a buret: Slowly open the stopcock to avoid liquid
surges. After drops begin flowing, slowly increase the
rate to 3 or 4 drops per second. Observe the titration
curve in DataStudio.
9. Watch the pH change. After the equivalence point, allow
about 5 mL of titrant to drop until the curve flattens, then
click the Stop button to end the data collection.
5. If using a syringe: With the top control valve at the
same set position as in the calibration, turn the bottom
On/Off valve to allow fluid to drip into the beaker.
Watch the drop count and/or fluid volume display in
real-time in DataStudio.
If using a glass buret with one stopcock: Start very slowly
to avoid liquid surges. After the drops begin flowing,
slowly increase the rate to 3 to 4 drops per second.
OR