PASCO PS-2110 Carbon Dioxide Gas Sensor User Manual
Page 2
C a r b o n D i o x i d e G a s S e n s o r
I n t r o d u ct io n
2
NOTE: If more distance is needed between the sensor and
the interface, plug the sensor into the included Extension
Cable, and then plug the cable into the interface.
•
Insert the sensor probe into the gas sample. Allow 90
seconds for the sensor to warm up with the probe tem-
perature between 20° and 30° C.
•
Start the PASCO data acquisition software. Set up a data
display in the software.
Using the PASCO Capstone Software
•
Click the “Hardware Setup” icon in the Tools palette to
open the “Hardware Setup” panel. Confirm that the Car-
bon Dioxide Gas Sensor icon appears with the inter-
face’s icon.
•
Click the “Data Summary” icon in the Tools palette to
open the “Data Summary” panel. The panel lists the sen-
sor’s measurement (such as CO2 Concentration (ppm)).
•
Click one of the display templates in the workbook
page, or double-click an icon in the “Displays” palette to
open a data display.
Using the SPARK Science Learning System
•
Start the interface and plug the sensor into a port on the
SPARK SLS.
•
In the sensor parameter screen, tap ‘CO2 Concentration’
to highlight it, and then tap ‘Show’ to open a graph dis-
play.
Record Data
•
Click “Record” or tap ‘Start’ to begin recording data.
CAUTION:
The sensor was not designed for use in liquids, dusty or
windy environments, or in direct sunlight. Do not place the
sensor in liquid samples such as water or beverages as this
will permanently damage the sensor. Using the sensor in
dusty or windy environments or in direct sunlight may cause
anomalous readings.
NOTE: Do not try to remove the probe from the sensor. It is
not removable.
STORAGE:
Always store the sensor in the plastic zip-lock bag to mini-
mize distorted sensor readings due to dust and dirt.
Collecting CO
2
Samples
Use the sampling bottle to collect air samples, such as an
atmospheric sample or the carbon dioxide gas produced from
germinating seeds.
To collect an atmospheric sam-
ple
Keep the bottle upright and the neck
open (without the stopper). Wait long
enough to allow atmospheric air to fill
the bottle. Insert the probe with the
stopper into the neck of the bottle. Be
sure that the stopper fits snugly into the
neck of the bottle.
To collect expired air or other
gas samples
Collect the sample in a plastic bag and clamp the bag closed.
To take a reading, open the bag and immediately place it
over the probe and stopper, holding the bag tightly around
the stopper.
Sensor Calibration
Because the sensor is factory calibrated, calibration is not
required for most activities. However, the sensor’s character-
istics may change over time. To restore the sensor to its fac-
tory-calibrated state, perform the calibration using a fresh air
sample.
•
Collect a sample of fresh air (400 to 450 ppm CO
2
).
•
Insert the probe with stopper into the upright sampling
bottle. Be sure that the stopper fits snugly into the neck
of the bottle.
•
Connect the sensor to a PASPORT-compatible interface
and start the data acquisition software. Set up a digits
display. Wait at least 90 seconds for the reading to stabi-
lilze.
•
Press the Calibrate button (CAL) on the sensor and hold
it for 3 seconds. The green light emitting diode (LED)
will stay on to indicate that calibration has begun.
•
Wait approximately one minute. When the green LED
flashes again, calibration is finished.
•
Check that the reading in the data acquisition software is
400 ppm ±50 ppm.
Suggested Activities
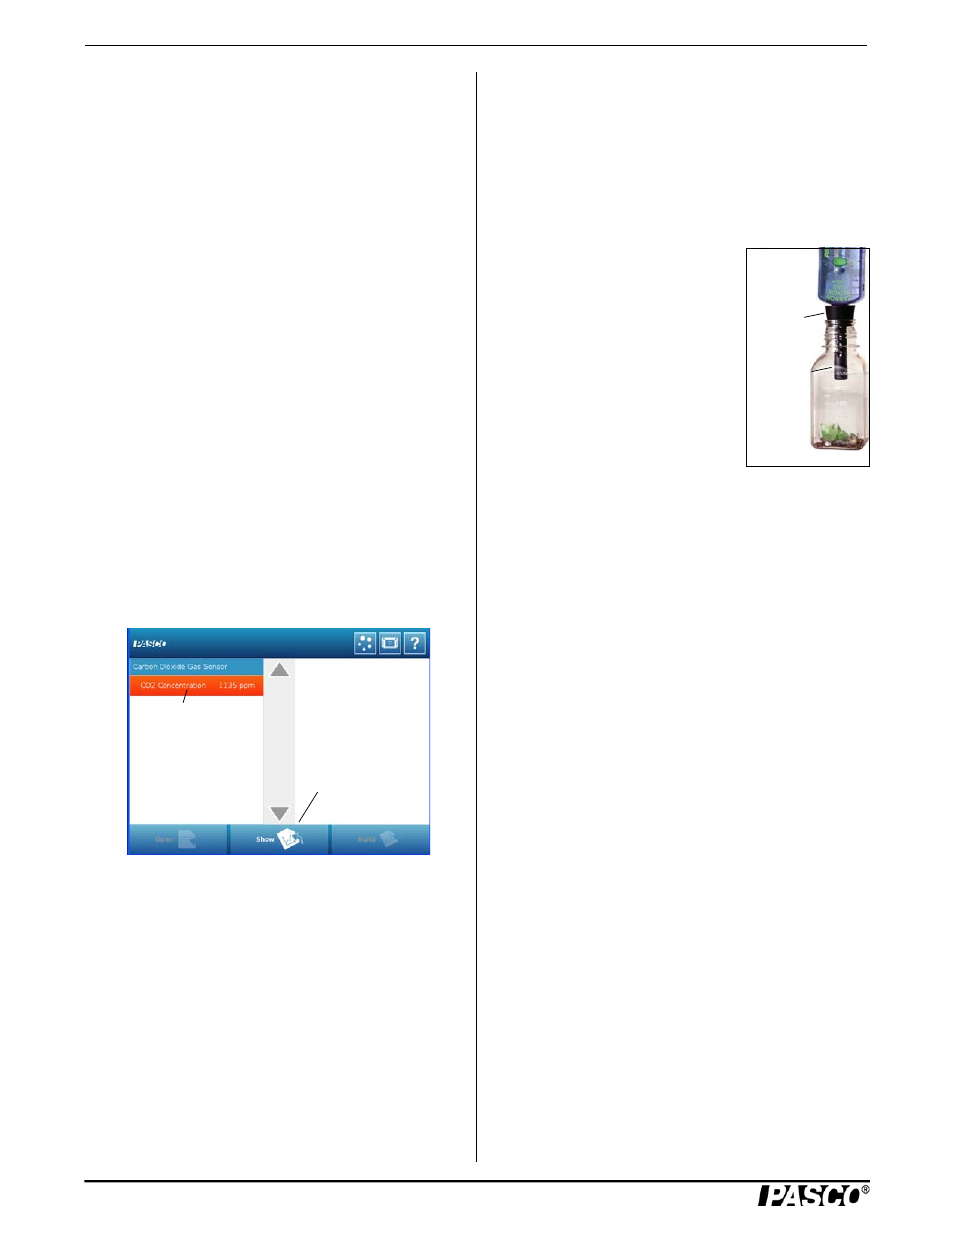
Cellular Respiration of Peas
•
Put 1/4 cup of dry pea seeds in the sampling bottle.
Insert the probe and stopper into the neck of the bottle.
Tap “CO2 Con-
centration”
Tap
“Show”
stopper
probe