Magnum Venus Plastech Hypaject MK III User Manual
Page 19
Hypaject MK III Instructions
Issue 07: April 2001-04-23
19
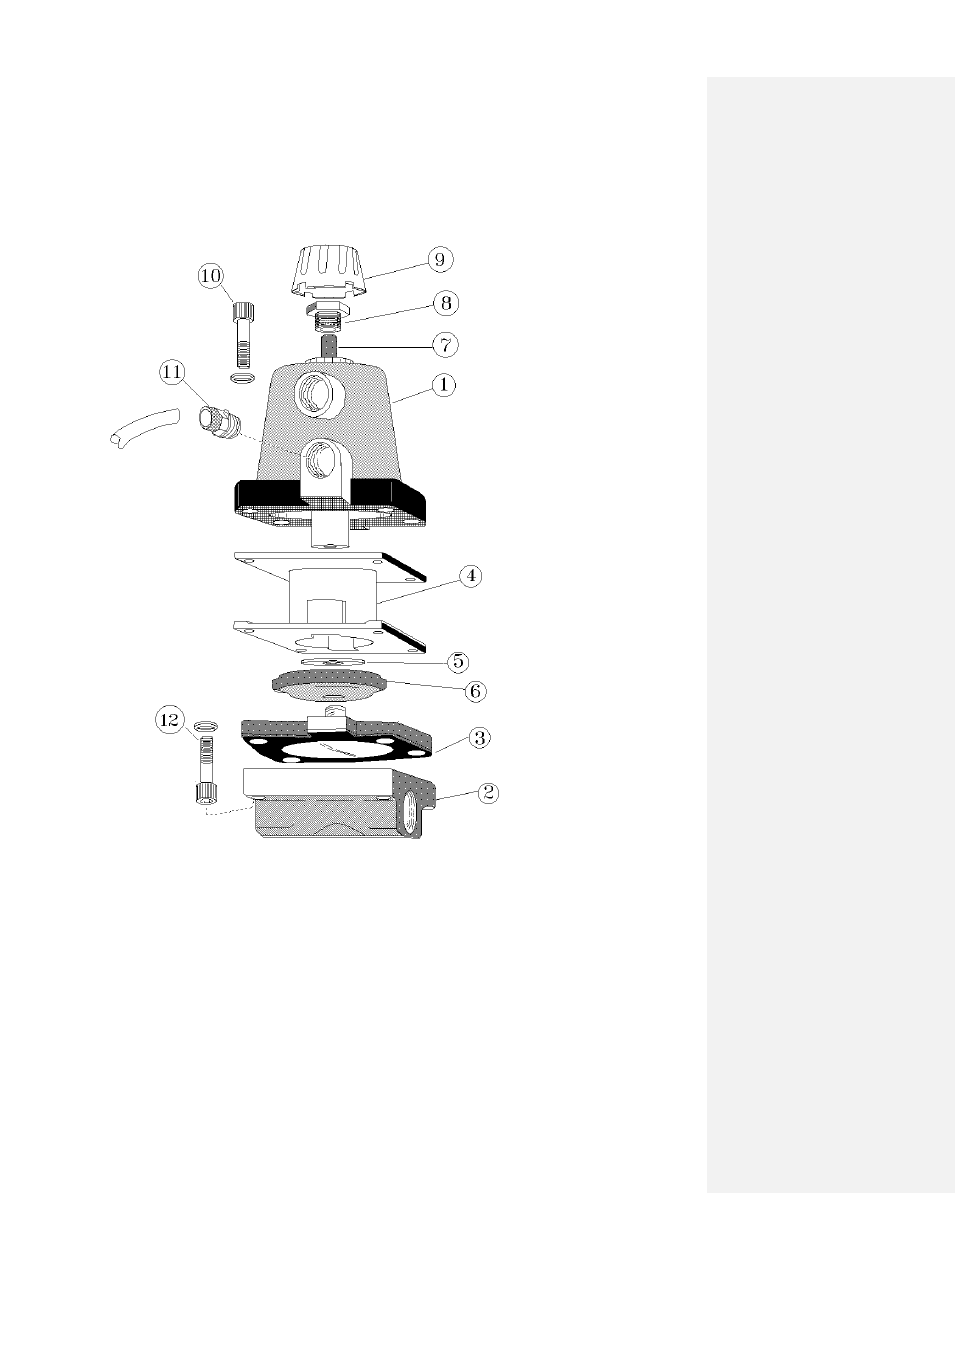
5.2 Resin load and resin injection valves
To access the valve main diaphragm seals simply remove the 4 seat fixing screws item 12.
Lift actuator body assembly off valve seat . Diaphragm seal (3) may be removed by
unscrewing from actuator shaft. When replacing new seal ensure items 5 and 6 are
correctly assembled onto seal prior to reinstallation. Reassemble in reverse order tightening
screws 12, evenly and firmly to squeeze seal between seat and spacer items 2 and 4.
1. Valve actuator body
5. Support washer
9. Adjuster locking cap
2. Valve seat
6. Diaphragm support
10.Actuator screws x4
3. Valve diaphragm
7. Actuator position indicator 11 6mm air fittings x2
4. Heat spacer
8. Actuator limit adjuster
12 Seat fixing screws x4
The Electrical cabinet has an electric cooling fan white filter located on the left hand lower
side which should be replaced when darkened with dust.
- PATRIOT 10:1 ADHESIVE SYSTEM (66 pages)
- PATRIOT PAT-CP-0550 (29 pages)
- PATRIOT 10 PAT-PH-10000 (34 pages)
- PATRIOT 7 PAT-PH-7000 Series (48 pages)
- PATRIOT 5 PAT-PH-5000 Series (42 pages)
- PATRIOT 4-1_4 PAT-PH-4250 (34 pages)
- PATRIOT 3-1_4 PAT-PH-3250 Series (36 pages)
- PATRIOT HV PAT-LS-49090 (33 pages)
- PATRIOT 1-3_4 PAT-LS-24050 (60 pages)
- PATRIOT 1-1_4 PAT-LS-12270 (66 pages)
- PATRIOT SS PAT-CCP-LS-0590-SS (30 pages)
- PATRIOT PAT-CCP-LS-0590 (42 pages)
- PATRIOT PAT-CP-3000 (28 pages)
- PATRIOT PAT-CP-1530 (32 pages)
- PATRIOT PAT-CP-0980 (29 pages)
- PATRIOT PAT-CP-0245 (32 pages)
- PATRIOT FIRST TIME START-UP CHECK LIST - Internal Mix (1 page)
- PATRIOT DAILY START UP - External Mix (1 page)
- PATRIOT DAILY START UP - Internal Mix (1 page)
- PATRIOT PRE-START CHECKLIST - External Mix (1 page)
- PATRIOT PRE-START CHECKLIST - Internal Mix (1 page)
- PATRIOT SET-UP - External Mix (1 page)
- PATRIOT SET-UP FOR CHARGEABLE - Internal Mix (1 page)
- PATRIOT Multi-Color Gel Coater MVE-PAT-1500-X (60 pages)
- PATRIOT TESTING & ADJUSTING (55 pages)
- PATRIOT DAILY SHUT DOWN CHECKLIST - External Mix (1 page)
- PATRIOT DAILY SHUT DOWN CHECKLIST - Internal Mix (1 page)
- PATRIOT SPRAY FAN SETUP - External Mix (1 page)
- PATRIOT SPRAY FAN SETUP - Internal Mix (1 page)
- PATRIOT FIRST TIME START-UP CHECK LIST - External Mix (1 page)
- UltraMAX VHPC-1100 Series (25 pages)
- UltraMAX VHPC-4200 Series (26 pages)
- UltraMAX VHPC-3200 Series (39 pages)
- UltraMAX VHPC-2200 Series (34 pages)
- UltraMAX VHPC-2000 Series (32 pages)
- UltraMAX VHPC-1200 Series (25 pages)
- UltraMAX VHPC-1000 Series (38 pages)
- UltraMAX MULTI–COLOR GELCOATER MVG-1400-X-1 (50 pages)
- UltraMAX MVP Installation & Set-Up (2 pages)
- UltraMAX Shut-Down Checklist (1 page)
- UltraMAX Start-Up Checklist (1 page)
- UltraMAX Pre-Start Checklist (1 page)
- UltraMAX Start-Up Sheet Quick List Instructions (1 page)
- UltraMAX Installation (1 page)
- UltraMAX HVLS-1000 Series (40 pages)