Using as a tilt mount, Using as a fixed mount – Level Mount LM50HDCC User Manual
Page 3
www.LevelMount.com
1-888-229-1459
©2008 Level Mount
Patents Pending
Using as a Tilt Mount:
NOTE: NEVER LAY YOUR TELEVISION FACE
DOWN ON ITS GLASS. Laying the television down
on the glass may cause permanent damage.
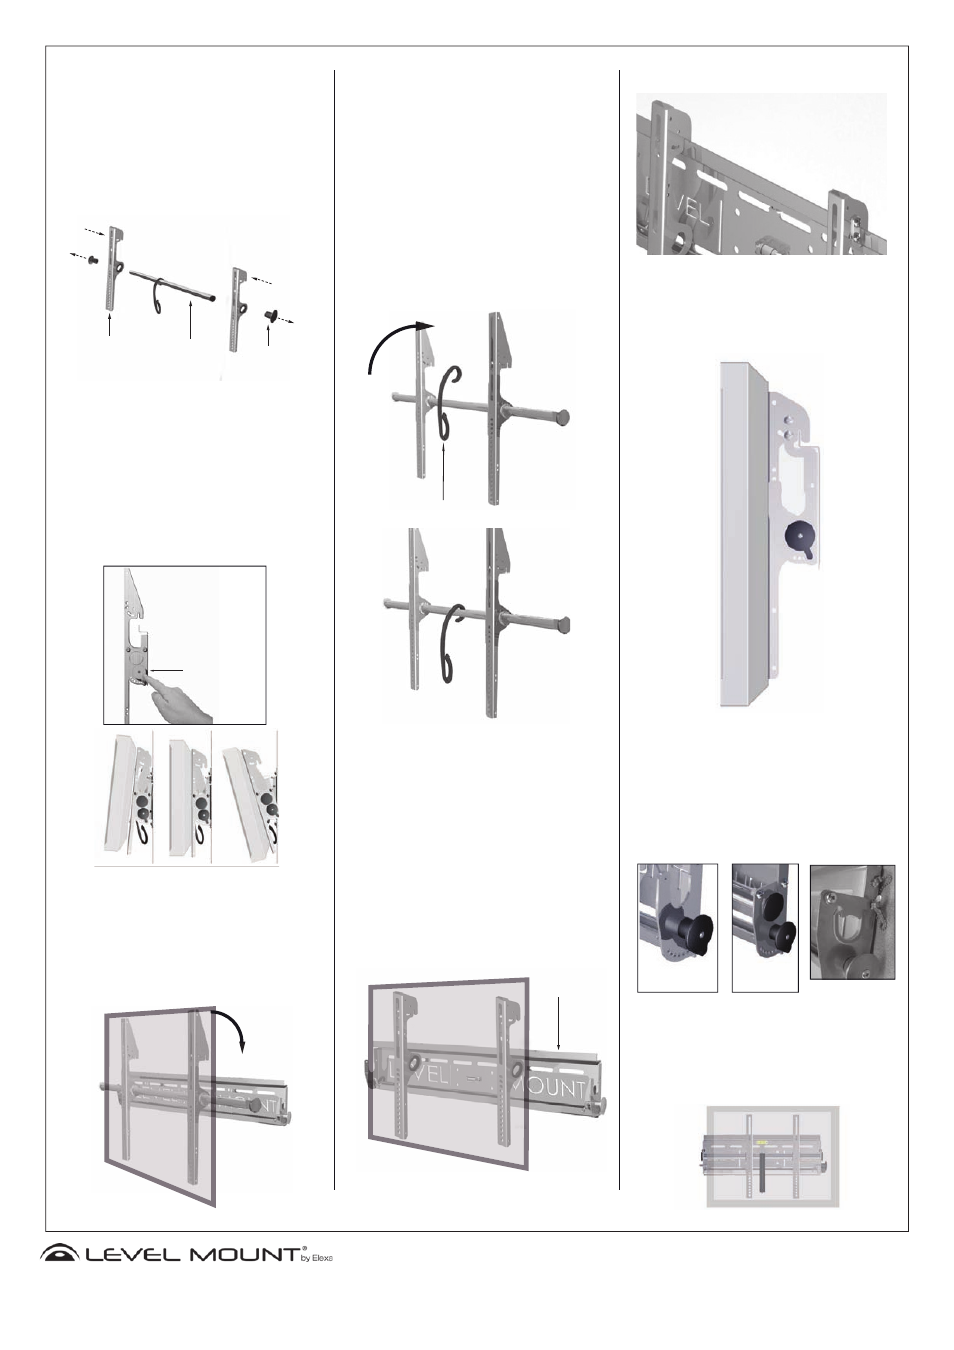
3. Unscrew the End Caps from both sides and
attach the Tilt Arms by sliding them on (Figure7).
Once the Tilts Arms are slid onto the Horizontal
Adjustment Bar, screw on End Caps.
Figure 7
Tilting the Display:
Tilting the Display: To tilt the display to a desired
angle, place one hand on the Tilt Adjustment
Knob and one on the bottom of the screen.
Gently unweight the bottom of the display from
the tilt bar by lightly pulling forward. Pull out
on the Tilt Adjustment Knob, adjust display to
desired angle, and release Tilt Adjustment Knob
so that it locks into a designated hole. The display
can be adjusted incrementally by 5 from -15 to
+15 degrees.
Mounting the Display to the Wall Plate:
4. Attaching Plasma/LCD monitor to wall: Once you
have attached the tilt arms to your display you
are ready to attach the display to the Wall Plate.
It will take 2 people to slide the TV onto the Wall
Plate. Slide the display into the Wall Plate until
the Horizontal Adjustment Bar rests firmly in both
sides of the Wall Plate Hook.
Tilt-
Adjustment
Knob
-15
0
15
Attaching Cord Management:
Attaching Cord Management to Horizontal Bar:
To attach the Cord Management simply hook it
over the Horizontal Adjustment Bar. Then slide
the Cord Management into the best position to
route cords to the wall or an electrical compo-
nent. It is recommended that you attach the Cord
Management before mounting the display to the
Wall Plate.
It is recommended to attach all wall wires to your
TV prior to mounting the TV on the wall. All cords
and cables should be routed through the Cord
Management hook to keep them out of the way
when lifting the TV. Be careful not to step on any
cords when lifting the TV as you could accidentally
pull the TV from your hands.
Using as a Fixed Mount:
Mounting the Display to the Wall Plate:
Attaching Plasma/LCD monitor to wall: Once you
have attached the Tilt Arms to your display you
are ready to attach the display to the Wall Plate.
It will take 2 people to slide the TV onto the Wall
Plate. Slide the attachment hooks of the Tilt Arms
over the top of the upper lip on the Wall Plate
until the Tilt Arms rests firmly on both sides of the
Wall Plate Lip(Figure 8).
Low Profile Design:
The LevelMount Fixed/Tilt Mount is designed in such a
way that it positions the display only 3 inches from the
wall.
Locking the Display (Using the Tilt Option):
Securely Locking the Display: Once the Horizontal
Adjustment Bar is resting on the Wall Plate, it can be
locked down. Lock the display to the Wall Plate by flip-
ping the lock tab over the Horizontal Adjustment Bar to
prevent accidental dislodging. Use the two screws and
hex nuts provided to secure the mount in place. A pin
can be placed into the lock tab to securely fasten it.
Adjusting the Display:
Adjusting the display horizontally: The Fixed Tilt LCD/
Plasma Mount can be adjusted to fit a VESA 100 (3.94’’
x 3.94’’) mounting pattern and a wider pattern for larger
displays. The display may be adjusted horizontally from
side to side up to 8 inches.
Horizontal
Adjustment Bar
Tilt Arm
End Cap
y
Cord Management
Figure 8
Upper Lip