Identification, Installation, Mechanical drawing – eLine Technology PRO3 Effio P & S User Manual
Page 7: Installation information
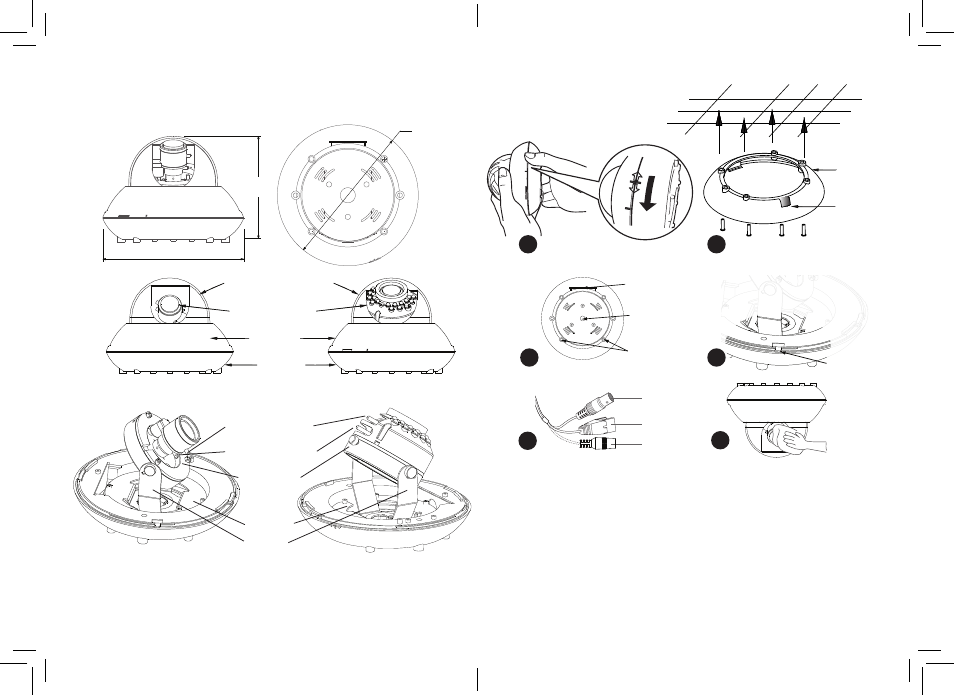
11
12
NOTE: Make sure you don’t have any missing parts before you make the installation.
Incorrect installation could void the warranty if instructions are not followed correctly.
Please call technical for assistance if you are unsure about any procedures.
Identification
Mechanical Drawing
Installation
Installation information
(General overview)
1
Remove the base holding dome as shown, turn right towards you.
Align up the arrows, the dome will make a click sound and will open.
2
Using the base as a drilled template. If recess fitting then can be ignored.
3
Fitting the cable out side of the dome you need to re-route the cable.
Remove the side cable exit screws, and back feed the cable.
4
Remove dome cover to adjust position and Focus & zoom, locate the
Clip and lift gently. Cover is on a rubber cable so won’t fall on the floor.
5
Attach power and video. Make sure power + and - are correct.
6
Carefully clean the camera with a soft lint free cloth.
7
With the IR LEDs model cover the photocell of camera with your thumb.
This checks the IR LEDs give off a faint red glow.
1
4
3
2
5
6
Standard Model
IR LED Model
Dome cover (transparent)
Lens
(Vari-focal models)
Body Cover
Dome base
Pan360°
Tilt 90°
Zoom adjustment
Focus adjustment
Rotate 180°
Standard Model
IR LED Model
Ceiling
Dome base
Cut Away for
Cable side exit
BOTTOM View
Mounting Holes
Power & Video
Cable hole
Side cable exit
Location
Dome Cover
Release Clip
전원
커넥터
비디오
커넥터
Power connector
Type B
Type A
Video connector
150 mm
6 in
109 mm
4 1/2 in
Ø 150 mm
6 in