Smart edge - ref. ste100 front panel description – Analog Way Smart Edge User Manual
Page 2
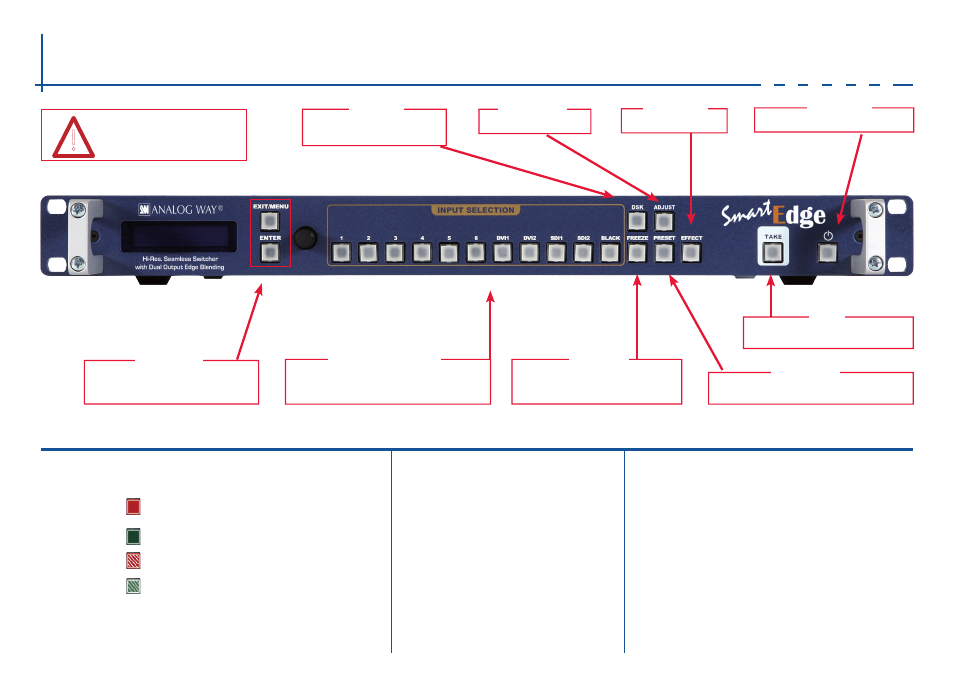
Smart Edge - Ref. STE100
Front Panel Description
EXIT/MENU: Home Menu or back one level
ENTER: Validates the menu or command
Select to access keying and titling
controls and parameters
Adjust active layer
Recall a custom stored preset (4 memories available).
To store a preset use Menu -> Presets
#1 to #6: Press to access analog source #1 to #6
DVI 1 to DVI 2: Press to access DVI #1 or DVI #2
SDI 1 to SDI 2: Press to access SDI #1 or SDI #2
BLACK: Clear the active layer
Select a custom transition
Hold for 3 seconds for stand-by Mode
Freeze the input linked to the current layer
on MAIN
CONTROL
DSK
ADJUST
PRESET
INPUT SELECTION
EFFECT
STAND-BY
FREEZE
O U T P U T S E T U P
1
-
Press the
EXIT/MENU
button from the Home menu
[all functions must be confirmed by the
ENTER
button]
2
-
Press [
Output]
3
-
Press [
Output format]
4
-
On Format line, select the display’s native resolution
5
-
Control or adjust your display device
6
-
If necessary, select [
Test Pattern] in the Output menu
I N P U T S E T U P
1
-
Press the
EXIT/MENU
button from the Home menu [all functions must be
confirmed by the
ENTER
button]
2
-
Press [
Input] and [Autoset ALL]
3
-
If the acquisition has failed, check all connections and perform a manual setup
4
-
For a comprehensive Input Setup, please refer to user’s Manual
5
-
For a manual input setup, press the
EXIT/MENU
button:
a)
Press [
Input],
b)
Select the right input from Input #1 up to SDI #2, then
c)
Select [
Type].
NOTE: To adjust input Size or Pos, use the [Layer] Menus.
To adjust Blanking, use the Auto-Centering or Blanking adjustments in the
Image menu.
B U T TO N C O L O R U S A G E
#1 = Source is on the main
outputs
Solid red:
#2 = Freeze enable
#3 = Stand-by button
#4 = Preset Selection
Solid green:
#1 = Source is on Preview
#2 = Function available for modification
Blinking red:
Layer/source selected, and is currently active on
the main output
Blinking green:
Layer/source selected, and is not currently active
one the main output
Display the selected sources onto the
MAIN output with the selected effects
TAKE
Keying and titling are
available with an external
Remote Control
!