CHIEF CM2L40 User Manual
Page 7
Installation Instructions
CM2L40
7
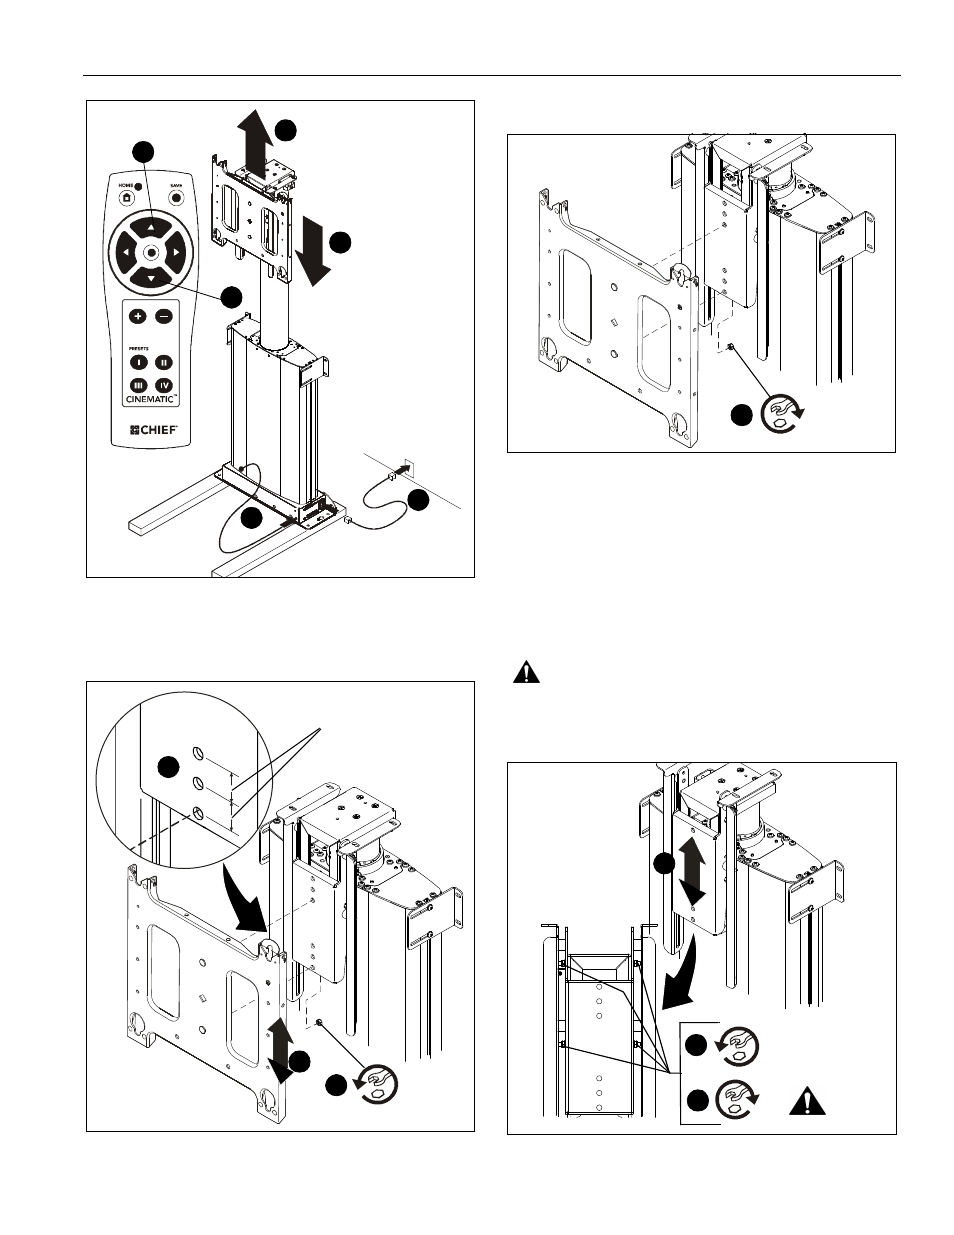
Figure 3
7.
Remove two locknuts securing faceplate to faceplate
mounting bracket. (See Figure 4)
8.
Move faceplate up one set of holes to adjust location 1" or
two sets of holes to adjust 2". (See Figure 4)
Figure 4
9.
Secure faceplate to faceplate mounting bracket using two
locknuts. (See Figure 5)
Figure 5
10. Using the remote control, lower the lift until it stops.
(See Figure 3)
If more than 2" of faceplate adjustment is required:
11. Raise lift following instructions in Step 6. (See Figure 3)
12. Loosen four nuts securing faceplate mounting bracket to
frame. (See Figure 6)
13. Slide faceplate mounting bracket upward desired amount.
(See Figure 6)
14. Tighten four nuts to secure faceplate mounting bracket to
frame. (See Figure 6)
WARNING:
IMPROPER INSTALLATION CAN LEAD TO
SEVERE PERSONAL INJURY OR DAMAGE TO
EQUIPMENT! Make sure all four nuts are tight before
continuing installation!
Figure 6
10
4
6
6
5
10
1"
(25MM)
7
8
x2
8
9
x 2
14
x 4
x 4
13
12
- MSMVPU (12 pages)
- K-Series (16 pages)
- FDP Series (8 pages)
- FSP Series (8 pages)
- JPP Series (8 pages)
- TPP Series (12 pages)
- TPM-2000 Series (8 pages)
- TPS Series (12 pages)
- PSS Series (8 pages)
- FSB018BLK (2 pages)
- PTS Series (8 pages)
- STS1 (8 pages)
- STLU (12 pages)
- MSS6000 (12 pages)
- PXR (32 pages)
- CM2C40 (76 pages)
- FWDIW Series (8 pages)
- JWDIW Series (8 pages)
- MWRIW Series (12 pages)
- PWRIW Series (12 pages)
- PNRIW Series (12 pages)
- TS525TU (16 pages)
- TS325TU (20 pages)
- TS218SU (16 pages)
- TS118SU (12 pages)
- MCD Series (8 pages)
- PDC Series (8 pages)
- MCS Series (8 pages)
- PCM Series (8 pages)
- PCS Series (8 pages)
- FHP110, FHPV (8 pages)
- JHS Series (8 pages)
- FHS Series (8 pages)
- MCB1U (12 pages)
- MCM1U (12 pages)
- MWC Series (8 pages)
- PWC-2000 (12 pages)
- RMT2 (12 pages)
- MTTU (12 pages)
- LTTU (12 pages)
- FTR Series (8 pages)
- MTMPU (12 pages)
- LTMPU (12 pages)
- XSM Series (12 pages)