Front panel overview – Extron Electronics SME 100 Setup Guide User Manual
Page 3
3
Front Panel Overview
SME 100
STREAMING MEDIA ENCODER
ADJUST
1
MENU
NEXT
2
3
CONFIG
a
b
c d
e
f
a
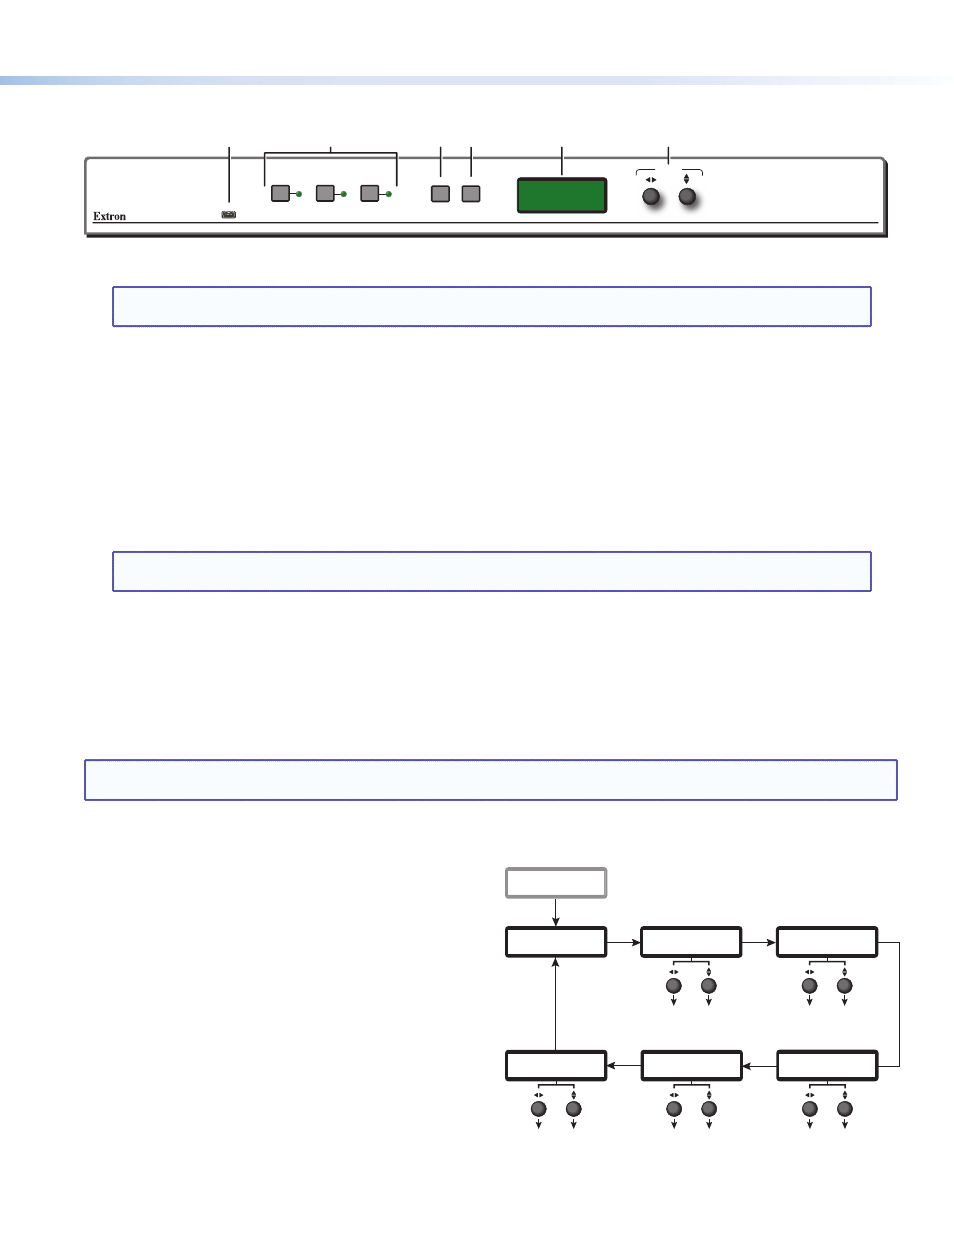
Config port — Connect a control PC to this port using a Mini-B USB cable (not supplied). Use this port to send
SIS commands to the SME 100 for device configuration and control.
NOTE: For information on using this port for device configuration and control and for a list of available
SIS commands, see the SME 100 User Guide.
b
Input selection buttons — These buttons select and switch inputs. A green LED lights to indicate the selected input. A
blinking LED indicates an audio breakaway input. An input that does not contain an input source can still be selected, but the
LCD display will show
No Signal.
z
Button 1 selects input 1 (component video, S-video, or composite video).
z
Button 2 selects input 2 (component video, S-video, composite video, and RGB video [RGBHV, RGBS, RGsB, RGBcvS]).
z
Button 3 selects input 3 (DVI-D video).
c
Menu button — This button navigates through the primary configuration menus of the SME 100.
d
Next button — This button navigates through the configuration submenus of each primary menu.
e
LCD display — This display shows the device settings and menu configuration information.
f
Adjust knobs — These are used with the Menu and Next buttons to adjust the settings of the configuration menus.
NOTE: The front panel buttons on the SME 100 can be locked so that configuration using the front panel is not
possible. Refer to the SME 100 User Guide for more information.
Configuring the Network Settings of the SME 100 Using the Front Panel
The SME 100 contains several primary configuration menus and one hidden menu that are available on the front panel
LCD display. In order to access the web-based user interface of the SME 100, the network settings may need to be configured.
The SME 100 is pre-configured with the following network settings:
IP address:
192.168.254.254
Subnet mask:
255.255.0.0
Gateway address: 0.0.0.0
NOTE: With these settings, the control PC and viewing devices must use IP addresses within the range of 192.168.0.1
through 192.168.254.253 and use the same subnet mask.
Use the following procedure to configure the network settings of the SME 100, if necessary.
1.
Press the Menu button repeatedly until the View Comm Settings menu is shown on the LCD display.
2.
Press and hold the Next and Input 3 button simultaneously
for approximately three seconds. This changes the View
Comm Settings menu to the Edit Comm Settings menu.
3.
Press the Next button repeatedly to cycle to the IP address
(IP), subnet mask (SM), and default gateway (GM) submenus.
4.
Change the IP address, subnet mask, and default gateway as
necessary (default values shown).
To configure the addresses:
z
Cycle to the desired octet by rotating the left Adjust
knob (
[
).
z
Adjust the value of the octet by rotating the right Adjust
knob (
{
).
5.
Save the network settings by pressing the Menu button. The
network settings of the SME 100 are now configured.
Next
Next
Next
Next
Next
+
Input 3
Next
Next
EDIT COMM
SETTINGS
DHCP MODE
SERIAL PORT
9600 RS232
I
P
VIEW COMM
SETTINGS
Change Value
Valid addresses
are 0 – 254.
DHCP Mode
Turn DHCP
on or off.
Select
Octet
S
M
G 000.000.
M 000.000
Change Value
Valid addresses
are 0 – 255.
Select
Octet
Change Value
Valid addresses
are 0 – 254.
Select
Octet
255.255.
000.000
192.168.
254.254
Baud Rates
300 600
1200 1800,
2400 4800 9600 (default),
19200 38400 57600 115200