Bell & gossett – Bell & Gossett V02300D ThermoMate Thermostatic Control Valves User Manual
Page 4
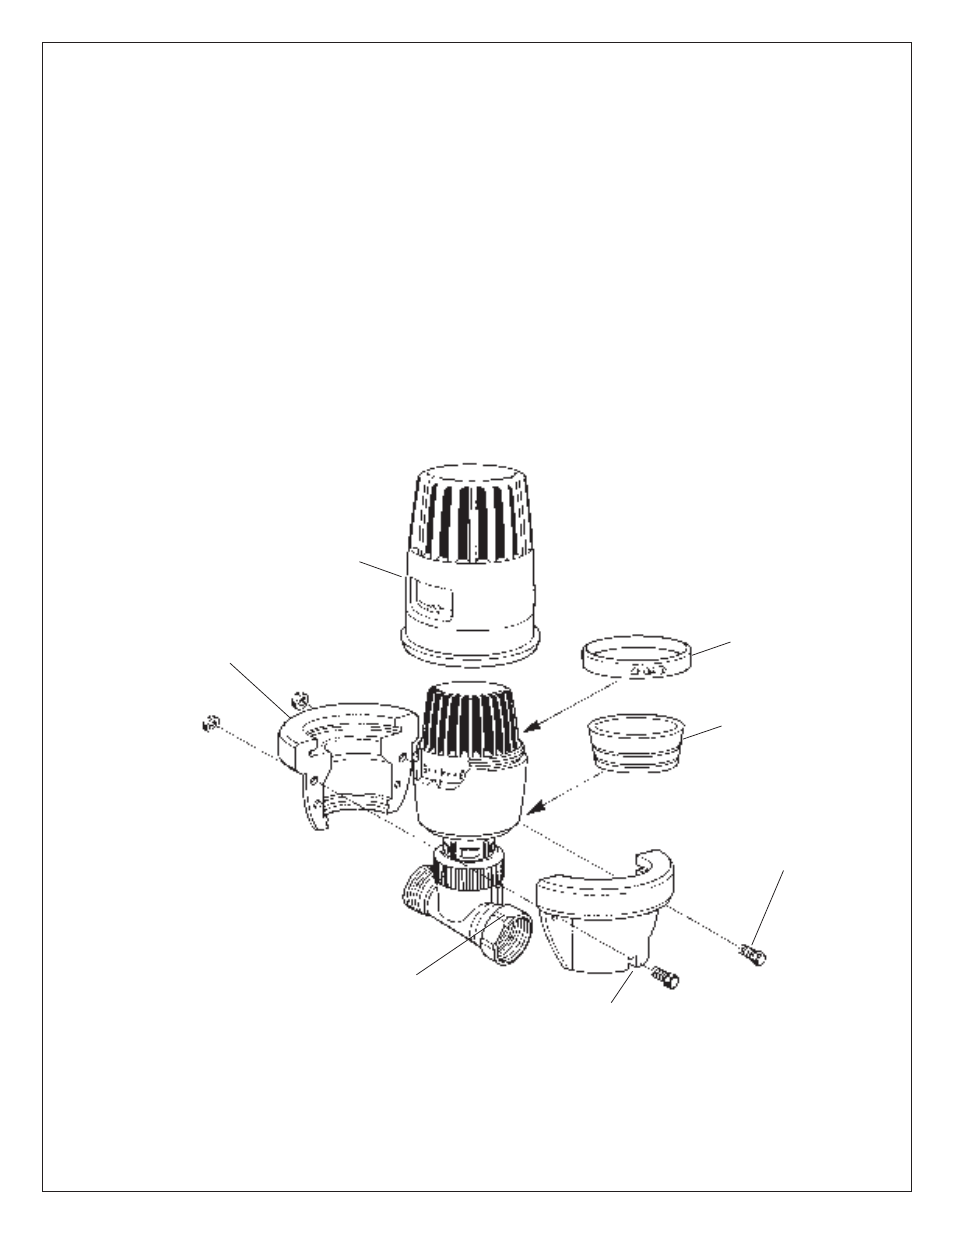
SCREW
VALVE BOOT
NOTCH
RETAINING
COLLAR
TAMPER PROOF COVER
SHROUD
NIGHT
SET BACK
RING
For further information, contact Bell & Gossett, 8200 N. Austin Avenue, Morton Grove, IL 60053,
Phone (847) 966-3700 – Facsimile (847) 966-9052.
PRINTED IN U.S.A. 8-95
Bell & Gossett
Morton Grove, IL, U.S.A.
INSTALLATION INSTRUCTIONS
FOR TAMPER PROOF COVER (See Fig. L)
1. Remove the night set back ring and the shroud from the
operator. The set back ring is removed by pulling it up and
the shroud is removed by pulling it down. To remove the
shroud operator must be removed from the valve body.
2. Mount the operator on the valve body and set to desired
temperature. If it is desired to lock the set temperature
refer to Section 4 under operating instructions.
3. Place the tamper proof cover over the operator so that the
window lines up with the temperature scale.
4. Place the tamper proof cover retaining collar halves over
the valve body, operator nut and tamper proof cover lip.
Notch in retaining collar must be fitted over lug on valve
body.
5. Hold the two halves of the retaining collar together and
lock in place with two supplied screws. Two sets of screws
are supplied. A standard set of machine screws and a set
of screws which require drilling out to remove if you want
to make it more difficult to remove tamper proof cover.
OPERATING INSTRUCTIONS
WITH TAMPER PROOF COVER
Once tamper proof cover is installed changes in temperature
setting can only be made by removing cover.
SERVICE INSTRUCTIONS
WITH TAMPER PROOF COVER
1. The tamper proof cover can be removed to service the
valve or the operator by removing the two screws holding
the two halves of the retaining collar together and then
removing the cover by pulling it up. If the permanent type
screws were used, they will have to be drilled out to remove
the retaining collar.
2. To complete the servicing of the ThermoMate refer to the
service instructions elsewhere in this manual.
FIG. L