AVSL 153.624 ROPE LIGHT POWER CABLE User Manual
Page 2
155.040
MONTAGEVOORSCHRIFT VOOR HET
AANKOPPELEN VAN DE VOEDINGSKABEL
AAN GLAMOUR LIGHT
WAARSCHUWING!
Overtuig u ervan dat de lichtslang spanningsloos
is, alvorens te beginnen met de montage.
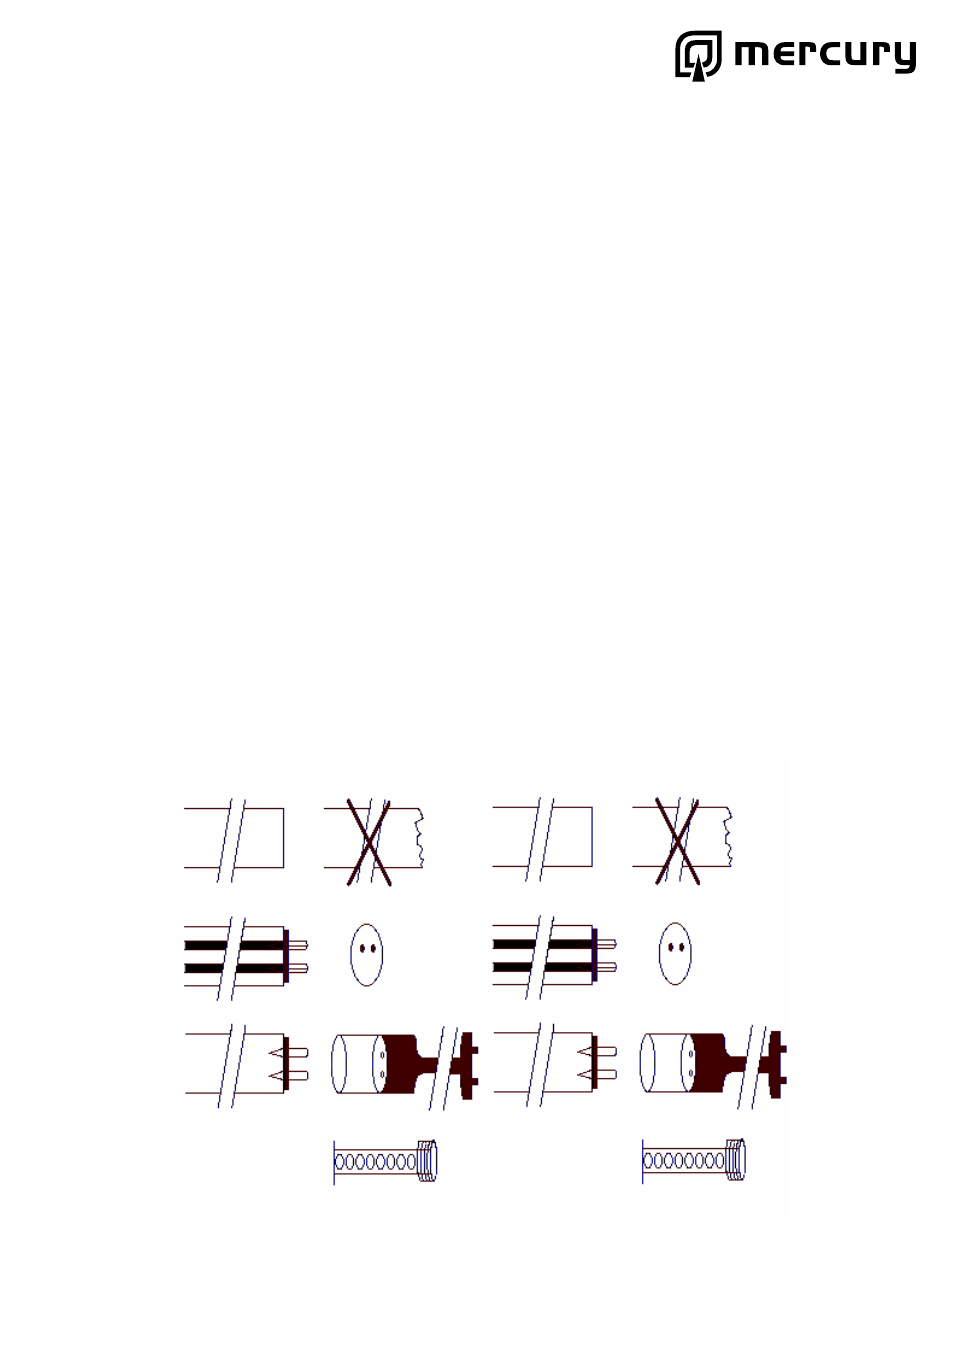
MONTAGE:
1. De lichtslang alleen doorknippen bij het
merkteken. Gebruik een scherpe snijtang en zorg
voor een gladde- en haakse snede! (Afbeelding
1).
2. Druk de connector met de scherpe pennen in
de slang en zorg dat de pennen in het centrum
van de aders zitten (Afbeelding 2). Let er op dat u
dit op de juiste wijze doet, aangezien de aders
zich excentrisch in de slang bevinden (Afbeelding
3). De connector moet nu in lijn zijn met de slang.
3. Test nu of de ronde pennen in het aansluitblok
passen (Afbeelding 4 en 5). Breng vervolgens
over een lengte van 2 cm lijm aan op de slang en
druk deze in de huls. Let op dat de pennen over
de volle lengte in het aansluitblok zitten. Laat de
lijm 10 minuten drogen alvo rens verder te gaan.
4. Monteer de bijgeleverde eindkap met de
daarvoor bestemde lijm op het einde van de
lichtslang (Afbeelding 6).
MOUNTING INSTRUCTIONS TO CONNECT
THE POWER CABLE AT GLAMOUR LIGHT
WARNING!
Disconnect the power supply when working on
the rope light!
MOUNTING:
1. Cut the “rope light” only at the sign. Be sure to
use a sharp cutter and make a clean and straight
cut (Picture 1).
2. Push the connector with the sharp pins into the
rope light and be sure that the pins are in the
centre of the wires (Picture 2). Pay attention to do
this the right way for the position of the wires is
excentric in the rope light (Picture 3). The
connector has now to be in line with the rope light.
3. Check if the round pins and the socket fit
together (Picture 4 and 5). Continue to add the
glue lengthwise about 2 centimetres at the rope
light and push the tube into the pvc-socket. Be
sure that the pins are fully connected with the
socket. Let the glue dry for about 10 minutes
before proceeding.
4. Install the joint end cap with the special glue at
the end of the rope light (Picture 6).
1.
2.
3.
4.
5.
6.