Pro Series 51178 51 Receiver User Manual
Installation instructions, Figure 1, Part numbers
Installation Instructions
Toyota Avalon, Camry, Solara
Lexus ES300, ES330
Part Numbers:
51178
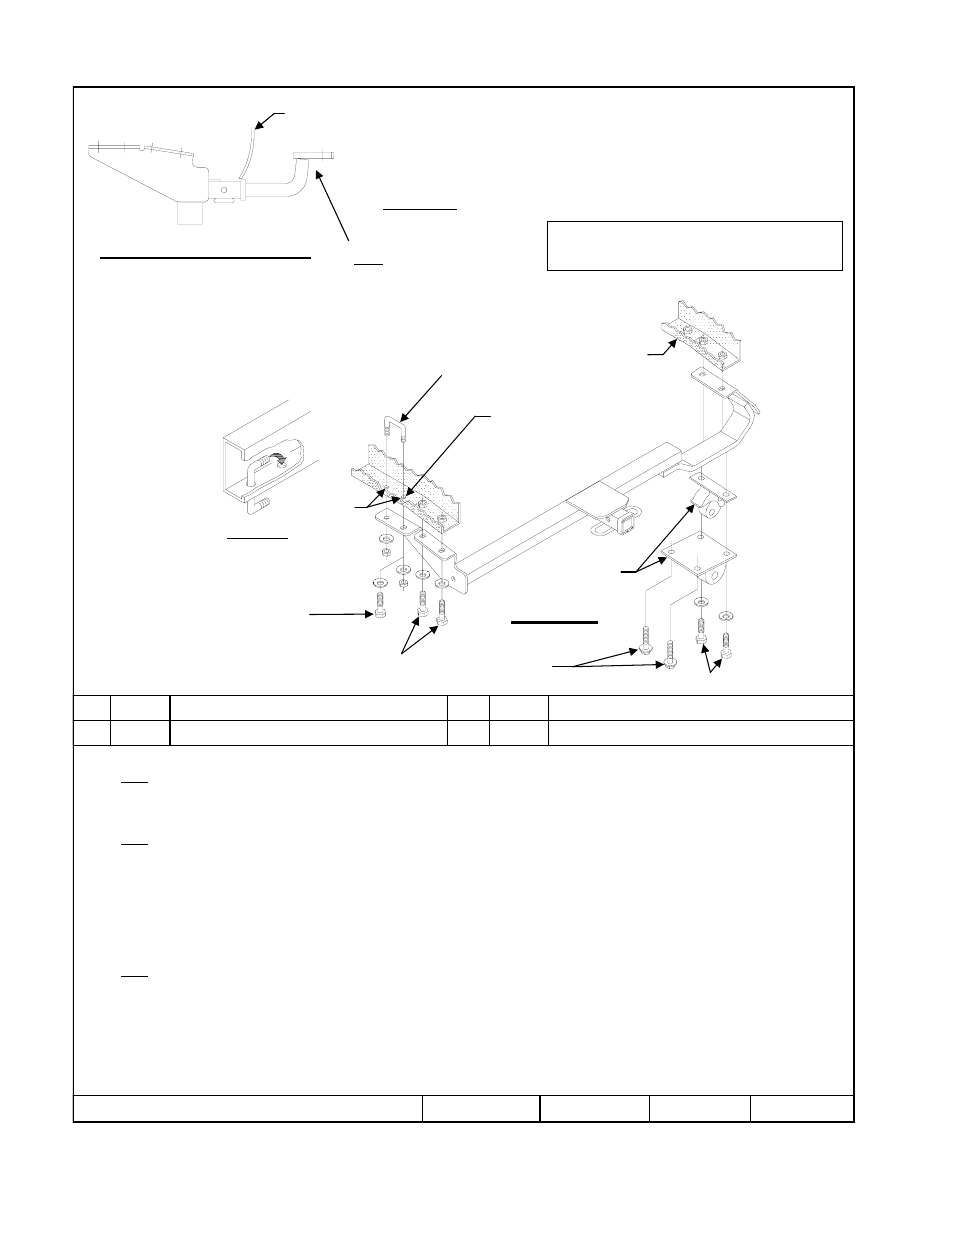
Hitch Shown In Proper Position
Wiring Access Location: PC3, PC4
Equipment Required:
Wrenches: 14mm, 17mm, 11/16”
Drill Bits: ½”
1.
If present, remove tie down brackets and bolts from each side of vehicle frame. Return to vehicle owner.
Note: On vehicles with muffler hanger bracket welded to passenger’s side tie-down bracket, the tie-down/muffler hanger will be re-attached
with hitch in step 3.
2.
On vehicles with muffler hanger bracket bolted to bottom of frame rail on passenger’s side, remove bolts which attach bracket to frame.
3.
Raise hitch into position and install (4) M10 bolts and conical toothed washers as shown in Figure 1.
Note: For vehicles with a muffler mounting bracket bolted to bottom of frame rail or a tie-down with the muffler mounting bracket welded on,
hitch will be sandwiched between frame rail and these components.
- For (2) bolt exhaust hanger configuration, install (2) M10 bolts and conical toothed washers supplied with hitch as
shown in Figure 1.
- For (4) bolt exhaust hanger configuration, install (2) M10 existing bolts (retained in Step 1) and (2) M10 bolts and
conical toothed washers supplied with hitch as shown in Figure 1.
4.
If existing weldnut is present in location shown above, omit U-Bolt and use existing weldnut and optional fastener.
5.
For vehicles without weldnut, use hitch as template and drill (2) ½” holes in vehicle frame as shown in Figure 1.
6.
Insert U-Bolt as shown in Figure 2. Install conical toothed washers and 3/8” hex nuts.
Note: On twin tip exhaust models, exhaust clearance can be increased by loosening (2) set screws on each chrome exhaust tip and removing
chrome tip. Return tips to customer for reinstallation upon removal of hitch.
Tighten all 3/8-16 U-Bolt nuts with torque wrench to 25 Lb.-Ft. (34 N*M)
Rev. A
8-27-09
51178N
Sheet 1 of 3
z
2009 Cequent Performance Products
Hex Bolt M10 x 1.25 x 30mm CL8.8
Qty. (5)
4
Conical Toothed Washer 3/8”
Qty. (6)
2
Hex Nut 3/8-16
Qty. (2)
3
U-Bolt 3/8-16
Qty. (1)
1
Tighten all M10 x 1.25 CL8.8 fasteners with torque wrench to 38 Lb.-Ft. (52 N*M)
Note: check hitch frequently, making sure all fasteners and ball are properly tightened. If hitch is removed, plug all holes in trunk pan or other body panels to
prevent entry of water and exhaust fumes. A hitch or ball which has been damaged should be removed and replaced. Observe safety precautions when working
beneath a vehicle and wear eye protection. Do not cut access or attachment holes with a torch.
This product complies with safety specifications and requirements for connecting devices and towing systems of the state of New York, V.E.S.C. Regulation V-5
and SAE J684.
3500 LB (1589 Kg.) Max Gross Trailer Weight
300 LB (136 Kg.) Max Tongue Weight
Do Not Exceed Lower of Towing Vehicle
Manufacturer’s Rating or
Drawbar must be used in the
RISE position only.
Drawbar Kit:
36061
Fastener Kit: 51178F
Form F206 Rev A 5605
Fascia
Frame
Note: If existing weldnut is
Present omit U-Bolt and
Use optional fastener
Exhaust Hanger
(Avalon)
Existing Bolts
Drilled
Holes
123
42
Figure 1
Figure 2
42
42
Optional
Fastener