Derale Performance 4" High Output Paddle Blade Electric Puller Fan User Manual
Engine, Diagram #2, Diagram #1
KIT CONTENTS
QTY.
DESCRIPTION
1
Electric Fan Assembly
4
Mounting Rod
4
Mounting Clip
4
1x1 Foam Pad
Please read these instructions completely before beginning installation
TOOLS NEEDED
Standard Screw Driver
12V Test Light
Wire Stripper
Crimping Tool
Dyke Pliers
16104-16105-InstructionSheet
INSTALLATION INSTRUCTIONS
H.O. EXTREME ELECTRIC FAN KIT
PART # 16104 & 16105
IMPORTANT
This fan assembly is designed for PULLER (engine
side) applications only.
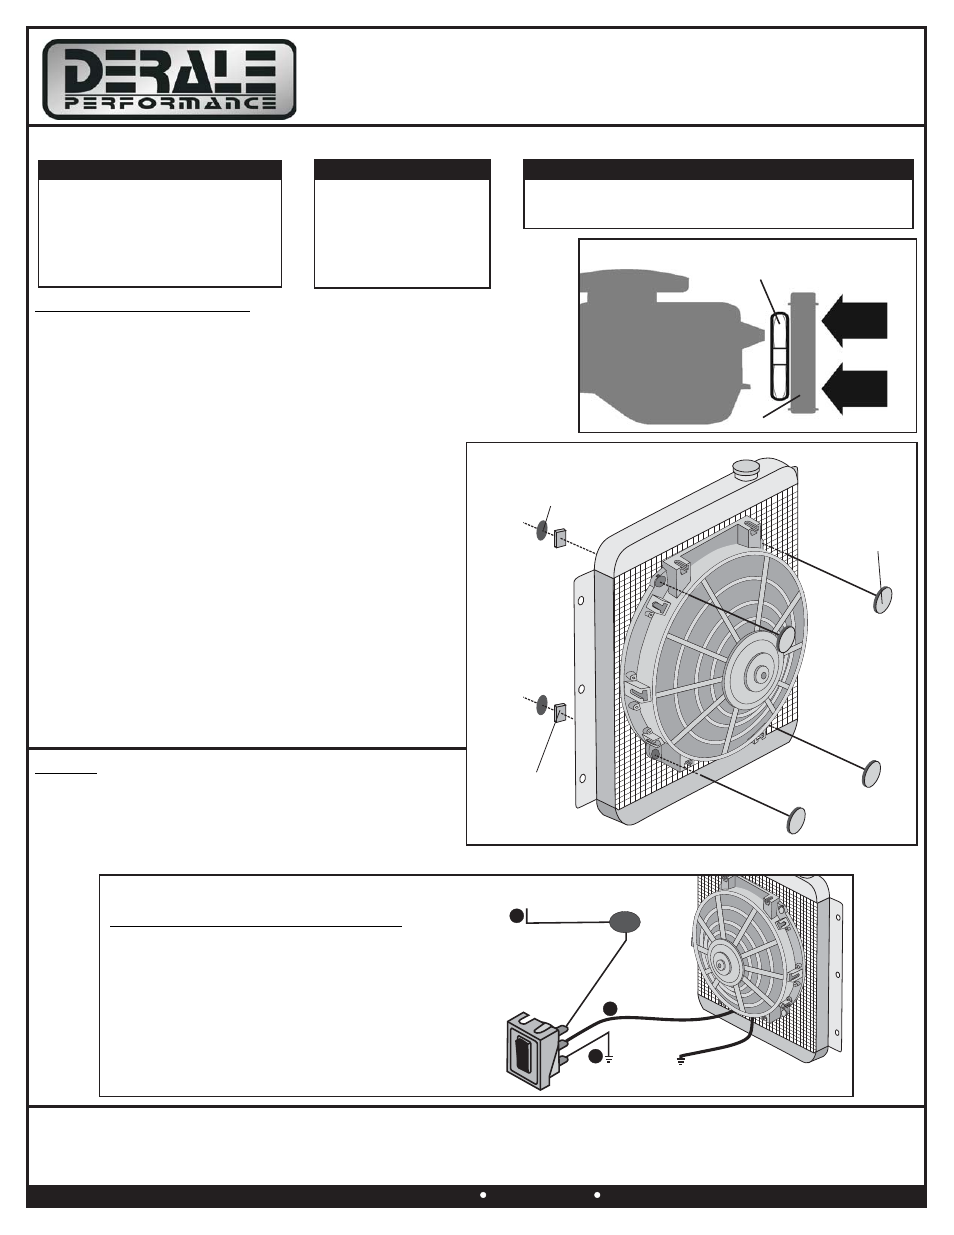
ELECTRIC FAN MOUNTING
Note: This Electric Fan Assembly requires 4 mounting positions.
(See Diagram #2)
1.
Position the electric fan against the radiator in the desired
location.
2.
Take the Plastic Rods provided and install through the
mounting holes on the shroud pushing them slowly into and
through the radiator core.
(Part# 16105 requires 3 mounting positions).
Caution: Do not use excessive force when pushing
Plastic Rods through radiator core. Excessive force
could cause damage to the radiator fins and/or core.
Plastic Rods should not be inserted thru both the
radiator and the condenser cores.
3.
Take the 1 x 1 Foam pads provided and install them
onto the Plastic Rods now protruding through the
radiator core.
4.
Take the Plastic Clips provided, making sure they are in
the correct direction (Derale writing out) install onto the
Plastic Rods and cinch them until the 1 x 1 Foam Pads
are compressed.
5.
Cut off the excess Plastic Rod.
Diagram #1
Engine
Puller Fan
Air Flow
Radiator
WIRING
This fan is designed for use on a 12V system. It can
be used as a puller fan with the wires configured as
indicated below.
Positive 12V Wire (+): Blue (Part # 16110: Blue)
Negative Wire (-): Black
20 Amp Fuse
12V (+) Switched
Ignition Source
Chassis
Ground
3
Positive (+)
Electric Fan
2
1
Chassis
Ground
TYPICAL MANUAL SWITCH WIRING
MANUAL SWITCH AND ELECTRICAL
COMPONENTS NOT INCLUDED.
Important: Before beginning reference the
Product Label on the Electric Fan for the factory
fan configuration and Positive fan lead color. If you
wish to configure the Electric Fan opposite of the
factory setting, the Positive (+) and Negative (-)
Electric Fan leads MUST be switched.
Warning: Installation of accessories should only be undertaken by those with mechanical knowledge and are familiar with working on
vehicles. Always use eye protection (goggles, safety glasses or shield). Park the vehicle in a well lit area, on level ground and apply the
parking brake. Only work on a cold vehicle that has been sitting overnight, failure to do so will result in severe burns and injury. Before starting
the vehicle, make sure no tools or any other items are left under hood that could interfere with or be drawn into moving parts of the engine.
Failure to follow instructions can lead to severe damage and personal injury.
Derale Performance, Los Angeles, CA
800.421.6288 www.derale.com
Diagram #2
Mounting Clips
1 x 1
Foam
Pads
Mounting
Rods