Assembly montaje assemblee – BabyTrend JG99773 - RANGE JOGGER - MILLENNIUM User Manual
Page 6
Copyright © 2013, Baby Trend Inc., All Rights Reserved. Todos los derechos reservados. Tous droits réservés.
Copyright © 2013, Baby Trend Inc., All Rights Reserved. Todos los derechos reservados. Tous droits réservés.
10
9
• Alinee el guardabarros delantero y presiónelo
en el armazón delantero. (Fig. 7c)
• Introduzca los 4 tornillos por debajo del
armazón delantero en los tubos plásticos del
guardabarros delantero. Ajuste bien los tornillos
sin forzarlos. (Fig. 7d)
NO AJUSTE DE MÁS.
• Examiner le bas du pare-chocs. Vous remarquerez
cinq tubes de plastique de 1/4 de pouce de
diamètre qui saillent de la base. (Fig. 7a)
• Ces tubes doivent être alignés avec les
trous du cadre avant. (Fig. 7b)
• Aligner le pare-chocs et presser
sur le cadre avant. (Fig. 7c)
• Insérer les 5 vis à travers le dessous du cadre
avant et dans les tubes en plastique du pare-
chocs. Tourner les vis seulement jusqu’à bien
serré. (Fig. 7d)
NE PAS TROP SERRER.
To remove, reverse the above steps.
Para remover, seguir los pasos al revez
Pour enlever, renversez les étapes ci-dessus.
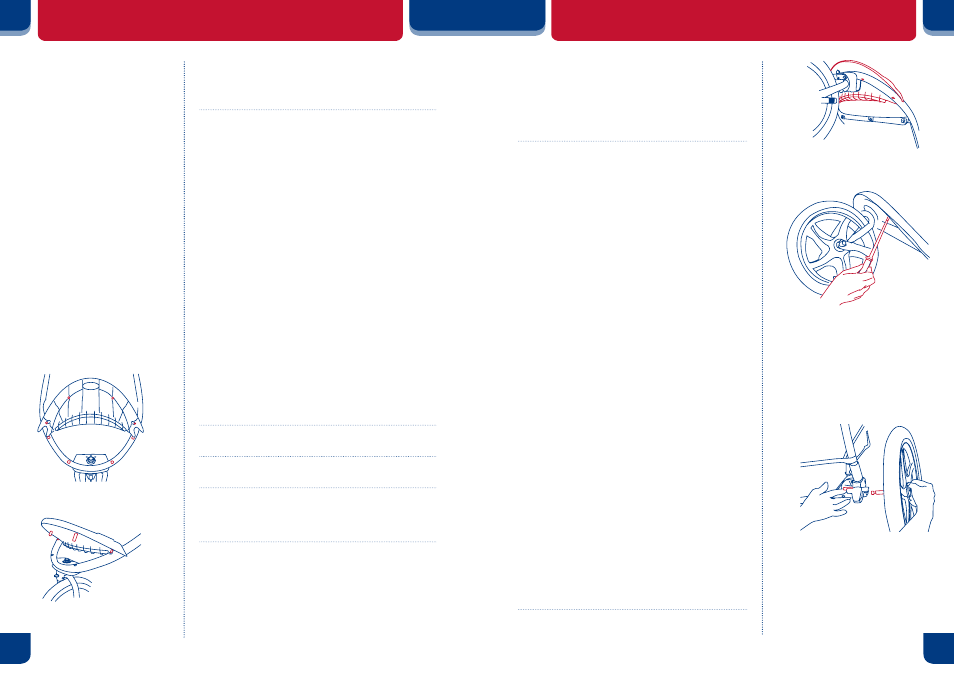
REAR WHEEL
RUEDA TRASERA
ROUES ARRIÈRES
• Lean the stroller forward to rest on the front wheel.
To attach the rear wheels, push each wheel’s
axle into the plastic corner fitting as shown in
Fig. 8. Depress the metal lever on the inside
of the corner fitting as you push the axle into
corner fitting. When the wheel will not go on any
farther, release the lever. Check that the wheel
has locked into the corner fitting by pulling on
the wheel. If not locked, lift upward on the lever,
push the wheel on farther and release lever.
• Ensure that the wheels are firmly locked
into place.
NEVER
use the stroller if the
wheels are not locked into place, contact our
customer service department immediately
at 1-800- 328-7363, between the hours of
8:00am and 4:30pm PST, for assistance.
• Incline el carrito hacia delante de modo que se
apoye en la rueda delantera. Para colocar las
debajo del reposapiés al frente del carrito.
Puede usar una llave inglesa estándar para
ajustar la tuerca.
NO AJUSTE DE MÁS.
ya
que podría dañar la arandela. (Fig. 6)
• Si la roue avant oscille au-delà de ce qui est
normal lors de l’utilisation pour la marche ou le
jogging, vous devrez peut-être ajuster l’écrou
de la roue avant. Cet écrou est situé sous le
repose-pied situé à l’avant de la Poussette. Vous
pouvez utiliser une clй а molette pour serrer
l’écrou.
NE PAS TROP SERRER.
Cela pourrait
endommager le logement de la roue avant. (Fig 6.)
FENDER INSTALLATION / REMOVAL
INSTALAR / REMOVER EL
GUARDABARROS
PARE-CHOCS INSTALLATION / RETRAIT
To secure the fender to the frame, use the 4 screws
provided.
Para sujetar el guardabarros al armazón,
use los 4 tornillos provistos.
Pour attacher le pare-chocs au cadre, utilisez
les 4 vis fournies.
• Examine the bottom of the front fender. You
will notice four 1/4 inch diameter plastic tubes
protruding from the bottom. (Fig. 7a)
• These tubes must be lined up with the holes
in the front frame assembly. (Fig. 7b)
• Line up the front fender and press onto
the front frame assembly. (Fig. 7c)
• Insert the 4 screws through the underside of
the front frame assembly into the front fender's
plastic tubes. Tighten the screws only until
snug. (Fig. 7d)
DO NOT OVER TIGHTEN.
• Examine la parte inferior del guardabarros
delantero. Notará cuatro tubos plásticos
de ¼ pulgada de diámetro que sobresalen
de la parte inferior. (Fig. 7a)
• Estos tubos deben estar alineados con los
agujeros del armazón delantero. (Fig. 7b)
ASSEMBLY MONTAJE ASSEMBLEE
ASSEMBLY MONTAJE ASSEMBLEE
7)
Fig. 7a
Fig. 7b
Fig. 7c
Fig. 7d
8)
Fig. 8