Rough Country 510.20 User Manual
Page 3
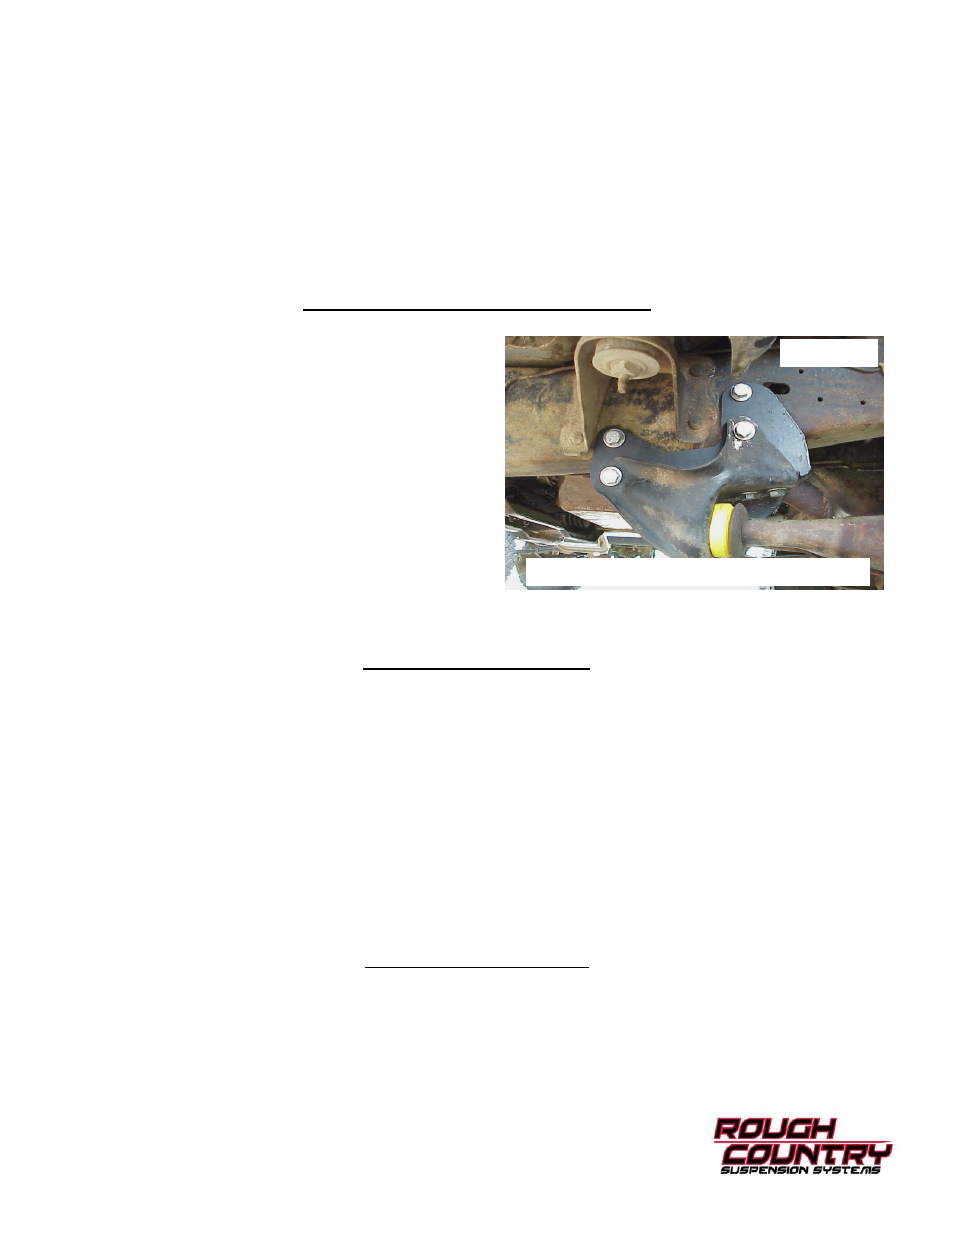
RADIUS ARM DROP BRACKET INSTALLATION
1. Make sure to support the frame rail and have a floor jack
under the axle lightly supporting the axle weight.
2. Drill or chisel off frame rivets holding on stock radius arm
brackets. ( 3 on each bracket) and remove stock bolts.
Loosen (1 1/8”) radius arm nut. Save original brackets
as they will be used later.
3. Check your radius arm bushings for wear and replace if
needed.
4. Install new radius arm drop brackets between frame and
original radius arm bracket. Drill all holes out to ½” and
use new ½” x 1 ½” bolts washers and nuts. See PHOTO
3.
5. Tighten all fasteners.
REAR BLOCK INSTALLATION
1. Raise the rear of the vehicle with a floor jack. Support the frame with jack-stands.
2. Disconnect the axle vent tube (if so equipped).
3. Remove the lower shock hardware and retain for later use. Remove the u-bolt hardware and u-bolts. Raise or
lower the axle as necessary to clear it from the rear springs. Do not allow the drive shaft to slip out.
4. Install the new lift blocks between the axle and the stock blocks. Thick end of the block should be placed to the
center of the vehicle. Jack the axle up to meet the blocks. Be sure to properly realign the center-pin when reas-
sembling the rear axle assembly.
5. Reconnect the vent hose and install the Rough Country u-bolts, nuts and washers. Torque the u-bolts to 75 to 90
ft./lbs.. NOTE: It may be necessary to enlarge the holes in the spring plate for u-bolt installation.
6. Lower vehicle to the ground and install shocks. The rear shock number is #650328 (8113). Install bushings and
sleeves
REAR SPRING INSTALLATION
1. Chock the front wheels.
2. Place the vehicle on jack stands and remove the tires and wheels. Remove the shock absorbers.
3. Remove
the
u-bolts.
4. Remove the spring eye bolts and remove the leaf springs.
5. Install the new rear lifted springs, install the eye bolts.
6. Install the new u-bolts and torque nuts to 100 ft/lbs.
7. Install the new shock absorbers and torque bolts to factory specifications and install the tires and wheels.
8. Remove the jack stands and lower vehicle to the ground.
15. Remove shock used to support beams earlier
16. With the jack positioned under the driver's side axle should he loaded slightly. Remove the coil springs upper retain-
ing clip then lower the lower retaining nut and washer. Install new coil spring. When lowering the axles for spring in-
stallation, take care not to overextend the factory rubber brake hoses. Torque upper clip(13-18), lower nut(30-70).
On some vehicles factory equipped with dual front shocks, keep the bottom of the coil pulled as far rearward as pos-
sible to gain clearance between coil and front shock
17. Repeat procedure on the passenger side.
18. Install shock both sides. The shock # 650330. (8108) Install the sleeves and bushings. This kit is packaged as-
suming a single shock set up. If dual shocks exist they are installed in front of the springs at this time.
Radius arm Shown in new Bracket
PHOTO 3