ASSISTANT AH-1085 User Manual
Autoset lcd radio clock, Operation manual
english
– 2 –
english
english
– 3 –
english
english
– 4 –
english
english
– 1 –
english
english
– 6 –
english
english
– 7 –
english
english
– 5 –
english
www.tiwell.com
www.assistant.ua
AUTOSET LCD RADIO CLOCK
Model AH-1085
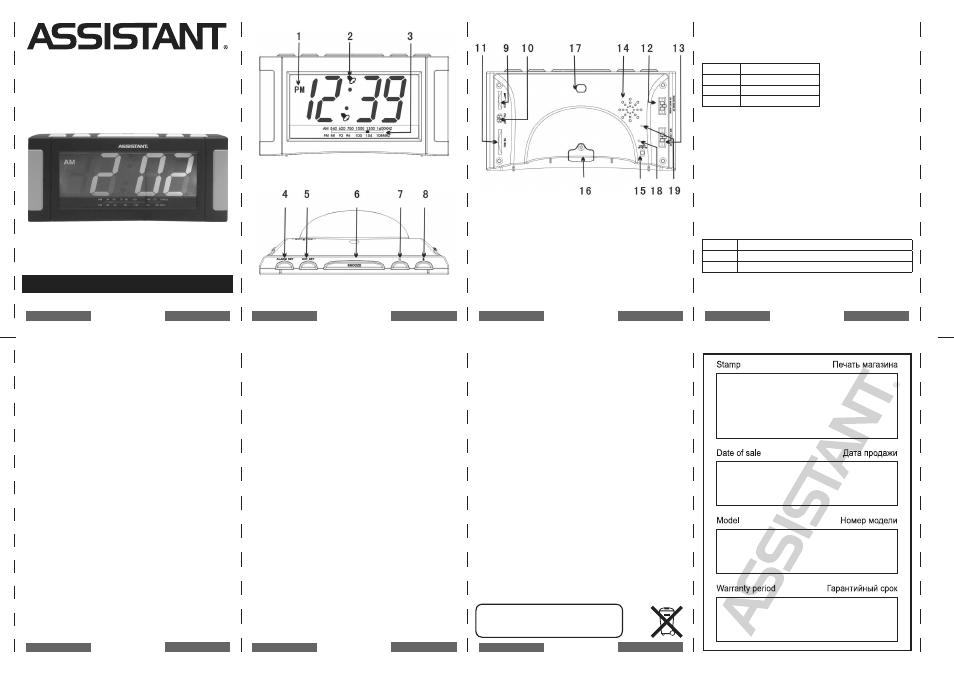
1. APPEARANCE
1. Pm indicator
2. Dual alarm indicator (al1 & al2)
3. am/Fm radio indicator
4. [ALARM SET] button
5. [DST SET] switch
6. [SNOOZE] Button
7. [-] Backward button / [AL2 ON/OFF] button
8. [+] Forward button / [AL1 ON/OFF] button
9. Radio [VOLUME] rotator
10. [AM/FM] radio switch
11. [RADIO TUNING] switch
12. [RADIO ON/WAKE UP] switch
13. [TIME ZONE] switch
14. speaker hole
15. ac/Dc 9V Power Jack
16. Backup battery cell
17. auto dimmer sensor
18. Fm antenna
19. [RESET] key
2. TIME ZONE SELECTION
slide the [TIME ZONE] switch to the appropriate time zone in
which you live. the default time zone is cet
see table below:
wet
Gmt 0 hour
cet
Gmt +1 hour
eet
Gmt +2 hour
msK
Gmt +3 hour
3. HOW TO OPERATE THE CLOCK
when the clock is plugged in, the correct time will be
displayed after a few seconds. the clock will automatically
indicate the Pm time. Press & hold [+] button for 2 seconds to
switch 12/24 hour format.
4. SETTING DAY-LIGHT SAVING TIME (DST)
the clock has Dst in the Dau position as the default. to change
the Dst to on/off, press the [DST SET] button once and either
“don” (Dst is on) or “dof” (Dst is off) appears. in a few seconds
the time will be displayed. Do not change this setting unless you
live in an area which does not observe or with different Daylight
saving time change.
DST table:
Dau
change Dst scheme automatically
Don
Dst + 1 hour manually
DoF
Dst 0/-1 hour manually
DST Auto adjustment Scheme:
start: last sunday in march
end: last sunday in october
5. WAKE UP TO RADIO OR ALARM
slide the [RADIO ON/WAKE UP] switch to radio or alarm. the
alarm will sound by radio or beep according to the selection.
6. SETTING THE ALARM
to set the alarm, press the [ALARM SET] button once, press
either [+] for alarm 1 or [-] button for alarm 2 setting. the hour
digit begins to flash, press either [+] or [-] button to choose the
correct hour (Be sure that the am/Pm indicator is correct). Press
the [ALARM SET] button again and press either [+] or [-] button
to choose the desired minute. Press the [ALARM SET] button
once again to confirm and return to normal mode.
7. DISPLAY THE DESIRED ALARM TIME
Press the [SNOOZE] button during normal mode to see alarm
times.
8. OPERATE THE ALARM AND SNOOZE
once the desired alarm time has been entered, press [+] ([AL1
ON/OFF]) or [-] ([AL2 ON/OFF]) button to activate the alarm
function which is indicated by a bell on the display panel. the
alarm will sound at the alarm time set. when the alarm sounds,
press the [SNOOZE] button to get an extra 10 minutes of sleep.
the snooze repeats unlimited. Press the [ALARM SET] button to
stop al1/al2 and repeat at next day. to turn the alarm function
off, press the [AL1 ON/OFF] or [AL2 ON/OFF] button to disable
al1 or al2 icon on lcD. the alarm will not sound the next day,
if the bell icon is not displayed. Press the [SNOOZE] button to
check the alarm time at normal mode.
9. PLAYING THE RADIO
slide [RADIO ON/WAKE UP] switch to “Radio on” position,
slide [AM/FM] switch and then rotate [VOLUME] to a
comfortable listening level. Rotate [RADIO TUNING] to adjust
the desired channel shown on the front. to turn off the radio,
slide [RADIO ON/WAKE UP] switch to “wake up” position either
“wake up-Radio” or “wake up-alarm”.
Note: the am antenna is built-in. Rotate the clock radio for
the best am reception. the ac power cord also serves as the Fm
antenna. For the best Fm reception, fully extend the Fm antenna
wire.
10. AUTO-SET (REAL TIME) INCORRECT
if for some reason the real time is incorrect or lost, press and
hold [DST SET] button for 5-7 seconds, and the year will begin
to blink, then press [+] or [-] button to set the year. Press [DST
SET] button again, set the month by pressing [+] or [-] button.
Press [DST SET] button again set the day, again to set the hour
(be sure the am/Pm is correct), again to set the minute, and once
more to save all in the memory.
11. NO TIME DISPLAYED WHEN
PLUGGED INTO THE AC POWER
if the display is blank when plugged into the ac outlet, press
the [RESET] button once. in a few seconds, the display will be
on and time will show. now repeat the procedure above to reset
the auto-set memory. after you have completed the time setting
procedure, the time will be automatically saved in the clock.
12. AUTO-SET (REAL TIME) BACKUP
BATTERY REPLACEMENT
to maintain the auto-set feature and to recover the time
and date (does not include the alarm time), we recommend the
button cell battery be replaced approximately every 3 years. the
replacement battery is a cR2032 (3V) button cell battery that is
available at most stores that carry button cell batteries. when
changing the backup battery, ac power must be connected.
However, if you do lose the real time, please see the procedure
to reset the real time memory above.
13. AUTO DIMMER
the brightness of leD backlight is automatically adjusted
according to the amount of light in the room.
14. SPECIFICATIONS
Bands:
am 540 -1600 KHz
Fm 88 -108 mHz
Power Consumption
Power sources of clock/Radio:
Primary Power: ac/Dc 9V external adaptor
Battery Backup: Dc 3V cR2032 lithium button cell
specifications are typical; individual units might vary.
specifications are subjected to change and improve without
notice.
OPERATION MANUAL