ASSISTANT AH-1074 User Manual
Assistaistt, Jumbo display led alarm clock
Attention! The text in this document has been recognized automatically. To view the original document, you can use the "Original mode".
ASSISTAISTT.
JUMBO DISPLAY LED ALARM
CLOCK
Model AH-1074
O P E R A T I O N M A N U A L
-
1
-
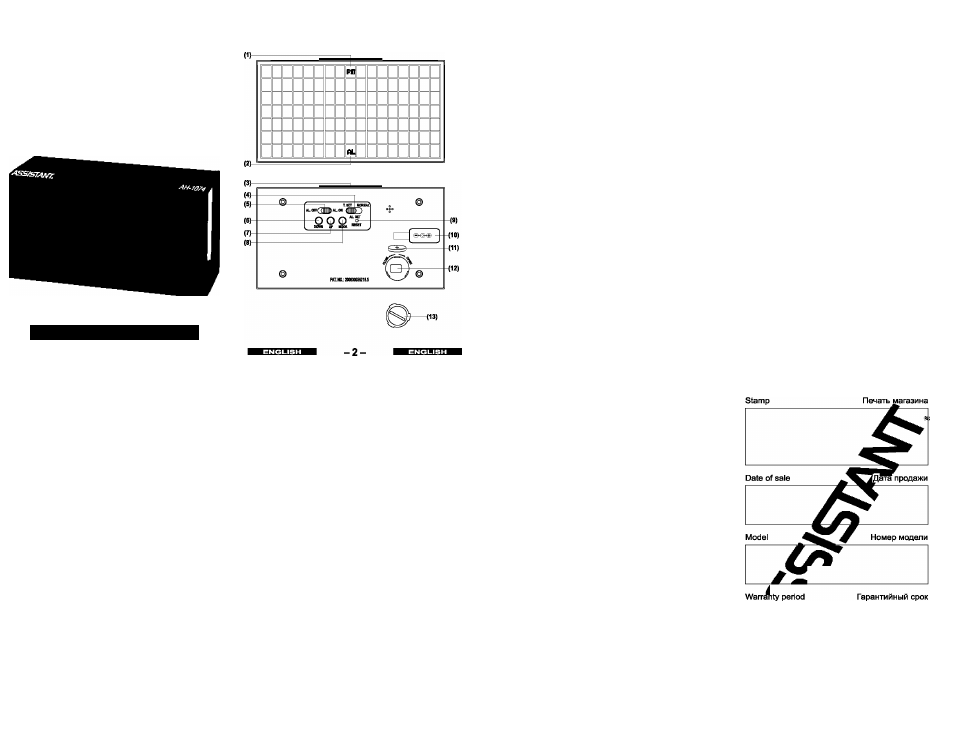
1. PM indicator
2. AL (ALARM) indicator
3. [SNOOZE] button
4. [FUNCTION] switch
5.
[ALARM
ON/OFF] switch
6. [DOWN] key
7. [UP] key
8. [MODE] key
9. [RESET] key
10. DC Jack
11. CR2032 button ceii (inciuded)
12. Button ceii compartment
13. Button Ceii cover
1 . FUNCTIONS
-Time
- Hidden Caiendar (Year, Month, Date)
- Snooze Aiarm
2. HOW TO SET
At first, connect the DC 6V adaptor to the DC
Jack 12. The dispiay wiii be on «12.00». Then open
-3-
the iNSTRUCTiON HOLDER to remove the ciear
insuiator in the Button Ceii compartment 14.
A. TIME SET:
- Move the
[FUNCTION]
switch 3 to «T. SET»
(TiME SET), hour part is biinking; press
[UP]
8 or
[DOWN]
key 9 to set the hour. (Be carefui to set
AM and PM correctiy. When the PM time is set
under 12-hour mode, a PM indicator 1 wiii be on
dispiay.)
- Press
[MODE]
key 7, minute part is biinking,
press
[UP]
8 or
[DOWN]
key 9 to set the minute.
- Press [MODE] key 7, second part is biinking,
press
[UP]
8 or
[DOWN]
key 9 to return to «00»
second. This step is to ensure setting the ciock
accurateiy.
- Press
[MODE]
key 7, the whoie dispiay (4 fig
ures) is biinking, it stands for year (the initiai year
is 2006); press
[UP]
8 or
[DOWN]
key 9 to set the
year (from 2000-2099).
- Press
[MODE]
key 7, month part is biinking,
press
[UP]
8 or
[DOWN]
key 9 to set the month.
- Press
[MODE]
key 7, date part is biinking, press
[UP]
8 or
[DOWN]
key 9 to set the date.
-4-
- Move the
[FUNCTION]
switch 3 to «NORMAL»,
the time & caiendar settings are finished.
B. SNOOZE ALARM SET:
- Move the
[FUNCTION]
switch 3 to AL. SET
(ALARM SET), hour part is biinking, press
[UP]
8
or
[DOWN]
key 9 to set the aiarm hour. (Be carefui
to set AM or PM correctiy.)
- Press
[MODE]
key 7, minute part is biinking;
press
[UP]
8 or
[DOWN]
key 9 to set the aiarm
minute.
- Press
[MODE]
key 7 again, the snooze intervai
minute is biinking; here you can set snooze intervai
from 1 minute 60 minutes by pressing
[UP]
8 or
[DOWN]
key 9. You can ignore this step, the defauit
snooze intervai is 5 minutes.
- Move the
[FUNCTION]
switch 3 to «NORMAL».
The snooze aiarm setting is finished.
C. TURN THE SNOOZE ALARM ON/OFF
Move the
[ALARM ON/OFF]
switch 5 to AL. ON
(ALARM ON), an AL (ALARM) indicator 2 wiii be
on dispiay. That means the snooze alarm function
is activated. When the set aiarm time is set up, the
aiarm sound starts.
-5-
a) Press
[SNOOZE]
key 6, the ciock wiii stop
aiarm temporariiy; the aiarm sound wiii start again
after snooze intervai ends. After doing so four times
repeatediy, the snooze function wiii stop working.
b) if there is no man-made stop, the ciock wiii
aiarm iasting 1 minute every snooze intervai, four
times totaiiy. After that, the snooze aiarm function
stops working.
c) Press any key except of «SNOOZE», the
snooze aiarm function wiii stop working.
d) Move the
[ALARM ON/OFF]
switch 5 to
«AL. OFF» (ALARM OFF), the snooze aiarm func
tion wiii stop working tiii the
[ALARM ON/OFF]
switch 5 is moved to «AL. ON».
3.12/24 HOUR MODE
Under normai state, press
[DOWN]
key 9 to seiect
12 or 24 hour mode.
4. HOW TO READ ALARM TIME,
MONTH AND DATE
Under normai state, press
[SNOOZE]
key 6
first time, you can see the set aiarm time; press
[SNOOZE]
key 6 second time within 3 seconds,
-
6
-
you can see month and date; press [SNOOZE]
key 6 again (or ieave it for 3 seconds), the ciock
wiii return to the normai working state.
5. RESET
if the clock is dead (the dispiay does not move)
during setting (s) or working, piease use a siim but
biunt object (iike baii pen pointer, toothpick etc.) to
press [RESET] key 4, then the ciock wiii return to
the initiai mode.
6. CLOCK BACK-UP
CR2032 button ceii 10 is to maintain ciock opera
tion in the event of biackout or other power faiiure.
Normaiiy, it can be used for 5 or 6 years, depending
on the frequency or duration of power faiiure.
7. MAINTAINCE
Piease use a soft doth or a paper towei to ciean
the ciock. Do not use any corrosive cieanser or
chemicai soiution on the clock.
Please keep the instruction paper inside of the
INSTRUCTION HOLDER for future use.
-7-
Made in China
Document Outline
- ASSISTAISTT.
- OPERATION MANUAL
- 1. FUNCTIONS
- 2. HOW TO SET
- 3.12/24 HOUR MODE
- 4. HOW TO READ ALARM TIME, MONTH AND DATE
- 5. RESET
- 6. CLOCK BACK-UP
- 7. MAINTAINCE
- СЕТЕВЫЕ ЧАСЫ
- NETZUHR
- LED ГОДИННИК