ASSISTANT AH-1083 User Manual
Led wall clock with remote control, Operation manual, Led-uhr mit fernsteuerung
3
2
1
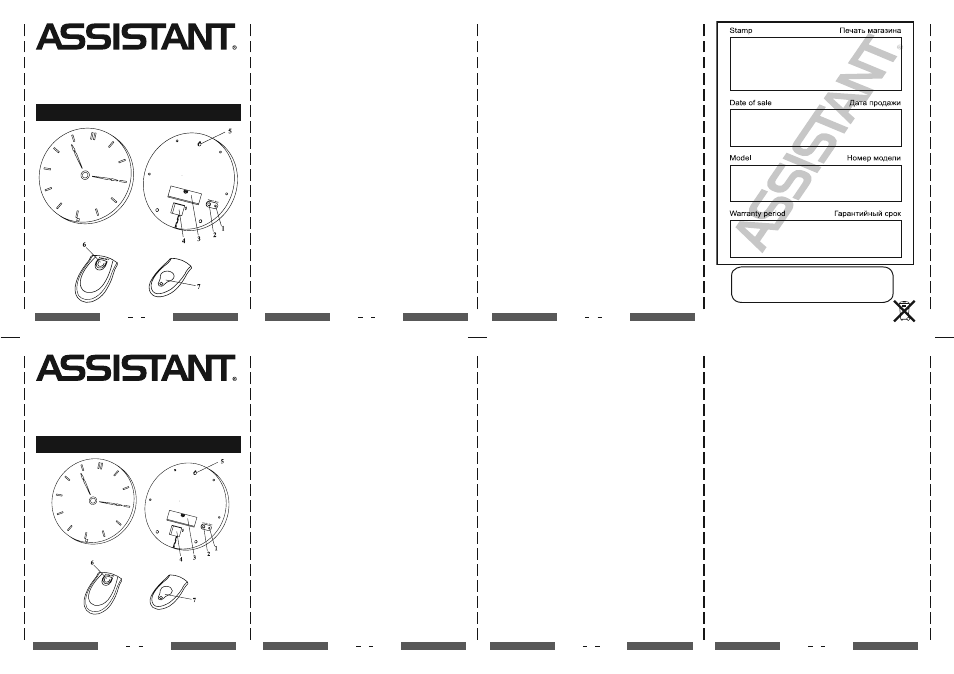
LED WALL CLOCK
WITH REMOTE CONTROL
Model AH-1083
CLOCK:
1. Reset button
2. Time Set button
3. Battery compartment
4. Power socket
5. Hanging Hole
REMOTE HAND-SET:
6. Time Set button
7. Battery compartment
SET THE TIME
Press the
[TIME SET] button (2) until the correct time
is set.
BATTERY BACK UP
Insert four “AAA” size batteries into the battery
compartment on the back-side of the clock. The
battery will hold the ALARM and TIME settings until
power is restored. If there is no battery and the power
is interrupted, the display will flash after AC power is
restore, the TIME will need to be reset.
BATTERY INSTALLATION FOR REMOTE
Unscrew the battery cover (7), insert one CR2032
button cell into the battery compartment and reinstall
the battery cover. If the unit does not work after being
used for a period of time, you may need to replace the
battery.
TO OPERATE REMOTE HAND-SET:
SET TIME
Press and hold the
[TIME SET] button (6) until the
correct time is set.
MAINTENANCE
A soft cloth or a paper towel may be used to clean
your clock. Do not use any corrosive cleanser solutions
on the clock. Keep the cloth clean and dry to avoid any
problems.
SAFETY INSTRUCTIONS
Do not expose this apparatus to rain or moisture.
No objects filled with liquids, such as vases, shall be
placed on the apparatus.
Ventilation
The appliance should be situated so that its location
or position does not interfere with its proper ventilation.
For example, the appliance should not be placed on
a bed, sofa, rug, or similar surface that may block the
ventilation openings; or, placed in a built-in installation,
such as a bookcase or cabinet that may impede the
flow of air through the ventilation openings.
The appliance should be situated away from heat
sources such as radiators, heat registers, stoves, or
other appliance (including amplifiers) that produce heat.
Disconnect from mains supply when not in use.
To avoid the risk of electric shock, do not remove the
cover of the apparatus.
There are no user serviceable parts inside.
Do not operate this product if the mains lead is
damaged.
The mains lead must be replaced by the manufacturer
or its appointed agent.
Please read the instruction manual before use and
retain for future reference.
The rating label is on the unit’s back.
During electro static discharge, the product may auto
reset then adjust the mode to return normal operation.
OPERATION MANUAL
ENGLISH
ENGLISH
ENGLISH
ENGLISH
4
3
2
1
DAS DEUTSCHE
GERMAN
DAS DEUTSCHE
GERMAN
DAS DEUTSCHE
GERMAN
DAS DEUTSCHE
GERMAN
LED-UHR
MIT FERNSTEUERUNG
Modell AH-1083
Uhr:
1. Resetknopf
2. Knopf der Zeiteinstellung
3. Batterienabteilung
4. Anschlussrosette für Kabel
5. Aufhängenloch
Fernsteuerungspult:
6. Knopf der Zeiteinstellung
7. Batterienabteilung
ZEITEINSTELLUNG
Drücken Sie den Knopf
[TIME SET] (2) solange, bis
genaue Zeit eingestellt wird.
ARBEIT MIT DEM PULT DER FERNSTEUERUNG
ZEITEINSTELLUNG
Drücken Sie den Knopf
[TIME SET] (6) solange, bis
genaue Zeit eingestellt wird.
Ein-Ausschalten des Weckers
BATTERIE DER RESERVEEINSPEISUNG
Legen Sie 4 Batterien “AAA” in die Batterienabteilung
auf der Rückseite der Uhr ein Die Batterien werden die
Einstellungen des Weckers ALARM und der Zeit TIME
so lange unterstützen bis die Einspeisung wiederher-
stellen wird. Wenn Batterie fehlt und Stromgebung
abgebrochen ist, flämmt der Bildschirm nach dem Wie-
derherstellung des Netzstromes auf, die Funktion Zeit
wird rückgesetzt.
BATTERIEEINLEGUNG FÜR FERNSTEUERUNG
Schrauben Sie den Deckel der Batterienabteilung (7)
ab, legen Sie eine Batterie CR2032 aus dem Batterie-
satz ein und montieren Sie den Deckel der Batterien-
abteilung.
Wenn die Anlage nach bestimmter Zeit nicht arbeitet,
braucht sie den Batterienwechsel.
WARTUNG
Für Uhrreinigung wird weiches Gewebe oder Papier-
bahn benutzt. Benutzen Sie keine aggressive Reini-
gungsmittel. Um keine Probleme zu haben, bewahren
Sie Gewebe im trockenen und reinen Zustand auf.
SICHERHEITSANWEISUNG
Vermeiden Sie das Eindringen des Regens oder der
Feuchtigkeit in die Anlage.
Die Gegenstände mit Flüssigkeiten lässt man nicht
auf der Anlage unterbringen.
Lüftung
Die Anlage soll so untergebracht sein, um ihre Lage
erforderliche Lüftung nicht stört. Zum Beispiel, die An-
lage soll nicht auf das Bett, das Sofa oder gleiche Ober-
fläche, welche die Luftöffnungen schliesst, aufgestellt
sein oder in den Bücherschrank oder den Raum, die
den Luftstrom durch die Lüftungöffnungen stören,
eingebaut sein.
Die Anlage soll weit von den Wärmequellen, solchen
wie Heizgeräte oder Heizkörper und andere Einrichtun-
gen (eingeschlossen Verstärker), die Wärme erzeugen,
untergebracht sein.
Wenn die Anlage nicht benutzt wird, soll sie ausge-
schaltet sein.
Nehmen Sie die Abdeckung der Anlage nicht ab, um
Risiko des elektrischen Unfalls zu vermeiden. Im In-
neren der Anlage gibt es keine Teile, die vom Benutzer
bediient werden.
Benutzen Sie diese Anlage nicht, wenn der Netzleiter
verletzt wird.
Der Netzleiter soll vom Hersteller oder vom ihm
bestimmten Vertereter ausgewechselt sein.
Lesen Sie bitte diese Anleitung vor dem Beginn der
Verwendung und bewahren Sie sie für weitere Arbeit
auf.
Die Kennzeichnung ist auf der Rückseite der Anlage
angeordnet.
Während der elektrostatischen Entladung kann
die Anlage automatisch rückgesetzt sein und in den
Normalbetrieb rüchgekehrt sein.
BETRIEBSANLEITUNG
ENGLISH
ENGLISH
Made in China
WWW.TIWELL.COM
WWW.ASSISTANT.UA