Installation, Daisy-chain installation – Tripp Lite B064-016 User Manual
Page 7
SIU
SIU
Cat5e/6 Cable
Cat5e/6 Cable
SIU
SIU
Cat5e/6 Cable
Cat5e/6 Cable
SIU
SIU
Cat5e/6 Cable
Up to 32 Levels
Cat5e/6 Cable
6
6
6
2
8
8
8
3
4
4
4
5
5
5
3
3
7
7
7
7
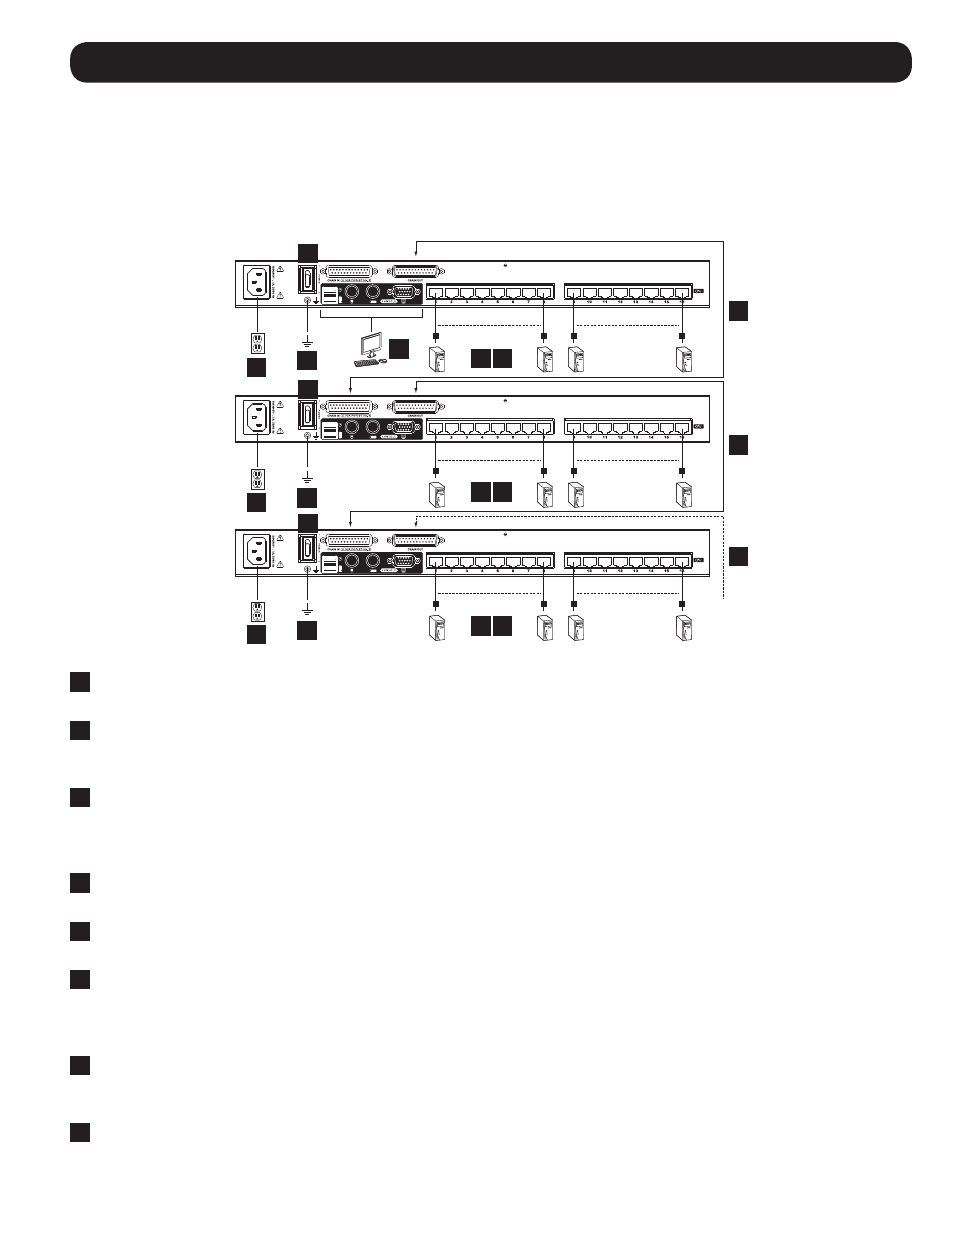
Installation
Daisy-Chain Installation
Up to 32 levels of B064-016 KVM Switches can be daisy-chained together to increase the number of connected computers
to up to 512. In a daisy-chain installation, the first KVM switch in the installation is considered Station 1, the next KVM is
Station 2, etc. Each KVM automatically identifies its position in the daisy-chain installation and displays the station number
in the Station ID LED on the front of the unit. To set up a daisy-chain installation, refer to the following instructions and the
corresponding installation diagram:
1
Make sure that power to all the devices you will be connecting has been turned OFF. You must unplug the power cords of
any computers that have the Keyboard Power On function.
2
Plug your keyboard, monitor and mouse into the console ports on the back of the first KVM in the installation. Note: You
can connect any combination of keyboard and mouse; both USB keyboard and mouse, both PS/2 keyboard and mouse,
or one of each type.
3
Connect the Daisy-Chain Out port of the first KVM switch to the Daisy-Chain In port of the next KVM switch in the
installation using a Tripp Lite P772-Series Daisy-Chain Cable. Note: The distance between any two daisy-chained KVMs
can not exceed 49 ft. (15 m.). The distance between the first and last KVM in a daisy-chain can not exceed 328 ft.
(100 m.). Repeat this step for each KVM you are adding to the installation.
4
Connect an available RJ45 computer port on a KVM switch to a Server Interface Unit (SIU) appropriate for the computer
you are connecting using Cat5e/6 cable. (See Server Interface Units (SIUs) on page 2 for details on which SIU to use.)
5
Connect the SIUs console connectors to the computer. Repeat steps 4 and 5 for each additional computer you are
connecting.
6
Starting with the first KVM in the installation, ground each switch by connecting one end of the included grounding wire
to the grounding terminal on the back of the unit, and then connect the other end to a suitable grounding object. Proper
grounding helps to protect your unit from damage due to surges or static electricity. Repeat this step for each KVM in the
installation.
7
Starting with the first KVM in the installation, connect the included power cord to the switch, and then plug it into a
Tripp Lite Surge Suppressor, Power Distribution Unit (PDU) or Uninterruptible Power Supply (UPS). Repeat this step for
each KVM in the installation.
8
Power-ON the first KVM switch in the installation, and wait for its station number to be displayed on the front of the unit.
Once displayed, power-ON each subsequent KVM in the installation, waiting for the station number to be displayed before
powering on the next unit. Once all KVMs are powered-ON, power-ON all connected computers.