Recording – Tascam MD-350 User Manual
Page 8
– 8 –
Recording
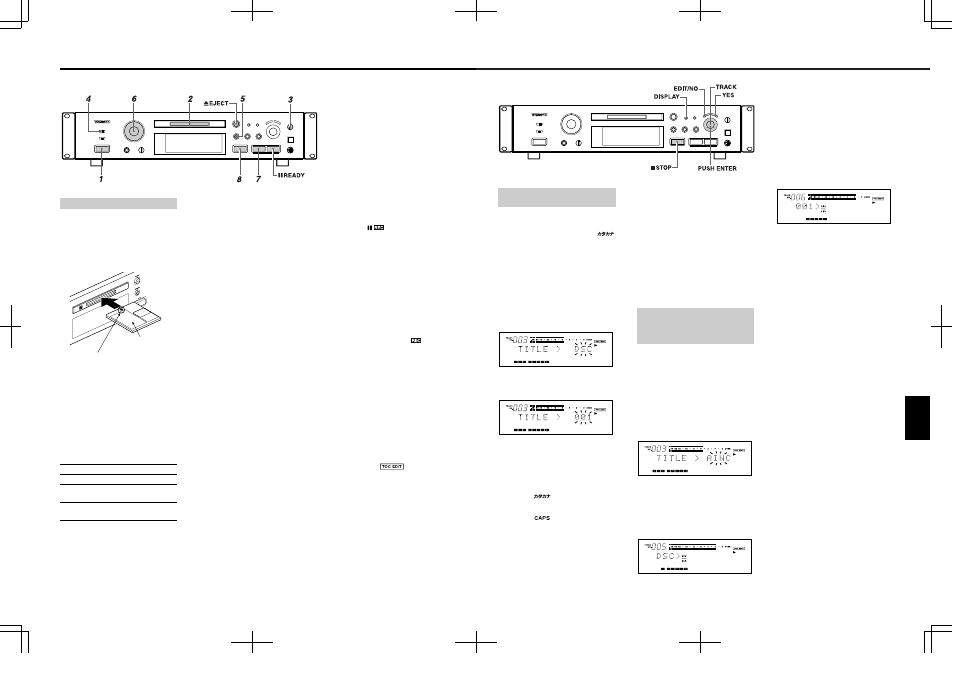
1. Press the [POWER] button.
… "NO DISC" appears on the display.
… Turn on the source component and the
amplifier. Set the input selector to the
source component.
2. Insert a recordable MD.
… When a blank MD is inserted, the
display shows "Disc Loading", "TOC
Reading", "No Track !!" and "Blank Disc"
in sequence.
… When a partially recorded MD is
inserted, the deck will automatically
start recording from the end of the last
recorded track.
3. Select the input with the [INPUT
SELECTOR].
Display
Selected Input
ANALOG
ANALOG INPUT
DIGITAL 1
DIGITAL INPUT 1
(OPTICAL)
DIGITAL 2
DIGITAL IN 2 (OPTICAL)
(front panel)
4. Select the recording mode following the
steps below:
The MD-350 is capable of recording and
playing back in standard stereo mode
(SP), monaural standard speed (MON),
double long-play (LP2) and quadruple
long-play (LP4) modes.
Recording an MD
Insert in the direction of
the arrow.
Hold the MD with the
label side up.
As the name suggests, LP2 provides
long-play facilities giving twice the
usual recording/playback time, and LP4
provides four times the usual
recording/playback time.
All modes are stereo, except for MONO,
when recording will be performed using
only the left (L) channel. "L" appears on
the level meter, but the output is sent to
both channels.
To select a mode (SP, MON, LP2 or LP4)
for recording:
a) With the unit in stop mode, press the
[EDIT/NO] button repeatedly until “REC
MODE?” is displayed.
b) Press the [YES] button. ("RecMode>
XXX" is displayed.)
c) Use the [
µTRACK≤] dial to select
the recording mode shown on the
display.
d) Press the [YES] button to confirm the
setting.
… Note:that when the time remaining on a
disc for further recording is shown, this
refers to the remaining time using the
current mode.
… It is possible to include tracks recorded
in different modes (SP,MONO, LP2 and
LP4) on one disc.
… Also note that while the LP4 (quadruple
long-play) mode provides exceptional
recording time thanks to advanced
compression technology, very
occasionally you may hear some slight
noise, depending on the material being
recorded. We therefore recommend that
if sound quality is more important for
your recording project than recording
time, you use either the SP (stereo) or
LP2 (double long-play) mode.
… The maximum amount of time available
with monaural recording is twice that of
stereo recording.
Buttons used on this page
ª Indication of recording mode
When the recording mode is shown, the
last three characters of the display are
used, and it is displayed as SP, MON, LP2
or LP4.
… In stop mode, the recording mode is
shown when the remaining time display
is selected.
… In record or record-ready mode, the
recording mode is always shown
… In play or in play-pause mode, the
recording mode is shown when the
remaining time is selected. In this case,
the display shows the recording mode
of the current material, not the
currently-selected recording mode.
5. Press the [º RECORD] button.
… The deck enters the Record-Ready
mode ("
" lights up).
… "Disc Full !!" or "Track Full !!" is
displayed when no room is available on
the MD for recording.
6. Adjust the recording level.
… If [ANALOG] was selected above,
adjust the recording level with the
[INPUT] control.
… When adjusting the recording level,
adjust so that the "OVER" segments of
the peak level meter do not light up.
.
7. Start recording.
Press the [¥ PLAY] button or the
[π READY] button ( "¥
" lights up).
Start playing the source program.
8. To stop recording, press the [ª STOP]
button.
ª To stop recording temporarily (ready)
Press the [π READY] button.
… Press the [¥PLAY] or [π READY]
button to resume recording.
… Whenever you pause recording, the
track number increases by one.
ª To eject the MD
Press the [
ø EJECT] button in stop mode.
If the power is turned off with the MD left
in the deck ("
" lights up) after
recording, the UTOC cannot be recorded.
Turn the power back on within 3 or 4 days
and eject the MD. The recorded data
might be lost if the MD is left in the deck
for a long time.
– 105 –
6. Seleccione cada caracter girando el
disco [µTRACK≤] y presionando
[PUSH ENTER] en el disco.
… Si utiliza el control remoto, seleccione
cada caracter con los botones
[µTRACK≤] y presione el botón
[ENTER] para ingresarlo.
7. Repita los pasos 5-6.
8. Presione el botón [YES] después de
asignar el título del disco.
… El modo de entrada de título para la
pista 1 es activado automáticamente
("001 > _" aparece indicado) y el cursor
parpadea en la indicación.
9. Repita los pasos 5-6.
10. Presione el botón [YES] nuevamente.
… Cuando el modo de entrada de título
para la pista 2 está activado ("002 > _"
aparece indicado), repita los pasos 5-8.
… Repita el procedimiento de entrada de
caracteres hasta que todos los títulos
hayan sido ingresados. El título del
disco aparece luego indicado, si la
platina está en el modo de parada, o si
la platina está en el modo de
reproducción, el título de la pista en uso
aparece indicado.
… Confirme los títulos girando el disco
[µTRACK≤].
… Presione el botón [ª STOP] para
abortar la operación.
Presione el botón [EDIT/NO] por más de
3 segundos (o presione el botón
[TITLE EDIT] en el control remoto) para
cancelar la función de título y retornar a
la reproducción.
Notas:
… Hasta 100 caracteres pueden ser
ingresados por cada título de pista.
Cuando el número total de caracteres
de los títulos de todas las pistas excede
los 1700, no se podrán escribir más
títulos de pistas en el MD.
… Si la función TITLE AUTO INC es
cancelada antes que todos los títulos
hayan sido asignados, el título de la
pista ingresado actualmente será
borrado. Sólo los títulos de las pistas
que ya hayan sido asignados serán
mantenidos.
… Si UNDO es ejecutado después que
TITLE AUTO INC fuera completado, el
último título de la pista editada será
cancelado.
… Los títulos de disco y pista pueden ser
asignados durante la grabación.
… Si un título de pista es asignado
mientras está en el modo de listo de
grabación durante la sobreescritura de
una pista, el título de pista será borrado
cuando retorne a la grabación.
Los títulos pueden ser asignados a cada
disco o cada pista empleando letras
mayúsculas o minúsculas, números "
" (katakana) y símbolos.
1. Presione el botón [EDIT/NO] de manera
que "TITLE ?" aparezca indicado.
2. Presione el botón [YES].
… Presione el botón [TITLE EDIT] si está
utilizando el control remoto.
3. Seleccione "DSC" o un número de pista
utilizando el disco [µTRACK≤].
… Para asignar el título a un disco,
seleccione "TITLE > DSC"
("DSC" parpadea).
… Para asignar el título a una pista,
seleccione "TITLE > XXX (número de
pista)" (el número de pista parpadea).
4. Presione el botón [YES].
"DSC > _" o "XXX > _" aparece indicado.
… Se activará el modo de ingreso de
caracteres y el cursor parpadea en la
indicación.
5. Presione el botón [DISPLAY] para
seleccionar el tipo de caracteres.
… Cuando "
" está encendido: Es
posible ingresar el alfabeto japonés
Katakana.
… Cuando "
" está encendido: Es
posible ingresar mayúsculas, números y
símbolos del alfabeto.
… Cuando no hay ningún indicador
encendido: Es posible ingresar
minúsculas, números y símbolos del
alfabeto.
6. Seleccione cada caracter girando el
disco [µTRACK≤] y presionando
[PUSH ENTER] en el disco.
Asignación de títulos
(función TITLE)
7. Repita los pasos 5-6.
… Presione el botón [ª STOP] para abortar
la operación.
… Presione el botón [EDIT/NO] por más de
3 segundos (o presione el botón [TITLE
EDIT] en el control remoto) para
cancelar la función de título y retornar a
la reproducción.
8. Presione el botón [YES] nuevamente.
… El título del disco o de la pista es
indicado nuevamente.
… Repita los pasos de 1 a 8 para asignar
los títulos para los otros números de
pistas.
Seleccione el modo "CONTINUE" con el
botón [PLAY MODE]. Los títulos pueden ser
asignados para el disco y para todas las
pistas sucesivamente.
1. Presione el botón [EDIT/NO] de manera
que "TITLE ?" aparezca indicado.
2. Presione el botón [YES].
… Presione el botón [TITLE EDIT] si está
utilizando el control remoto.
3. Seleccione "TITLE > AINC" con el disco
[µTRACK≤] ("AINC" parpadea).
4. Presione el botón [YES].
… El modo de entrada del título de disco se
activa ("DSC > _" aparece indicado) y el
cursor parpadea en la indicación.
… El cursor parpadea en la posición del
primer caracter aun si un título ya
hubiera sido asignado.
5. Presione el botón [DISPLAY] para
seleccionar el tipo de caracter.
Asignación de títulos para el
disco y para todas las pistas
sucesivamente
(función TITLE AUTO INC)
Butones empleados en esta página
ESPA
Ñ
OL