Tascam MD-350 User Manual
Page 15
– 98 –
La platina inicia la grabación cuando la
entrada de audio excede un cierto nivel y
pausa cuando la entrada de audio cae por
debajo de un cierto nivel continuamente
durante 4 segundos o más.
1. Realice los pasos 1 a 4 de “Grabación
de un MD” en la página 94.
2. Presione el botón [SYNC RECORD] en el
control remoto. La platina ingresa en el
modo de listo de grabación sincronizada
(se encienden "
" y "
").
… El tiempo de grabación restante
aparece después que "S_SYNC ON" es
indicado.
3. El componente fuente inicia la
reproducción.
… La platina inicia la grabación
sincronizada por detección de la señal
de audio de entrada. Hace una pausa
cuando el nivel de audio de entrada cae
por debajo de un cierto nivel.
… No puede iniciar la grabación
manualmente presionando el botón
[¥PLAY] o el botón [π READY] durante
el modo de listo de la grabación
sincronizada.
… Pulse de nuevo el botón [SYNC
RECORD] para cancelar la grabación
sincronizada.
Notas:
… Al presionar el botón [π READY]
durante la grabación sincronizada
aborta la operación de grabación
sincronizada.
… El cambio de la entrada con el
interruptor [INPUT SELECTOR] durante
la grabación sincronizada anula este
proceso de grabación sincronizada.
Grabación sincronizada
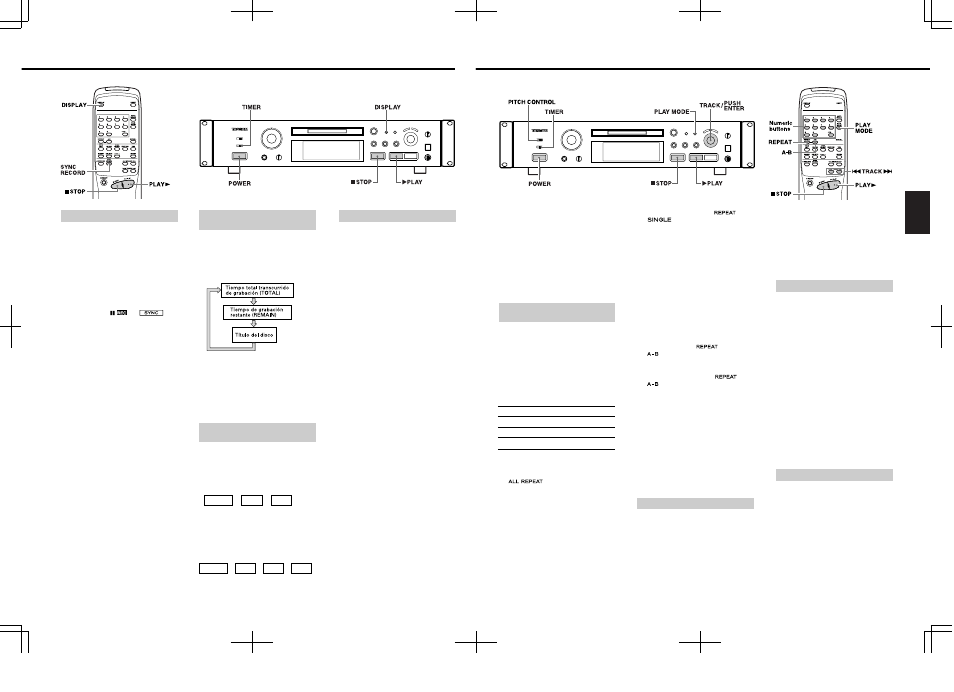
Cada vez que presione el botón [DISPLAY]
la indicación cambia de la siguiente
manera:
En el modo de parada/grabación:
… El tiempo de grabación restante
(REMAIN) es sólo indicado en el modo
de listo de grabación.
… El título del disco puede ser indicado
solamente cuando haya sido grabado en
el MD.
ª
Presione el botón de reproducción
[¥PLAY] inmediatamente después de
parar la grabación.
La pista que ha sido grabada aparecerá
indicada desde el principio.
∑
∑
ª
Para reproducir la primera pista del MD
después de la grabación:
Presione el botón de parada [ª STOP] otra
vez inmediatamente después de parar la
grabación y presione el botón de
reproducción [¥ PLAY].
∑
∑
∑
¥PLAY
ªSTOP
ªSTOP
Grabación
¥PLAY
ªSTOP
Grabación
Verificación de las pistas
grabadas
Comprobación del tiempo
restante de grabación en el MD
Conectando esta platina a un temporizador
(comercialmente disponible), usted puede
iniciar y detener las operaciones de
grabación a la hora preajustada.
1. Realice los pasos 1-6 de "Grabación de
un MD" en la página 94.
2. Ajuste el conmutador [TIMER] en [REC].
3. Ajuste [TIMER] de manera que inicie o
detenga la fuente de alimentación en la
hora de inicio y finalización deseada.
… Como la grabación real se inicia
después de la operación "TOC Reading",
ajuste la hora de activación de la
grabación por temporizador levemente
antes de la hora en la que desee iniciar
la grabación.
… La alimentación de cada componente se
desactiva.
… Cuando la hora de inicio se cumple, la
alimentación es suministrada a los
componentes y la grabación se inicia.
[PRECAUCION]
… Cuando la grabación por temporizador
es realizada en el modo "SHUFFLE" o
"PROGRAM", la platina automáticamente
ingresa en el modo "CONTINUE".
… Asegúrese de activar la platina
nuevamente y de eyectar el MD dentro
de los 3 ó 4 días de grabación por
temporizador. Cuando el MD es
eyectado, el contenido grabado será
escrito en el MD. Si deja la platina
desactivada por un período prolongado
después de haber finalizado la
grabación por temporizador, el
contenido puede desaparecer.
… Durante la grabación por temporizador,
la misma se inicia desde el fin de la
porción previamente grabada en el MD.
… Ajuste el conmutador [TIMER] en [OFF]
después de la grabación por
temporizador. Si se deja el temporizador
en [REC] la platina iniciará
automáticamente la grabación la
próxima vez que se conecte la
alimentación.
Grabación por temporizador
Butones empleados en esta página
ENGLISH
All or one of the tracks, or a specified
portion (A-B) of an MD can be played
repeatedly. Program playback and Shuffle
playback can also be repeated.
ª To repeat all MD tracks
(All-track repeat)
1. In the Stop mode, press the [PLAY
MODE] button to select one of the
following repeat play modes.
Play Mode
Repeat
CONTINUE
Normal repeat
SHUFFLE MODE
Shuffle repeat
PGM MODE
Program repeat
2. Press the [REPEAT] button on the
remote control unit once to display
"REPEAT ALL".
… "
" lights up.
3. Press the [¥PLAY] button.
The tracks will be played repeatedly in
the specified mode.
… To release REPEAT playback and
resume normal playback, press the
[REPEAT] button repeatedly until
"REPEAT OFF" appears.
… The Repeat Playback mode will not be
canceled even when the power is
turned off.
ª
To repeat a single track
(Single-track repeat)
1. During playback in the "CONTINUE
MODE", press the [REPEAT] button on
the remote control unit twice.
Repeating Track(s)
(Repeat Playback)
… "REPEAT 1" appears ("
" and
"
" light up).
2. Press the [¥PLAY] button. The current
track will be repeated.
3. The track to be repeated can be
changed by turning the [µ TRACK≤]
dial or by pressing the [µ TRACK≤]
buttons or numeric buttons (1 to 9, 0,
+10) on the remote control unit.
… Single-track repeat is unavailable in the
"SHUFFLE MODE" or "PGM MODE".
ª
To repeat a section within a track
(A-B repeat)
A specified portion (between A and B) of a
track can be played repeatedly.
1. During playback, press the [A-B] button
on the remote control ("REPEAT A–" is
displayed, and "
" lights up,
"
" blinks) at the starting point (A) of
the portion you want to repeat.
2. Press the [A-B] button again ("REPEAT
A-B" is displayed, and "
" and
"
" light steadily) at the ending point
(B). The portion (A-B) will be played
repeatedly.
… A-B repeat playback of portions
extending over more than one track is
not possible during programmed
playback or shuffle playback.
… To cancel Repeat playback and resume
normal playback, press the [A-B] button
or [REPEAT] button again.
("REPEAT OFF" is displayed.)
… Press the [ª STOP] button to erase the
specified portion (between A-B).
3. Set the timer to the desired start time
and turn off the power.
When the set time comes, each
component will be turned on and
playback will start.
… Set the [TIMER] switch back to [OFF]
after timer playback.
– 15 –
Buttons used on this page
ª
To add a track to the program
In the Stop mode, turn the [µTRACK≤]
dial to select the desired track number and
press [PUSH ENTER] on the dial.
A track can also be added from the remote
control unit by simply entering the track
number with the numeric buttons
(1 to 9, 0, +10).
… The new track is appended to the end of
the existing program.
By connecting this deck with a timer
(commercially available), playback can be
started at a specified time.
1. Insert a pre-recorded MD and set the
[TIMER] switch to [PLAY].
2. Select the amplifier's input which
allows this deck to play back.
… Timer playback is available when
"SHUFFLE MODE", "PGM MODE", "ALL
REPEAT" or "REPEAT SINGLE" playback
is selected.
Timer Playback
You can use the pitch control feature to
play back material at ±12.0% relative to the
normal playback pitch. This feature is not
available in LP2 mode.
To set the pitch change which will be
operative when the PITCH ON/OFF switch
is on:
1 In stop, play or pause mode, press the
[EDIT/NO] button until "Pitch?" appears.
2 Press the [YES] button.
3 Turn the [µ TRACK≤] dial to adjust
the pitch in 0.1% steps.
4 Press the [YES] button after making the
adjustment.
… The value set in this way does not take
effect until the PITCH ON/OFF switch is
set to ON.
… Note that when the position of the
PITCH ON/OFF switch is changed, the
sound is momentarily muted.
Pitch control
Tracks recorded in different modes (SP,
MONO, LP2 and LP4) can be combined on
one disc. When playing back a disc, the
appropriate mode is automatically
selected as each track is played back, and
this is shown on the display.
Play modes