Consejos útiles para la reproducción – Tascam MD-350 User Manual
Page 14
Each press clears the current last track
in the program.
3. Press the [¥ PLAY] button to start
Program playback.
… The program is held in memory after
Program playback has been stopped by
pressing the [ª STOP] button or it has
stopped automatically at the end.
… Pressing the [ª STOP] button in the Stop
mode clears the program memory.
… When the total program playback time is
longer than 159 minutes and 59 seconds,
"---m--s" appears on the time counter.
… When the 25th track has been
programmed, "PGM Full !!" is displayed
and no more tracks can be programmed.
… Pressing the [PLAY MODE] button in the
Stop mode cancels the Program Play
mode and clears the program memory.
… The Program mode will not be canceled
even when the power is turned off, and
the programmed data will remain in the
deck.
… If you attempt program playback when
no programmed data is entered, normal
playback will start after "PGM Empty !!"
is displayed.
ª
To check the program contents
In the Play or Play-Ready mode, turn the
[µTRACK≤] dial or press the [µ ] or
[≤] button on the remote control unit to
display the program contents.
ª
To delete a programmed track
In the Stop mode, press the [CLEAR] button.
Each press clears the current last track in
the program.
– 14 –
2. Press the [¥PLAY] button.
… When playback is finished, the deck
pauses at the beginning of the next
track.
3. Press the [¥PLAY] or [π READY] button
to start playing the next track.
… To release Auto Ready playback, press
the [AUTO SPACE] button repeatedly
until "
" disappears.
… A.SPACE and A.READY playback cannot
be used together.
ª
Auto cue mode
(tracks recorded in SP mode only)
The auto cue function lets the unit
automatically start playback at the audio
start of each track. The trigger level which
determines the point at which playback
starts is set as follows:
1 In stop, play or pause mode, press the
[EDIT/NO] button until “AUTO CUE?”
appears.
2 Press [YES].
3 Turn the [ µ T R A C K ≤ ] dial to
cycle the threshold level between the
following values: “-54dB”, “-60dB”,
“-66dB”, “-72dB” and “OFF”.
4 Press the [YES] button after making the
adjustment.
… When the Auto Cue mode is on (the
value is anything except “OFF”), and the
unit is in STOP, moving to the next or
previous track will automatically cue the
playback point to the first point in the
track where the sound level rises above
the trigger level as set above and the
unit will pause.
… When Auto Cue is on, and Auto Ready is
also on, moving to the next or previous
track will automatically cue the
playback point to the first point in the
track where the sound level rises above
the trigger level as set above and the
unit will pause at this point. If the
desired start of the track is cut off using
this function, the trigger level should be
adjusted to a lower level.
… Note that if Auto Cue and Auto Ready
are both off, moving to the next track
will enter stop mode as usual.
… If the Auto Cue mode is on, the Auto
Space function is unavailable.
Buttons used on this page
… If the Auto Space function is on when
Auto Cue is turned on, the Auto Space
function and the Auto Ready function (if
this is on) will be turned off.
… If the Auto Cue function is on, and the
[AUTO SPACE] button is pressed, the
only effect is to turn the Auto Ready
function on or off.
… The function does not work with tracks
recorded in any mode other than SP
mode. With any non-SP tracks, the cue
point is the top of the track, not the cue
point.
… This cue is made to ±1 frame accuracy
(in SP mode, this is ±64 ms).
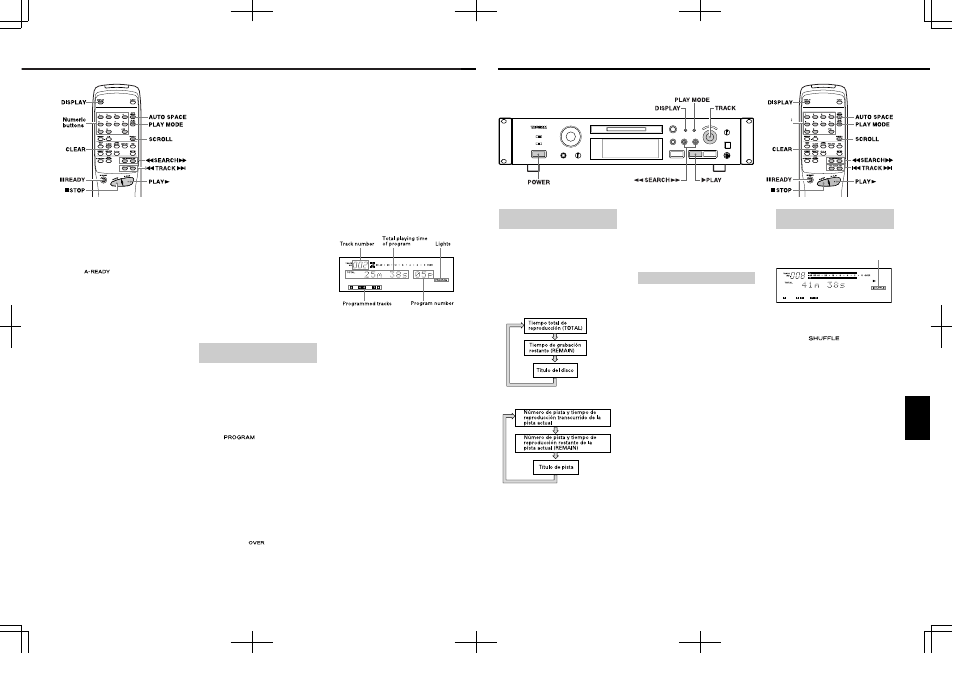
Up to 25 tracks can be programmed in the
desired order and played.
ª
To program tracks
1. In the Stop mode, press the [PLAY
MODE] button repeatedly until "PGM
MODE" appears in the display. After
"PGM MODE", the display shows "0m 00s
00p" ("
" lights up).
2. Turn the [µTRACK≤] dial so that the
desired track number indicator lights on
the music calendar, and press [PUSH
ENTER] on the dial.
… The track number blinks.
… Repeat this operation to program other
tracks.
… Tracks can be programmed
automatical-ly by simply pressing the
numeric buttons (1 to 9, 0, +10) on the
remote control unit to display their
numbers sequentially.
… When a track number of 21 or more is
selected, the "
" indicator blinks.
However, the track number can still be
checked on the TRACK NO. display.
… The same track can be programmed
repeatedly.
… If you make a mistake in the track
number entry, press the [CLEAR] button.
Playing Tracks in the Desired
Order (Program Playback)
Useful Tips for Playback
– 99 –
ESPA
Ñ
OL
Consejos útiles para la reproducción
Cada pista del disco será aleatoriamente
reproducida.
Encendido
1. Con el modo de parada activado,
presione repetidamente el botón [PLAY
MODE] hasta que aparezca "SHUFFLE
MODE" ("
" encendido).
2. Presione el botón de reproducción
[¥PLAY].
… Para reproducir la próxima pista, gire
hacia la derecha el disco
[µ TRACK≤] (o presione el botón
[≤] del control remoto), durante la
reproducción aleatoria.
… Para reproducir la pista actual desde el
principio gire hacia la izquierda el disco
[µ TRACK≤] (o presione el botón
[µ ] del control remoto), durante la
reproducción aleatoria.
… El modo aleatorio no será cancelado
aun cuando la alimentación sea
desactivada.
… Para desactivar el modo de
reproducción aleatoria, presione
repetidamente el botón [PLAY MODE]
hasta que aparezca indicado
"CONTINUE MODE".
Reproducción aleatoria de
pistas ("SHUFFLE")
… El título del disco o de la pista puede ser
desplazado (hacia arriba o hacia abajo)
en la indicación con el botón [SCROLL]
del control remoto. Después del
desplazamiento, el título vuelve a su
indicación original.
ª Reproducción de una pista por búsqueda
directa
Especifique la pista deseada presionando
los botones numéricos (1 a 9, 0, +10) del
control remoto. Se iniciará la reproducción
de la pista especificada.
… Ejemplos de operación para búsqueda
directa de la pista número 10 o mayor:
Para buscar la pista número 10:
Presione +10 una vez y luego 0.
Para buscar la pista número 25:
Presione +10 y luego presione 5 dos
veces.
… Presione el botón [CLEAR] cuando
"TRACK NO." esté parpadeando para
cancelarlo.
ª Salto a la pista anterior o posterior
Gire hacia la derecha el disco
[µ TRACK≤] o gírelo hacia la izquierda
(o presione los botones [µ TRACK ≤]
del control remoto), durante la
reproducción para saltar a la pista
posterior o a la anterior a la pista actual.
ª Búsqueda de una secciónn
Durante la reproducción, mantenga
presionado los botones [∆ /˚ ] (o
[∆ SEARCH ˚]) para buscar la sección
deseada.
… En el modo de listo de reproducción es
posible buscar la sección deseada
observando el tiempo de reproducción
transcurrido o el tiempo de
reproducción restante en la indicación.
… La búsqueda normal no es posible si hay
varias pistas cortas (de pocos segundos
de duración), sucesivas.
Selección de la pista deseada
La información mostrada en la indicación
le permite verificar el título del disco, el
título de pista, el número total de pistas de
un MD, el tiempo total de reproducción.
… Cada vez que presiona el botón
[DISPLAY] la indicación cambia de la
siguiente manera.
Con el modo de parada activado:
Con el modo de reproducción activado:
… El número total de pistas aparecen en la
indicación TRACK NO.
… El título del disco y los títulos de la pista
son indicados sólo cuando han sido
grabados en el MD.
… Después de seleccionar una pista en el
modo de parada (cuando "TRACK" está
encendido), el presionar el botón
[DISPLAY] indica el título de la pista.
… Cuando un título de la pista está
compuesto por más de 100 caracteres,
el centésimo caracter y los siguientes
no podrán ser indicados.
Empleo de la ventanilla de
indicación
Butones empleados en esta página
Botones
numéricos