Easy connect utility, Operations, Using the wireless utility (continued) 5 – Toshiba TDP-TW355 User Manual
Page 36
71
Operations
70
Using the Wireless Utility (Continued)
5
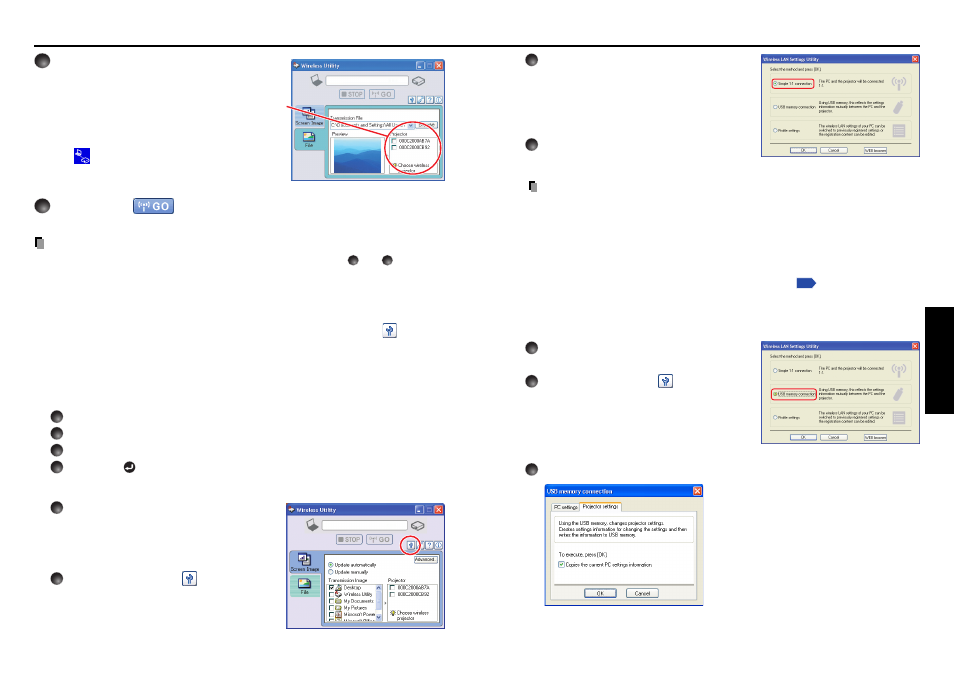
Select the projector to transmit
to.
The IDs of projectors accessible for
communication will be listed. (If projector name
has been set up already, it is shown instead of
the MAC address.) Select the checkbox of the
projector to be transmitted to from this list. Then
icon
is displayed on the projector’s screen
for few seconds.
It is possible to select up-to four projectors.
6
Click on the
button.
The selected file’s image is displayed by the projector.
Note
• Only one file can be sent at a time. To send another file, repeat steps
4
and
6
.
■ Easy Connect utility
This feature allows users to easily connect the projector to a computer over wireless
networks, without making
Network settings
via
Wireless Utility
.
Launch the
Wireless Utility
software application and click the Tool button
to bring
up the
Wireless LAN Setting Utility
dialog box. Select a desired connection mode in
this dialog box.
● How to set up a simple 1:1 connection
• Setting on the projector
1
Turn the projector power on.
2
Insert the supplied wireless LAN PC card to the PC card slot.
3
Switch the input to Wireless/Card.
4
Press the
button on the projector control panel.
• Setting on the computer
1
Launch the Wireless Utility software
application.
When the
Wireless Utility
launches, the
Screen Image
transmission mode window
appears on the computer screen.
2
Click the Tool button
.
The
Wireless LAN Setting Utility
dialog box
appears.
3
Select Simple 1:1 connection then
click OK.
The connection starts up.
When a connection confirmation message
appears, proceed as instructed in the
message.
4
The projector name of the connected
projector or the MAC address of the
wireless LAN PC card is displayed.
Notes
• This operation is allowed only when the Transmission mode is set to
Ad hoc
in the
projector network settings.
• The operation procedure of the projector setting and the computer setting can be
altered without affecting the connection setup, assuming the operation on each side
is complete within 60 seconds.
● How to connect USB memory
Set up wireless LAN using a commercial USB memory. See
for available USB
memories.
Copying the computer settings to the projector
• Setting on the computer
1
Plug the USB memory into the
computer.
2
Click the Tool button
of the
Wireless Utility to bring up the
Wireless LAN Setting Utility dialog
box. Select USB memory connection
and click OK.
The dialog box for USB memory connection appears.
3
Select the setting information then click OK.
The setting information is saved to the USB memory.