Using the menus, How to use the menus, The image adjustment menu – Toshiba TDP-TW355 User Manual
Page 20: P.38, P.39, Operations
39
Operations
38
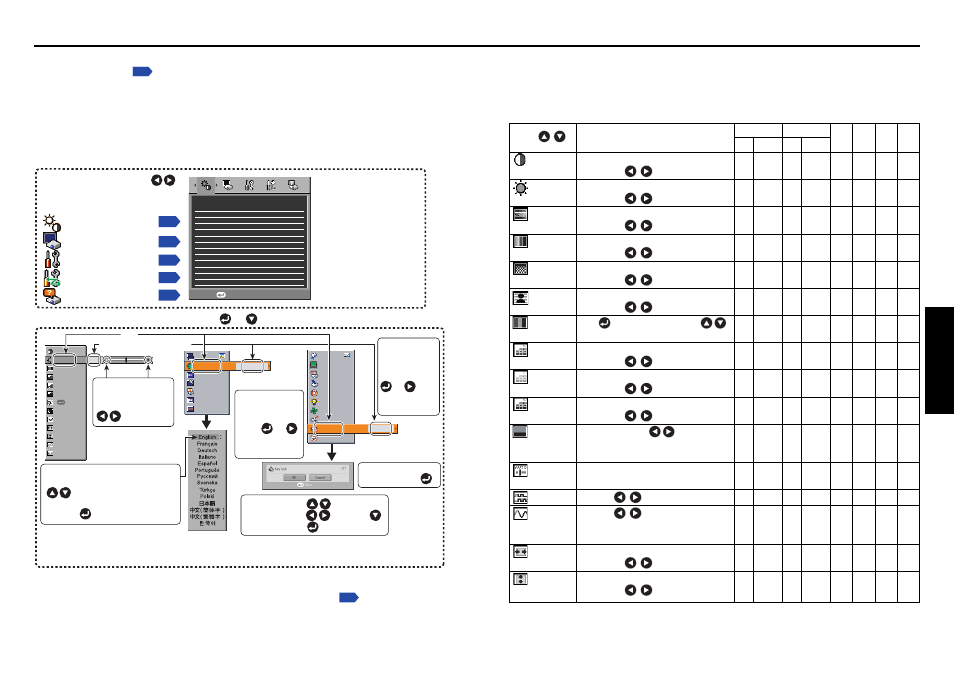
■ The image adjustment menu
Use this menu to set or adjust image-related items. Items that can be set or adjusted are
marked with “Yes”, and those that cannot are marked with “No”. (When an item is masked,
it indicates that you cannot select for the current input.)
Description
Digital (DVI) Analog (D-SUB)(BNC)
Item
RGB Y/P
B
/P
R
RGB Y/P
B
/P
R
Video S-video PC card USB
Contrast
Adjust the image contrast.
Yes
Yes
Yes
Yes
Yes
Yes
Yes
Yes
Lower
Higher
Brightness
Adjust the brightness of the image.
Yes
Yes
Yes
Yes
Yes
Yes
Yes
Yes
Darker
Brighter
Color
Adjust the color of the image.
No
Yes
No
Yes
Yes
Yes
No
No
Lighter
Deeper
Tint
*1
Adjust the tint of the image color.
No
No
No
No
Yes
Yes
No
No
Reddish
Greenish
Sharpness
Adjust the sharpness of the image.
No
Yes
No
Yes
Yes
Yes
No
No
Softer
Sharper
Noise
Set the function to reduce screen noise.
No
Yes
No
Yes
Yes
Yes
No
No
reduction
*2
On (Enable)
Off (Disable)
Picture mode
Press
. Toggle the picture mode with
.
Yes
Yes
Yes
Yes
Yes
Yes
Yes
Yes
Bright/Standard/True color
R-level
Adjust red of the image color.
Yes
Yes
Yes
Yes
Yes
Yes
Yes
Yes
Less red
More red
G-level
Adjust green of the image color.
Yes
Yes
Yes
Yes
Yes
Yes
Yes
Yes
Less green
More green
B-level
Adjust blue of the image color.
Yes
Yes
Yes
Yes
Yes
Yes
Yes
Yes
Less blue
More blue
NTSC mode
*3
Set the black level with
.
No
No
No
No
Yes
Yes
No
No
US
: NTSC (US) mode
JAPAN : NTSC (JAPAN) mode
Auto setting
Automatically adjusts items such as the sampling
No
No
Yes
No
No
No
No
No
phase depending on the type of input signal.
Phase
Adjust with
to eliminate flicker.
No
No
Yes
No
No
No
No
No
Frequency
Adjust with
to eliminate periodic patterns
No
No
Yes
No
No
No
No
No
and flickering when many vertical lines appear on
the screen.
H-position
Adjust the horizontal position of the image.
No
No
Yes
No
No
No
No
No
Move left
Move right
V-position
Adjust the vertical position of the image.
No
No
Yes
No
No
No
No
No
Move down
Move up
You can call up on-screen menus, and conduct a number of adjustments and settings using
the operation buttons
on the control panel (main unit side) and remote control.
■ How to use the menus
The menu shown below is for operation instructions purposes and might differ from the
actual display.
Using the menus
Execute
+16
+16
+16
+16
+16
+64
+64
+32
255
255
30
Standard
Brightness
+12
Image adjustment
Contrast
Brightness
Picture mode
R-level
G-level
B-level
Auto setting
Phase
Frequency
H-position
V-position
Clamp 1
Clamp 2
+12
+12
Bright
+12
+12
+12
+12
+12
+12
+12
+12
+12
To image adjustment menu
On
On
On
Language
English
Standard
Off
Off
On
Manual
Low
1
Yes
Key lock
Off
Toggle items with .
Select items with and press .
Fix selection with .
Display the Setting display menu.
The Setting display (2) is displayed.
1. Press the MENU button
2. Select a Category
3. Adjustments & Settings
Select a category by using .
There are following five
categories:
Displays the current
adjustments and
settings of selected
category.
Item shown with gray
cannot be adjusted with
the current input source.
Image adjustment menu
Display setting menu
Default setting menu
Control setting menu
The figure shows displays given for operation instructions purposes. As the display may differ depending on the item, use
the following pages as a reference.
Item
Adjustment/Setting Value
These marks signify
the items can be
adjusted/set by using
.
These marks signify the items can
be selected from the list by using
.
After an item is selected, apply it by
pressing .
Press or to open the menu.
Status display menu
These marks
signify that there
are options.
Press or
to display a list of
options.
These marks
signify that
there are setting
screens. Press
or to
display a list of
setting screens.
* When no item is
changed, press .
4. Back
RETURN button
5. Press the MENU button.
6. End
Press the MENU button or RETURN button.
(The menu disappears 30 seconds after the last operation.)