Astronomical imaging – Orion STARSHOOT 52085 User Manual
Page 8
14
15
of the mouse. To do this, hold down the Shift key, then left-click and drag the
mouse on the image. You’ll find this feature to be a great convenience when
fine adjusting the screen stretch to get an image to look its best.
Instead of using the Screen Stretch Window, it is faster to use the Quick
Stretch facility. This allows you to modify the image appearance instantly with
small up/down and left/right movements of the mouse. To do this, hold down
the Shift key, then left-click and drag the mouse on the image. You’ll find this
feature to be a great convenience when fine adjusting the screen stretch to get
an image to look its best.
The trick with stretching is determining exactly how to stretch the image for
best effect. Often there are several different possibilities for the same image.
Trial-and-error will be the best way to judge what the best screen stretch set-
ting is. Try several different settings until you find one you think looks best.
When the image is subsequently saved, the screen stretch setting information
will be kept when the image is next opened. Feel free to adjust the Screen
Stretch settings all you want; it will not effect the image data you captured
and only effects how the image is displayed. You can always switch back to a
preset setting, like Medium or Moon.
2. astronomical Imaging
Now that you’re familiar with basic camera and software operation, it’s time to
take the StarShoot Pro out at night under the stars to capture some astronomi-
cal images. We recommend starting with the Moon, as it is easy to acquire
into the camera’s field of view, and typically does not require stacking multiple
exposures like planetary and deep sky images do.
the Fan and tEC
One of the most advantageous features of the StarShoot Pro is the cooling
system which includes the cooling fan and thermo-electric cooler (TEC). The
TEC is automatically turned on when the camera is plugged into your com-
puter and powered on with the 12VDC power source. The cooler can be shut
off if needed for troubleshooting purposes or to save power. The cooling fan
speed can also be adjusted.
The TEC is like a refrigerator in the camera. When the camera is running, it
produces internal heat which causes “noise” in images. The TEC counteracts
this by cooling the CCD chip, which reduces thermal noise. This produces
better quality images than cameras without coolers can provide. The TEC
in the StarShoot Pro, with the added help of the cooling fan, will reduce the
temperature of the camera’s interior to approximately 54°F (30° C) below the
ambient outside temperature.
To turn the TEC on/off or adjust the cooling fan speed:
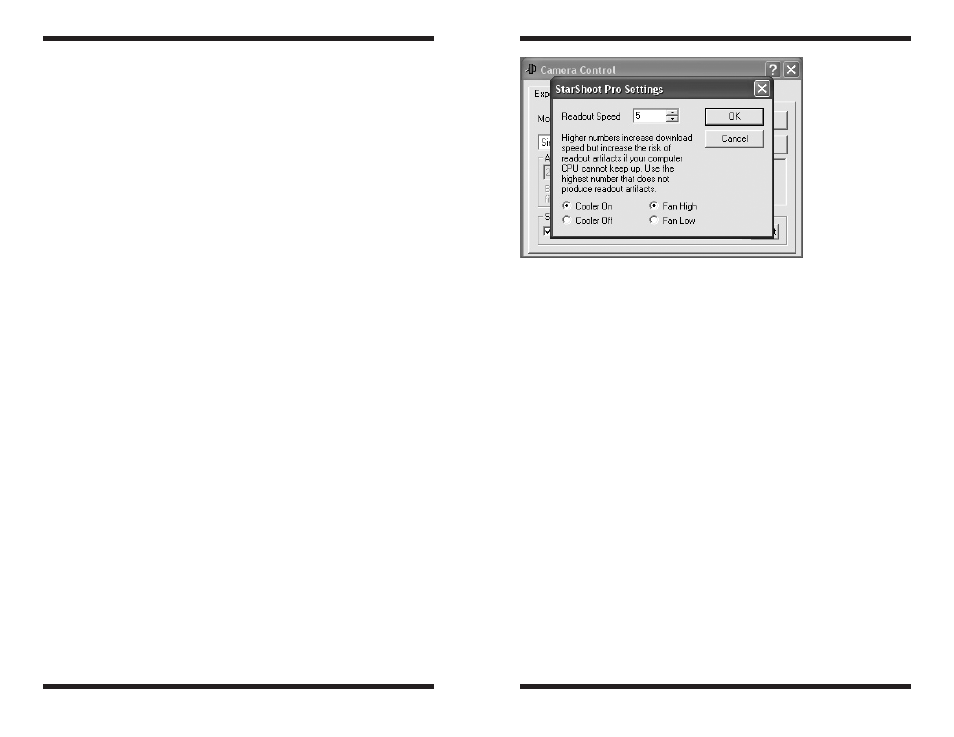
Click Setup in the Camera Control Window. The StarShoot Pro Settings
Window will appear (Figure 10). Choose Fan High or Fan Low (default is Fan
High), and Cooler On or Cooler Off (default is Cooler On).
Normally you should not have to make any adjustments in the StarShoot Pro
Settings Window. See “Appendix A. Troubleshooting” to see if or when these
settings need to be adjusted.
Focusing
Focusing the CCD camera is one of the most critical parts of imaging. It can
be challenging, but MaxIm DL Essentials has some helpful features which will
assist you when focusing your StarShoot Pro. Before focusing, make sure your
mount is polar aligned and tracking.
For best results, we recommend focusing on a star at least 30º above the hori-
zon (or higher). Follow these steps to achieve an accurate focus:
1. Find and center a moderately bright star through your finder scope. Try to
find a star around magnitude 4 or 5. If you are not using an optical finder
or just using your unaided eye, the star should look relatively faint. This is
important because brighter stars will easily over saturate the camera and
compromise the focus accuracy.
2. Center your telescope on the star using an eyepiece. Make sure the right
ascension (R.A.) tracking motor is engaged on your mount.
3. Replace the eyepiece with the StarShoot Pro.
4. Set the Mode to in the Camera Control Window to Light Color 1x1. Set
Seconds (exposure time) to 1 second to begin with. In the box below the
Mode box, select Single.
Figure 10.