Goto hand controller operation – Orion ATLAS EQ-G User Manual
Page 12
12
Functions of the Goto Hand controller
There are four main categories of control buttons on the GoTo
hand controller (Figure 13):
1.
Mode buttons
2.
Directional buttons
3.
Scroll buttons
4.
Dual Purpose buttons
Mode Buttons
The three mode buttons are located at the top of the con-
troller, directly below the LCD screen. They include the
ESC,
ENTER, and SETUP buttons.
The
ESC button is used to escape from a certain command or
go back a level in the menu tree.
The
ENTER button is used to select the functions and sub-
menus in the menu tree, and to confirm certain functional
operations.
The
SETUP button is a “hot key” that takes you to the Setup
Menu.
Directional Buttons
The directional buttons allow the user to have complete motion
control of the Atlas EQ-G mount at almost any step in opera-
tion. These controls are locked out when the mount is slewing
to an object. The directional buttons are very helpful when
initially aligning the mount, centering objects in the eyepiece
field of view, and manual guiding. The directional buttons are
typically used in conjunction with the
RATE button. The left
and right directional buttons can also be used to move the text
cursor when entering data into the hand controller.
scroll Buttons
The up and down scroll buttons allow you to scroll up and
down within the menu tree or selections displayed on the
hand controller screen.
Dual Purpose Buttons
The dual purpose buttons serve two distinct purposes. They
are used for data entry and as quick reference keys.
TOUR button: Takes you on a preset tour of the best night sky
objects visible
RATE button: Changes the speed of the motors when the
directional buttons are pressed. There are 10 speeds to
choose from, with 0 being the slowest and 9 being the fast-
est.
UTILITY button: “Hot key” access to the Utility Functions
menu.
USER button: Enter or recall coordinates for up to 25 objects
in the User Defined database.
ID button: Identifies the object the mount is currently pointing
to.
NGC, IC, M, Planet, and Object buttons: Allow direct access
to catalogs and databases of over 13,400 objects.
Goto Hand controller
operation
This section provides a guide for initial setup and alignment of
the Atlas EQ-G mount with the GoTo hand controller.
initial setup
1. Perform the polar alignment using the procedure previous-
ly outlined in Section 6. A rough polar alignment will suf-
fice, but an accurate polar alignment using the polar axis
finder scope will increase tracking accuracy (and pointing
accuracy for one-star alignments).
2. Rotate the telescope tube about the mount’s declination
axis so the tube is parallel with the mount’s R.A. axis (and
the front of the tube is pointed to the sky, not the ground).
Rotate the mount’s R.A. axis so the counterweight shaft is
pointed straight down. The telescope and mount should
now appear as shown in Figure 14. This will be called the
“home” position of the mount.
Note: Once the mount is initially set to its “home” position, the
mount should not be moved manually. Otherwise, the GoTo
hand controller will lose track of the mount’s position, and the
alignment procedure will need to be performed again. Keep
both the R.A. and Dec. lock levers engaged.
3. Turn on the power switch on the mount
4. The initial screen displayed on the hand controller is the
version screen. Press
ENTER to proceed.
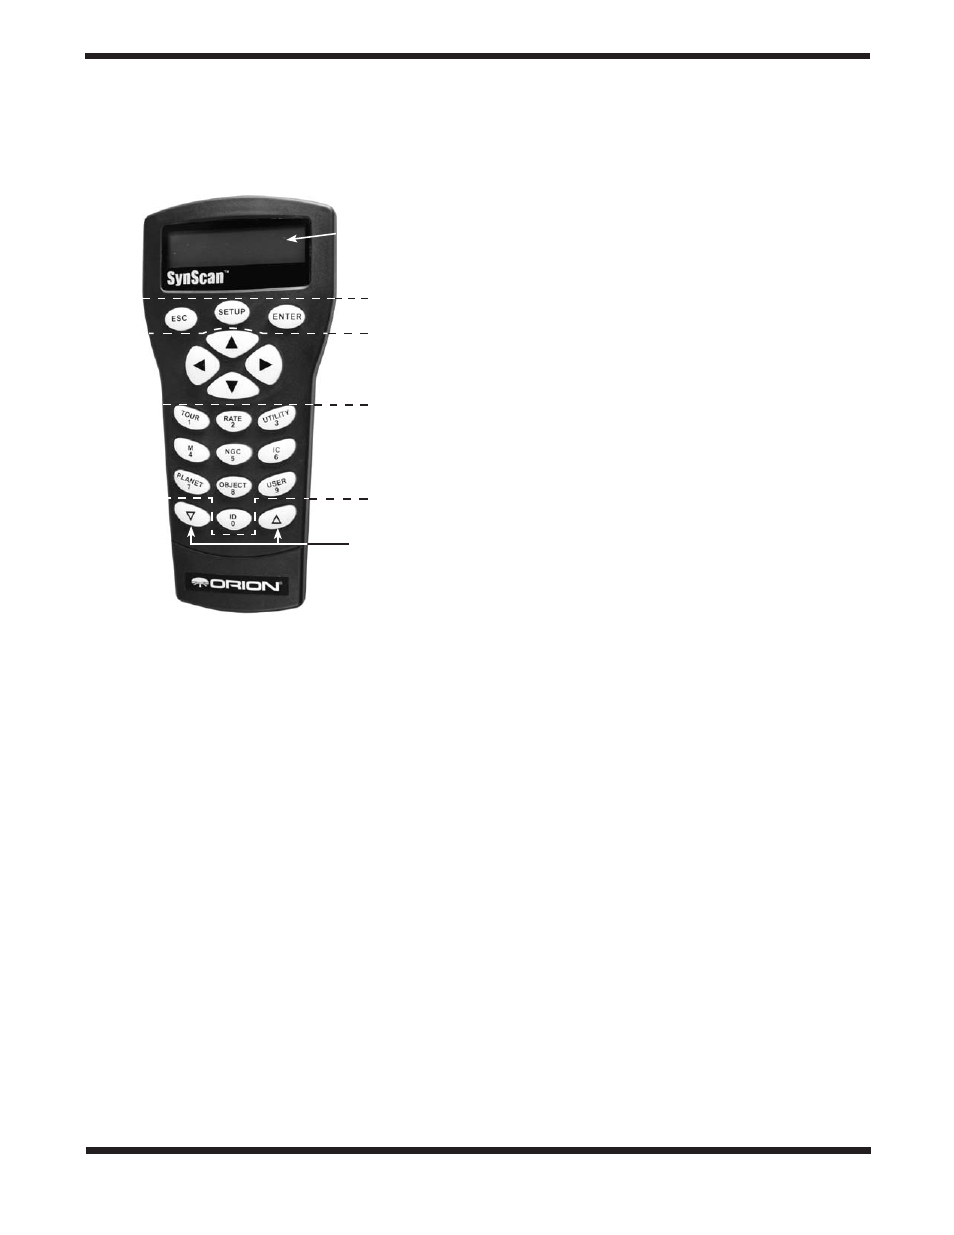
Figure 13.
The GoTo hand controller.
Display screen
Mode buttons
Directional
buttons
Dual purpose
buttons
Scroll buttons