Installation, Bay louvers, Optional bay door – Regency Gas Insert U35-NG1 User Manual
Page 13: Optional bay trim, Double screen doors
13
U35 FPI Direct Vent Gas Insert
INSTALLATION
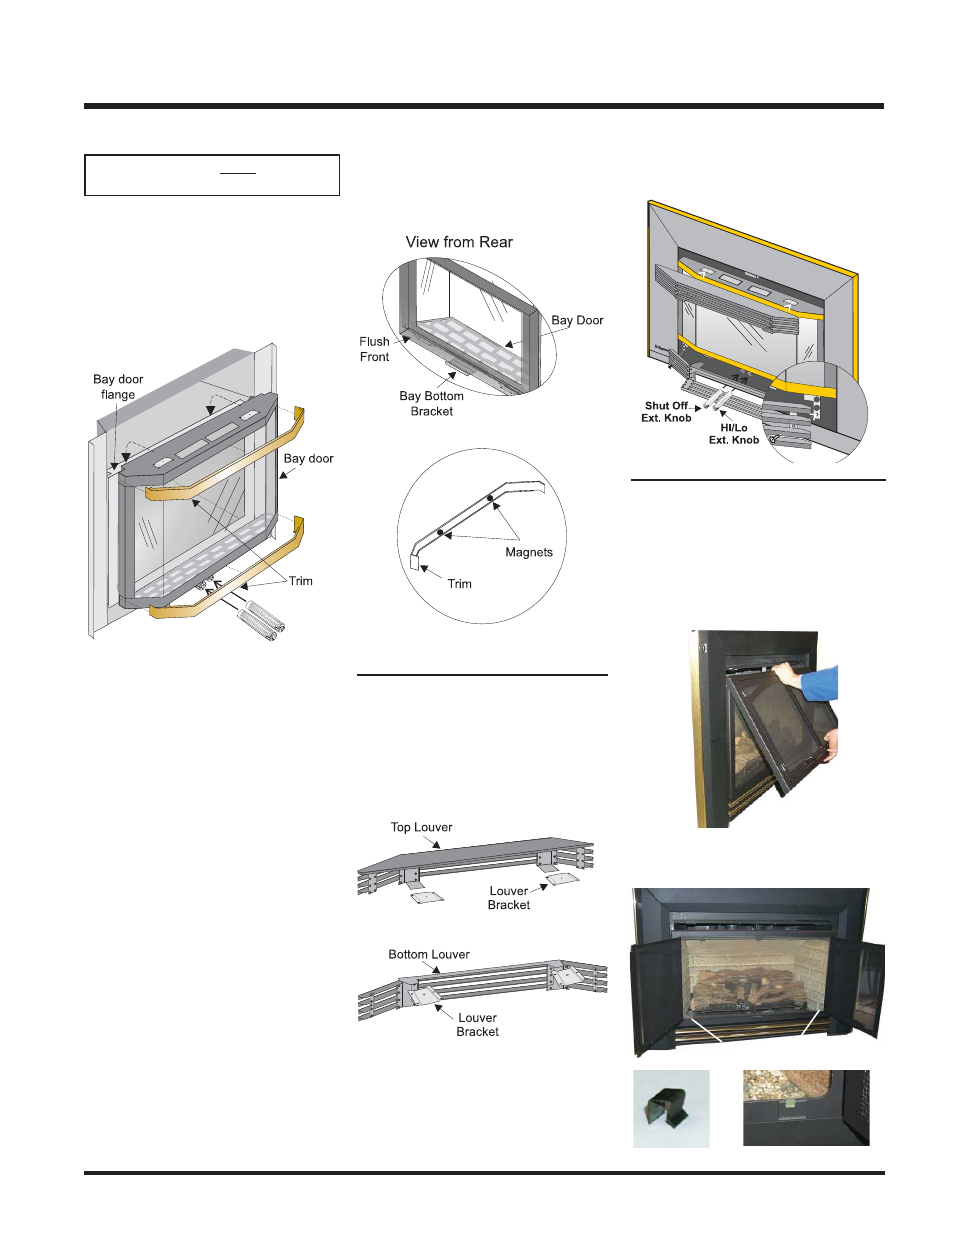
BAY LOUVERS
1) Install top louver by sliding the two bracket
clips into the brackets located on top of the
bay door. See below. The fi tted louver leaves
a small gap between faceplate bottom and
louver top.
Diagram 4
OPTIONAL BAY DOOR
The Bay louvers MUST be used
with the Bay glass option.
The optional Bay door is an overlay on the
fl ush front. The standard fl ush door and glass
must remain on the unit. Hook the top of the bay
door over the fl ush door fl ange and swing the
bottom against the bottom fl ange of the fl ush
door. Press down on the Bay Bottom bracket
and push in until it clips behind the bottom of
the fl ush front.
Diagram 3
OPTIONAL BAY TRIM
Attach 4 supplied magnets each to the back
of the top and bottom trim pieces, and attach
trim to the top and bottom of Bay door. See
diagrams 3 and 4.
Removing Bay Door
To remove only the Bay Door - use a screwdriver
to unclip the Bay Bottom bracket from the fl ush
door and then swing up and unhook from the
top fl ush door fl ange.
To remove the Bay Door & the Flush Front
together, pull the hook from the slot in the
bottom door bracket under the unit (see Standard
Flush Door instructions above). Then pull the
Bay Door and Flush door out and lift off of the
fl ange at the top of the unit.
Note: If any maintenance etc. must be done
in the fi rebox, fi rst remove the Bay
louvers and door.
2) Install bottom louver by sliding the two
bracket clips into the brackets located
underneath the bay door. Secure with 1
screw into each Bottom Louver Mounting
Bracket as per diagram below. Use the
bottom hole in the bracket.
DOUBLE SCREEN
DOORS
1) Pull out the top louver.
2) Center the screen door and hook over the
fl ush door.
Clip locations
Clip installed on right side.
3) Open the screen door(s) and secure the
screen door to the fl ush door front with 2
clips on the bottom left and right side.
3) Slide the valve extension knobs onto the valve
knobs. Match each extension knob with the
corresponding valve knob. Extension knobs
are for Bay Front installations only.