English – 71, Special featur es, Adjusting the color matching using a colorimeter – Panasonic PT-D12000U User Manual
Page 71: Press enter. 5, Press ◄► to adjust the values. 6, Inputting the current luminance, Inputting the coordinates of a
ENGLISH – 71
Special Featur
es
Press ENTER.
5.
The “3COLORS:RED”, “3COLORS:GREEN” or
•
“3COLORS:BLUE” screen will be displayed.
If you selected “7COLORS”, the
“7COLORS:RED”, “7COLORS:GREEN”,
“7COLORS:BLUE”, “7COLORS:CYAN”,
“7COLORS:MAGENTA”, “7COLORS:YELLOW”,
or “7COLORS:WHITE” screen will be displayed.
3COLORS:RED
RED
GREEN
BLUE
2048
0
0
Press
◄► to adjust the values.
6.
These values can be adjusted from 0 (off) to
•
2 048 (full gain). The color value being adjusted
is added or subtracted from the adjustment
color listed at the top of the menu (e.g.
3COLORS: RED)
Note
The effects of correcting the adjustment color:
•
When tuning the correction color that is the same
as the adjustment color: the brightness of the
adjustment color changes.
RED: RED is added to or reduced from the
adjustment color.
GREEN: GREEN is added to or reduced from the
adjustment color.
BLUE: BLUE is added to or reduced from the
adjustment color.
This adjustment should be carried out by a person
•
who is familiar with the projector or by a service
person because a high level of skill is required to
make successful adjustment.
Pressing DEFAULT will restore the factory defaults
•
for all items.
When any setting other than “OFF” has been
•
selected for color matching, the “COLOR
TEMPERATURE” setting is fixed at “USER1”.
Adjusting the color matching
using a colorimeter
The “RED”, “GREEN”, “BLUE”, “CYAN”, “MAGENTA”,
“YELLOW” and “WHITE” colors can be changed to the
desired hues using a colorimeter which is capable of
measuring the chromaticity coordinates and luminance.
Inputting the current luminance
and chromaticity coordinates
Press
▲▼ to select “COLOR
1.
MATCHING”.
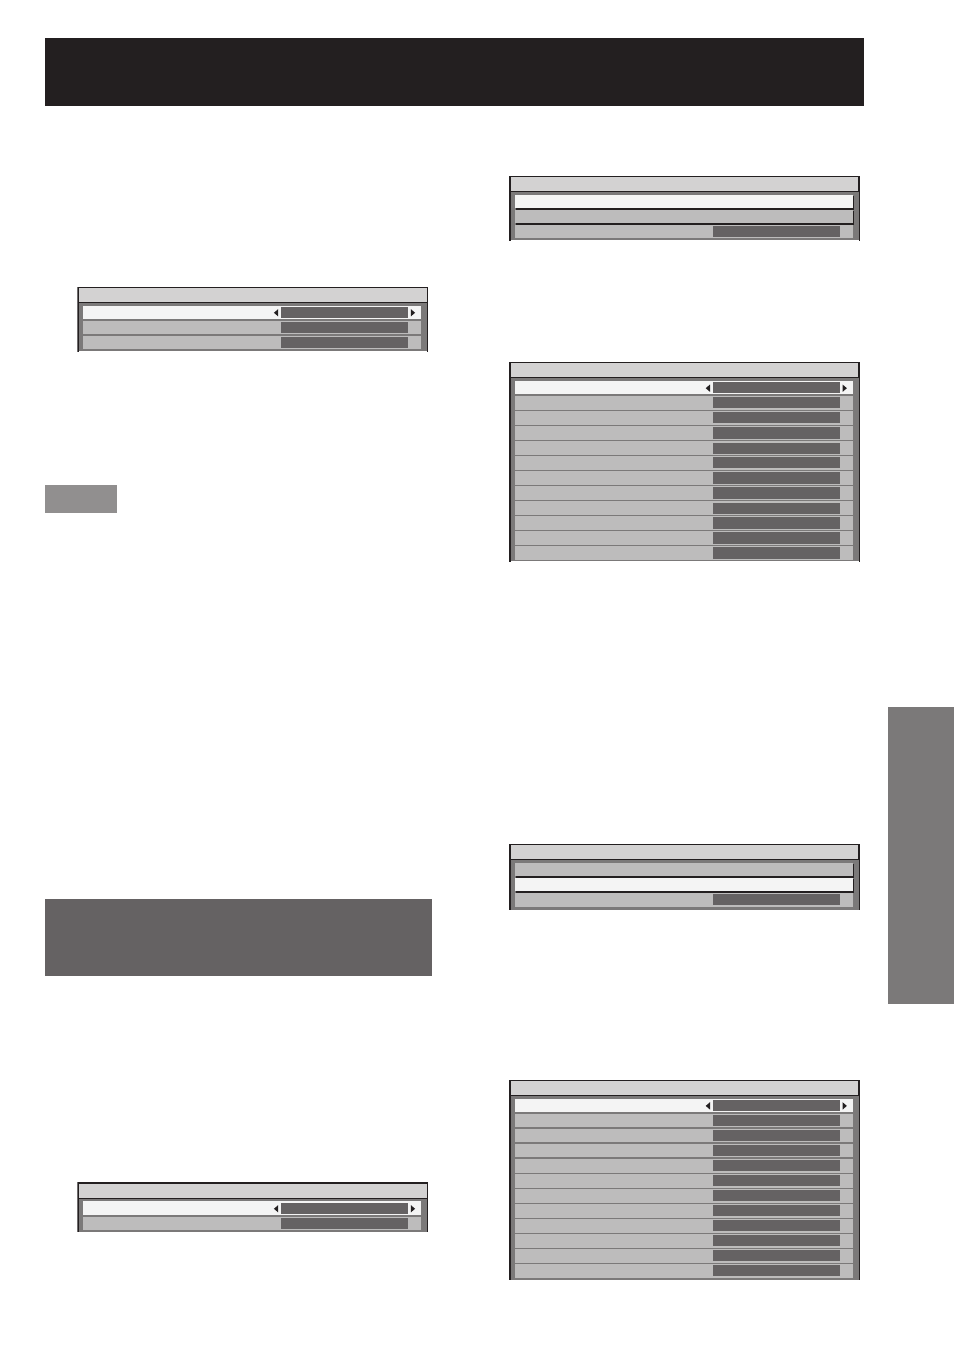
DISPLAY OPTION
COLOR MATCHING
LARGE SCREEN CORRECTION
OFF
OFF
Press
◄► to select
2.
“MEASURED” or “709MODE”.
Press ENTER.
3.
The “MEASURED MODE” screen will be displayed.
•
MEASURED MODE
MEASURED DATA
TARGET DATA
AUTO TESTPATTERN
ON
Press
▲▼ to select “MEASURED
4.
DATA”.
Press ENTER.
5.
The “MEASURED DATA” screen will be displayed.
•
MEASURED DATA
BLACK Y(RELATIVE)
x
y
RED Y(RELATIVE)
x
y
GREEN Y(RELATIVE)
x
y
BLUE Y(RELATIVE)
x
y
1
0.35
0.36
1400
0.67
0.33
5099
0.35
0.63
500
0.15
0.05
1/2
Use the colorimeter to
6.
measure the luminance (Y) and
chromaticity coordinates (x, y) (If
the projector is new, these values
will not need to be changed).
Press
▲▼ to select the colors, and
7.
press
◄► to select their values.
After all the data has been input,
8.
press MENU.
The “MEASURED MODE” screen will be displayed.
•
MEASURED MODE
MEASURED DATA
TARGET DATA
AUTO TESTPATTERN
ON
Inputting the coordinates of a
desired color (only “MEASURED”)
Press
▲▼ to select “TARGET
9.
DATA”.
Press ENTER.
10.
The “TARGET DATA” screen will be displayed.
•
TARGET DATA
RED x
y
GREEN x
y
BLUE x
y
CYAN x
y
MAGENTA x
y
YELLOW x
y
0.64
0.33
0.3
0.6
0.15
0.6
0.225
0.329
0.321
0.154
0.419
0.505
1/2