Panasonic Ceiling Mount Bracket ET-PKB80 User Manual
Et- pkb80, Ceiling mount bracket for high ceilings
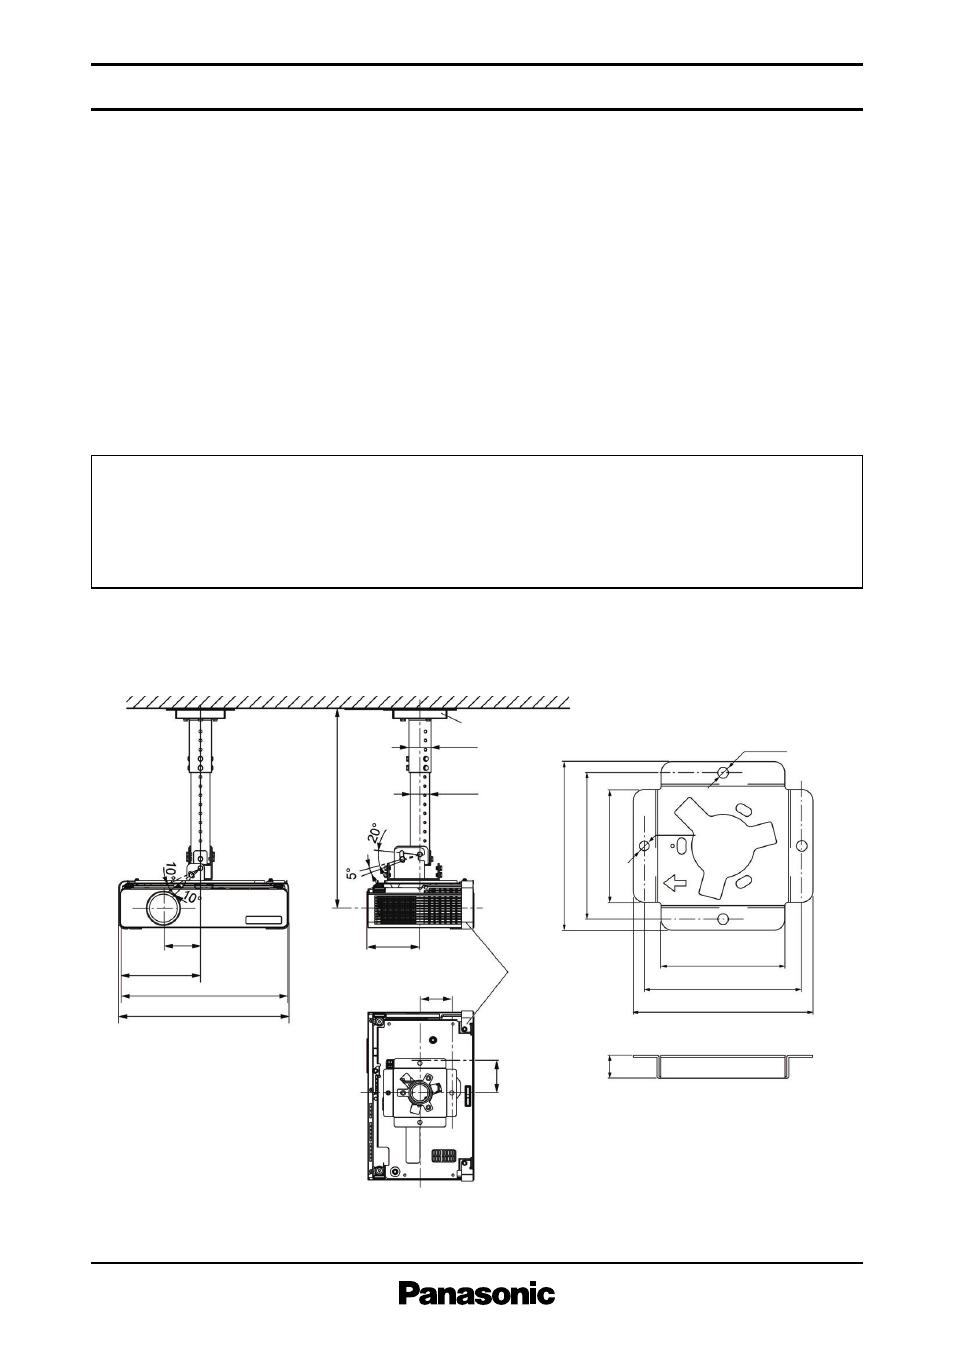
Attachment plate
ш49
81
(3-3/16˝)
96
(3-25/32˝)
370
(14-9/16˝)
116
(4-9/16˝)
374
(14-23/32˝)
70 (2-12/16˝)
110 (4-11/32˝)
140 (5-/12˝)
160 (6-5/16˝)
3- Ш9.5 (3/8˝)
Ш8.5 (11/32˝)
65
(2-9/16˝)
357–
437 (14-1/16˝–17-7/32˝)
(Adjustable in 20 mm (25/32˝) steps)
150 (5-29/32˝)
130 (5-1/8˝)
100 (3-15/16˝)
20 (25/32˝)
Projector
ø43
(1-15/16˝)
(1-11/16˝)
S
P
E
C
F
I
L
E
ET-PKB80
Ceiling mount bracket for high ceilings
As of April 2008
< 1 >
Specifications
Vertical correction angle:
+20°, -5°
Horizontal slant correction angle:
±10°
Horizontal turn correction angle:
±5°
Dimensions (W x H x D):
374 x 400 – 480 x 211 mm (14-23/32˝ x 15-3/4˝–18-29/32˝ x 8-5/16˝)
Weight:
2.8 kg (6.2 lbs)
Attachment plate
Illustration shows the ET-PKB80 attached to the projector.
Parts
Attachment plate . . . . . . . . . . . . . . . . . . . . . . 1
Projector mount bracket . . . . . . . . . . . . . . . . 1
Adjuster pole A . . . . . . . . . . . . . . . . . . . . . . . 1
Adjuster pole B . . . . . . . . . . . . . . . . . . . . . . . 1
Angle adjuster A . . . . . . . . . . . . . . . . . . . . . . 1
Angle adjuster B . . . . . . . . . . . . . . . . . . . . . . 1
Holding bracket A . . . . . . . . . . . . . . . . . . . . . 1
Holding bracket B . . . . . . . . . . . . . . . . . . . . . 1
Washer-fitted hexagonal bolts (M6 x 12) . . . 19
Washer-fitted screws (M4 x 10) . . . . . . . . . . . 6
Wire rope . . . . . . . . . . . . . . . . . . . . . . . . . . . . . 1
Flat wire clip . . . . . . . . . . . . . . . . . . . . . . . . . 2
Clamp tube . . . . . . . . . . . . . . . . . . . . . . . . . . .2
Weights and dimensions shown are approximate. Specifications subject to change without notice.
unit : mm (inch)
NOTE: This illustration is not drawn to scale.
Dimensions
Description
This ceiling mount bracket is to be used when mounting home cinema projectors to the ceiling.
C a u t i o n :
•
All mounting work must be done by a qualified technician.
•
Ensure that the mounting (ceiling) area has sufficient strength.
•
Read the enclosed mounting instructions carefully before starting the mounting procedure.
•
Do not use a power screwdriver or impact screwdriver to tighten screws. A torque screwdriver or similar tool
should be used.
•
When the system is no longer to be used, have a qualified technician promptly remove and dispose of it.