Minidisc operation (continued) – Sharp MD-X8 User Manual
Page 19
18
0048
MINIDISC OPERATION
H
H
H
H
H
Loading and playing MiniDiscs
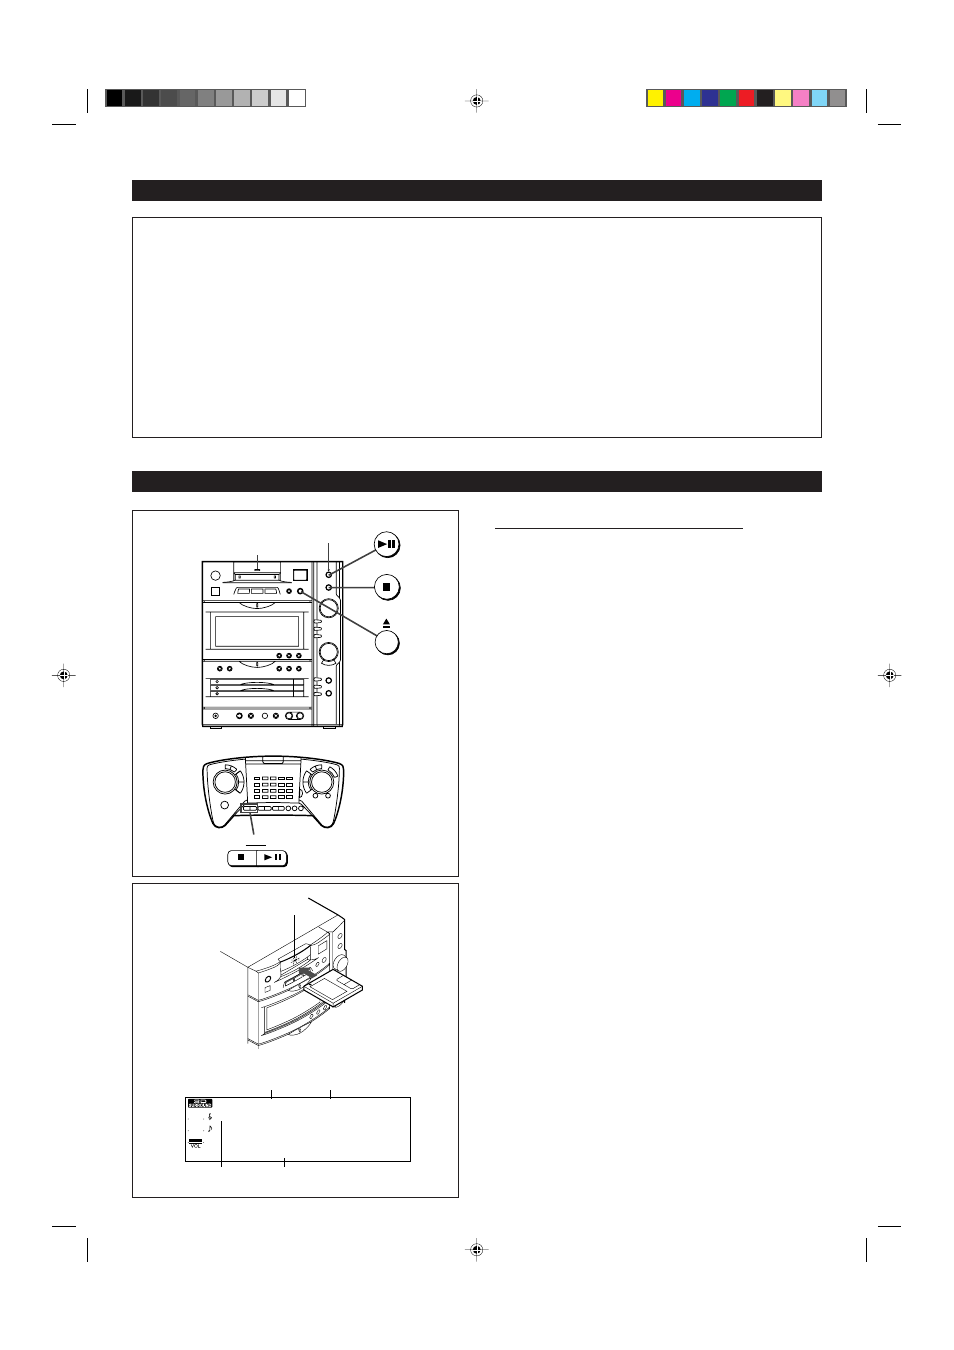
1
Press the MD
H
button.
I
The power will be turned on automatically,and the unit will enter the
MD playback mode.
2
Load a recorded MiniDisc in the direction indicated by the
arrow on the MiniDisc, with the labeled side facing up.
I
The total number of tracks and the total disc playing time will be
displayed. At this time, the MD indicator will light.
3
Press the MD
06
button.
I
The MD playback indicator will light and playback will begin from track
1on the disc you have specified.
I
When the last track has been played back, this unit will stop automati-
cally.
To interrupt playback:
Press the MD
06
button.
I
The MD playback indicator will flash.
I
Press the MD
06
button to resume playback from the same point.
To stop playback
Press the MD
H
button.
To remove a MiniDisc:
Press the
7
button.
I
The MiniDisc will be ejected.
Notes:
I
Although vibration will not normally cause a MiniDisc to skip, you may
hear a skip in the sound if there is continuous vibration.
I
When you listen to MiniDiscs near a radio or a TV set, the radio or the
TV set may pick up noise.
Keep the unit as far away as possible from tuners.
I
When a optionally available sound card is used, an MD inserted in this
product can be played from a personal computer.
Direct playback
If a MiniDisc is loaded in the unit, pressing the MD
06
button
turns the power on, and begins playback.
After use:
Press the POWER button to turn the power off.
Note:
I
The power cannot be turned off while reading the information on a
MiniDisc.
I
If no disc and track names have been recoded on an MiniDisc, they
will not appear on the display.
MD indicator
Total number
of tracks
Total playing time
Disc name
Track name
3
W
F O R
W
E V E R
WWWWWWWW
2
W
W A V E
WWWWWWWWWWWW
1
W
L O V E
W
S O N G
WWWWWWW
B E S T
W
H I T S
WWWWWWWWWWWW
M D
WWW
1 2
WWW
5 5 : 0 8
W
T O T A L
Cautions:
I
Do not carry the unit with a disc left in a disc tray. The disc may
come loose inside the unit and be damaged or cause damage
to the unit. This may also cause malfunctions.
I
If you press the CD
06
button, one of the CD PLAY buttons (1-3)
on the main unit or remote control, or any of the CD
7
buttons while
the disc tray is open, the disc tray will close automatically. Therefore,
be careful not to get your fingers caught in the disc tray.
I
Do not place two CDs in one disc position.
I
Do not push the disc tray while it is moving.
I
If the power fails while the tray is open, wait until the power is
restored before trying to close it.
I
If the disc tray is stopped forcibly, “ERROR” will appear on the
display and the unit will not function.
If this occurs, turn the power off, and turn it on again.
I
If TV or radio interference occurs during CD operation, move the unit
away from the TV or radio.
I
If the disc is damaged, dirty, or loaded upside down, the disc will be
skipped and the next disc will be automatically played.
I
If the main unit is subjected to a sharp jolt or it is used where
vibrations are present, sound dropouts may occur. Use the unit in a
stable environment.
I
If the volume is set to too high, a dropout may occur due to vibrations
from the speakers. If this happens, move the main unit away from the
speakers or turn down the volume.
I
Do not use CDs with loose cellphane tape or stickers or CDs which
have glue left on the surface from tape or stickers. If such a CD is
inserted, you may not be able to remove the CD or the unit may
cause malfunction.
MINIDISC OPERATION
(Continued)
MD playback indicator
MD indicator
MD
MD
*17-21
98.6.23, 0:11 PM
18