JVC DLA-G150HTE User Manual
Page 11
DLA-G150HTE
1-11
No.51847
17
Installing the Projector
ENGLISH
DEUTSH
FRAN
ÇAIS
ITALIANO
ESPAÑOL
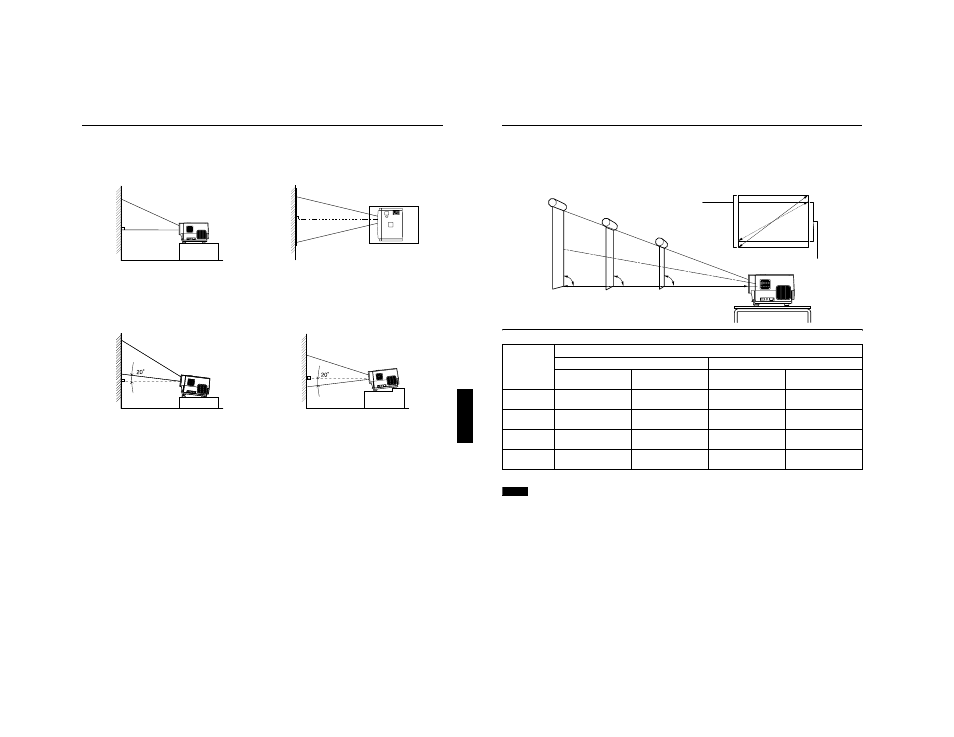
Installing the Projector against the Screen
The projector should be placed so that the center line of the lens is at a right angle to the screen as shown in the following
figures.
■
Side view
■
Top view
■
Trapezoidal-distortion correctable maximum angle
The projector has a function to correct the trapezoidal distortion of the projected image on the screen.
To correct this distortion, use the KEYSTONE buttons on the projector. (Refer to “Removing the Trapezoidal Distortion of the
Image” on page 34.) Also, correction is possible by using the “Keystone” menu. (Refer to “Setting and Adjusting Other
Functions (OPTIONS)” on page 53.)
LAMP
TEMP
ST
AND BY
HIDE
PC
VIDEO
MENU
KEYST
ONE
V
O
LUME
PRESET
ESCAPE
E
NTER
OPERA
T
E
Correctable angle:
Up to approx. 20° upward from the horizontal line
Correctable angle:
Up to approx. 20° downward from the horizontal line
18
Installing the Projector
Projection Distance and Screen Size
• The projector’s projection lens is a zoom lens of about 1.5 x. The screen size at the maximum enlargement is 1.5 times that
of the minimum size.
• The projection distance that can be focused is 2.5 to 20 m. Install the projector within this range.
* Also, refer to the table of “Relationship between Projector Distances and Projector Screen Size” on page 19 as a reference.
Notes
• For detailed relationship between projection distances and projection screen sizes, refer to Appendix A. The relationships for
both 4:3 and 16:9 ratios are listed there.
• When installing a screen, use a 4:3 aspect-ratio picture.
• (A 16 : 9 aspect-ratio picture is projected based on the width of the range in which a 4:3 aspect-ratio picture is projected.)
• The diagonal length of a 16:9 aspect-ratio screen is about 91.8% that of a 4:3 aspect-ratio screen. This value is only a guide
(reference).
• If sunlight or lamp light strikes the projection screen directly, the picture tends to become pale and dim. Use a curtain or
other means to shield the light.
• Set the projector horizontally on a surface that is within the range of adjustable angles (up/down adjustment angle: +7° ;
horizontal adjustment angle: ±1.5°).
• If the keystone is adjusted, the projected screen becomes smaller.
• When hanging from the ceiling, use a dedicated hanging fixture (not supplied).
Projection
distance
Projection screen size (diagonal length)
When screen aspect ratio is 4 : 3
When screen aspect ratio is 16 : 9
Minimum projection
screen
Maximum projection
screen
Minimum projection
screen
Maximum projection
screen
8.2 ft
(2.5 m)
42"
(approx. 107 cm)
63"
(approx. 160 cm)
39"
(approx. 100 cm)
57"
(approx. 144 cm)
16.4 ft
(5 m)
86"
(approx. 219 cm)
128"
(approx. 325 cm)
79"
(approx. 201 cm)
117"
(approx. 297 cm)
32.8 ft
(10 m)
172"
(approx. 437 cm)
259"
(approx. 657 cm)
158"
(approx. 402 cm)
237"
(approx. 601 cm)
65.6 ft
(20 m)
345"
(approx. 877 cm)
521"
(approx. 1,323 cm)
317"
(approx. 806 cm)
478"
(approx. 1,214 cm)
90˚
90˚
90˚
Screen
Change of projection screen
according to aspect ratio
Screen with 4:3 aspect ratio
Screen with 16:9 aspect ratio
Center line of the lens
Install the projector so the lower edge of the projection screen is at the
same height as the lens' center line.